Installing the NFS CSI Driver on a Kubernetes cluster to allow for dynamic provisioning of Persistent Volumes
In this post we will take a look at connecting a Kubernetes cluster to an existing NFS server. I've previously written a post on this which you can find here. That post also shows how to set up said NFS server for development purposes.
In that previous post we looked at mounting the NFS directly by a Pod, and also through Persistent Volumes (PV) and Persistent Volume Claims (PVC). The provisioning of those (Kubernetes) volumes was static.
Now we'll see how we can use the NFS CSI Driver to allow for dynamic provisioning of Persistent Volumes through Storage Classes and Persistent Volume Claims.
NFS CSI Driver
The NFS CSI Driver allows a Kubernetes cluster to access NFS servers on Linux. The driver is installed in the Kubernetes cluster and requires existing and configured NFS servers.
The driver is currently in version 4.5 and supports Kubernetes version 1.21 and newer.
The status of the project is GA, meaning it is in General Availability and should be considered to be stable for production use.
Installing the NFS CSI Driver
The installation of the NFS CSI Driver in a Kubernetes cluster is done by deploying a few resources in the cluster. The resources will be placed in the kube-system namespace.
The install guide covers multiple ways of installing the driver. We'll use the install-driver.sh bash script to get everything installed.
Please note that running scripts directly from the Internet in this way is not a best practice and might be a security risk!
1curl -skSL https://raw.githubusercontent.com/kubernetes-csi/csi-driver-nfs/v4.5.0/deploy/install-driver.sh | bash -s v4.5.0 --

As we can see the script deployed some resources in the cluster. Amongst them we'll have a NFS controller and a NFS node pod running on each Kubernetes node.
1kubectl -n kube-system get pod -o wide -l app=csi-nfs-controller
2kubectl -n kube-system get pod -o wide -l app=csi-nfs-node

With those in place we can start using our NFS CSI Driver to connect to a NFS server and provision some storage in our cluster!
Kubernetes Storage Classes
For us to be able to support dynamic provisioning of storage we need to configure a Storage class
A Storage Class let's us define how Kubernetes can ask the underlying infrastructure to provision storage dynamically.
In the Storage Class spec we'll define the Provisioner which will be the NFS CSI driver we just installed, and we'll add the details of the specific NFS server we'll connect to as parameters
Create Storage class
The Storage Class will be created from the following yaml spec
 1apiVersion: storage.k8s.io/v1
 2kind: StorageClass
 3metadata:
 4  name: nfs-csi
 5provisioner: nfs.csi.k8s.io
 6parameters:
 7  server: 192.168.199.11
 8  share: /nfs/cka_cluster_pvs/
 9reclaimPolicy: Delete
10volumeBindingMode: Immediate
11mountOptions:
12  - nfsvers=3
Note that we define the following:
name: The name of the Storage Class. This is what we will bind our Persistent Volume Claims to later onprovisioner: This uses thenfs.csi.k8s.ioCSI driver we installed earlierserver: The address of the NFS server to mountshare: The path exported by the NFS serverreclaimPolicy: This specifies how to handle volumes that no longer is used (i.e. when deleting a claim). Defaults toDelete, can be set toRetainvolumeBindingMode: Instruct the storage backend to immediately create the volume, or by setting this toWaitForFirstConsumerto wait until a Pod is trying to utilize the volumemountOptions: Specifics for mounting this storage. In our case we specify that we use NFSv3
So let's go ahead and create this StorageClass in our cluster
1kubectl apply -f nfs-sc.yaml
2kubectl get storageclasses
3kubectl describe storageclasses nfs-csi
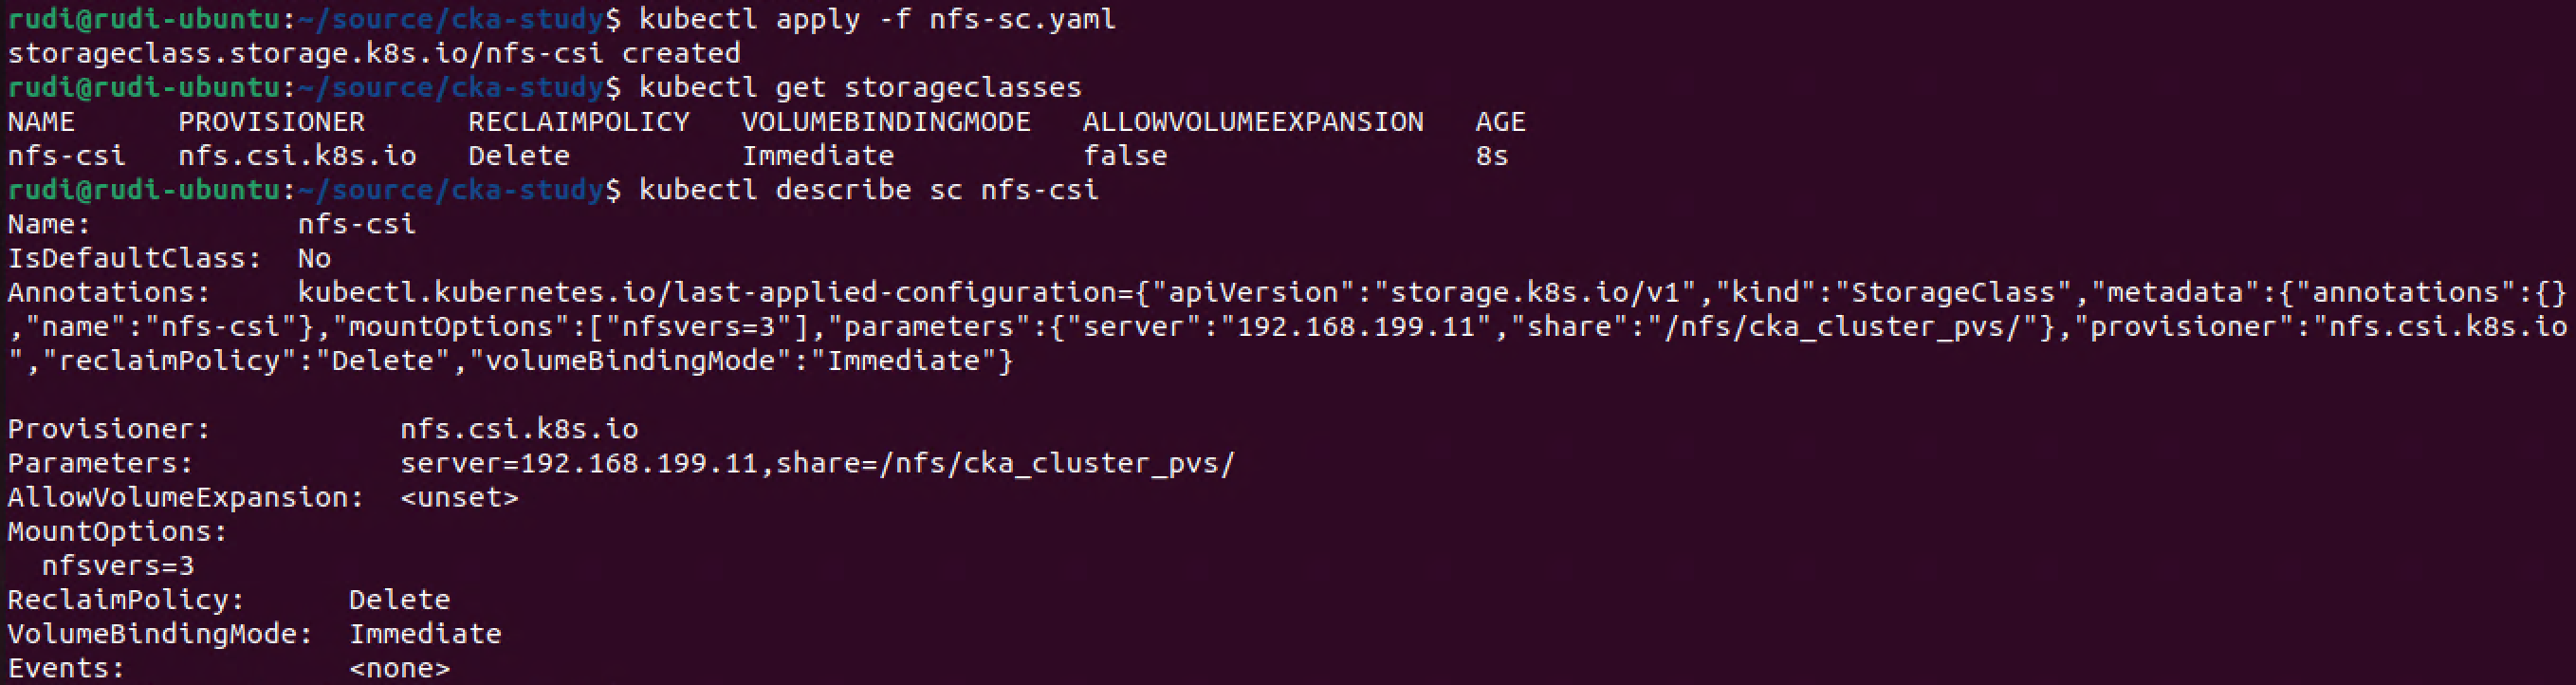
The StorageClass has been created
Kubernetes Persistent Volumes
With the StorageClass in place we can go ahead and create a PersistentVolumeClaim that utilizes this StorageClass
Create Persistent Volume claim
The PersistentVolumeClaim (PVC) will specify the accessMode the amount of resources (e.g storage size) it requests, and which storageClassName to use.
So to dynamically create a PersistentVolume in our cluster which utilizes our NFS server we'll create a PVC spec as follows
 1---
 2apiVersion: v1
 3kind: PersistentVolumeClaim
 4metadata:
 5  name: pvc-nfs-dynamic
 6spec:
 7  accessModes:
 8    - ReadWriteMany
 9  resources:
10    requests:
11      storage: 2Gi
12  storageClassName: nfs-csi
accessModes: The access modes the PV wants. Must match what is provided by the underlying storagestorage: This specifies how much storage we want the PV should havestorageClassName: PVC needs to map to an existing StorageClass (it's also possible to have a Default StorageClass). In our example we map it to the name of the StorageClass we just created
Let's go ahead and create a PVC.
1kubectl apply -f nfs-pvc.yaml
2kubectl get persistentvolumeclaims
3kubectl describe pvc pvc-nfs-dynamic
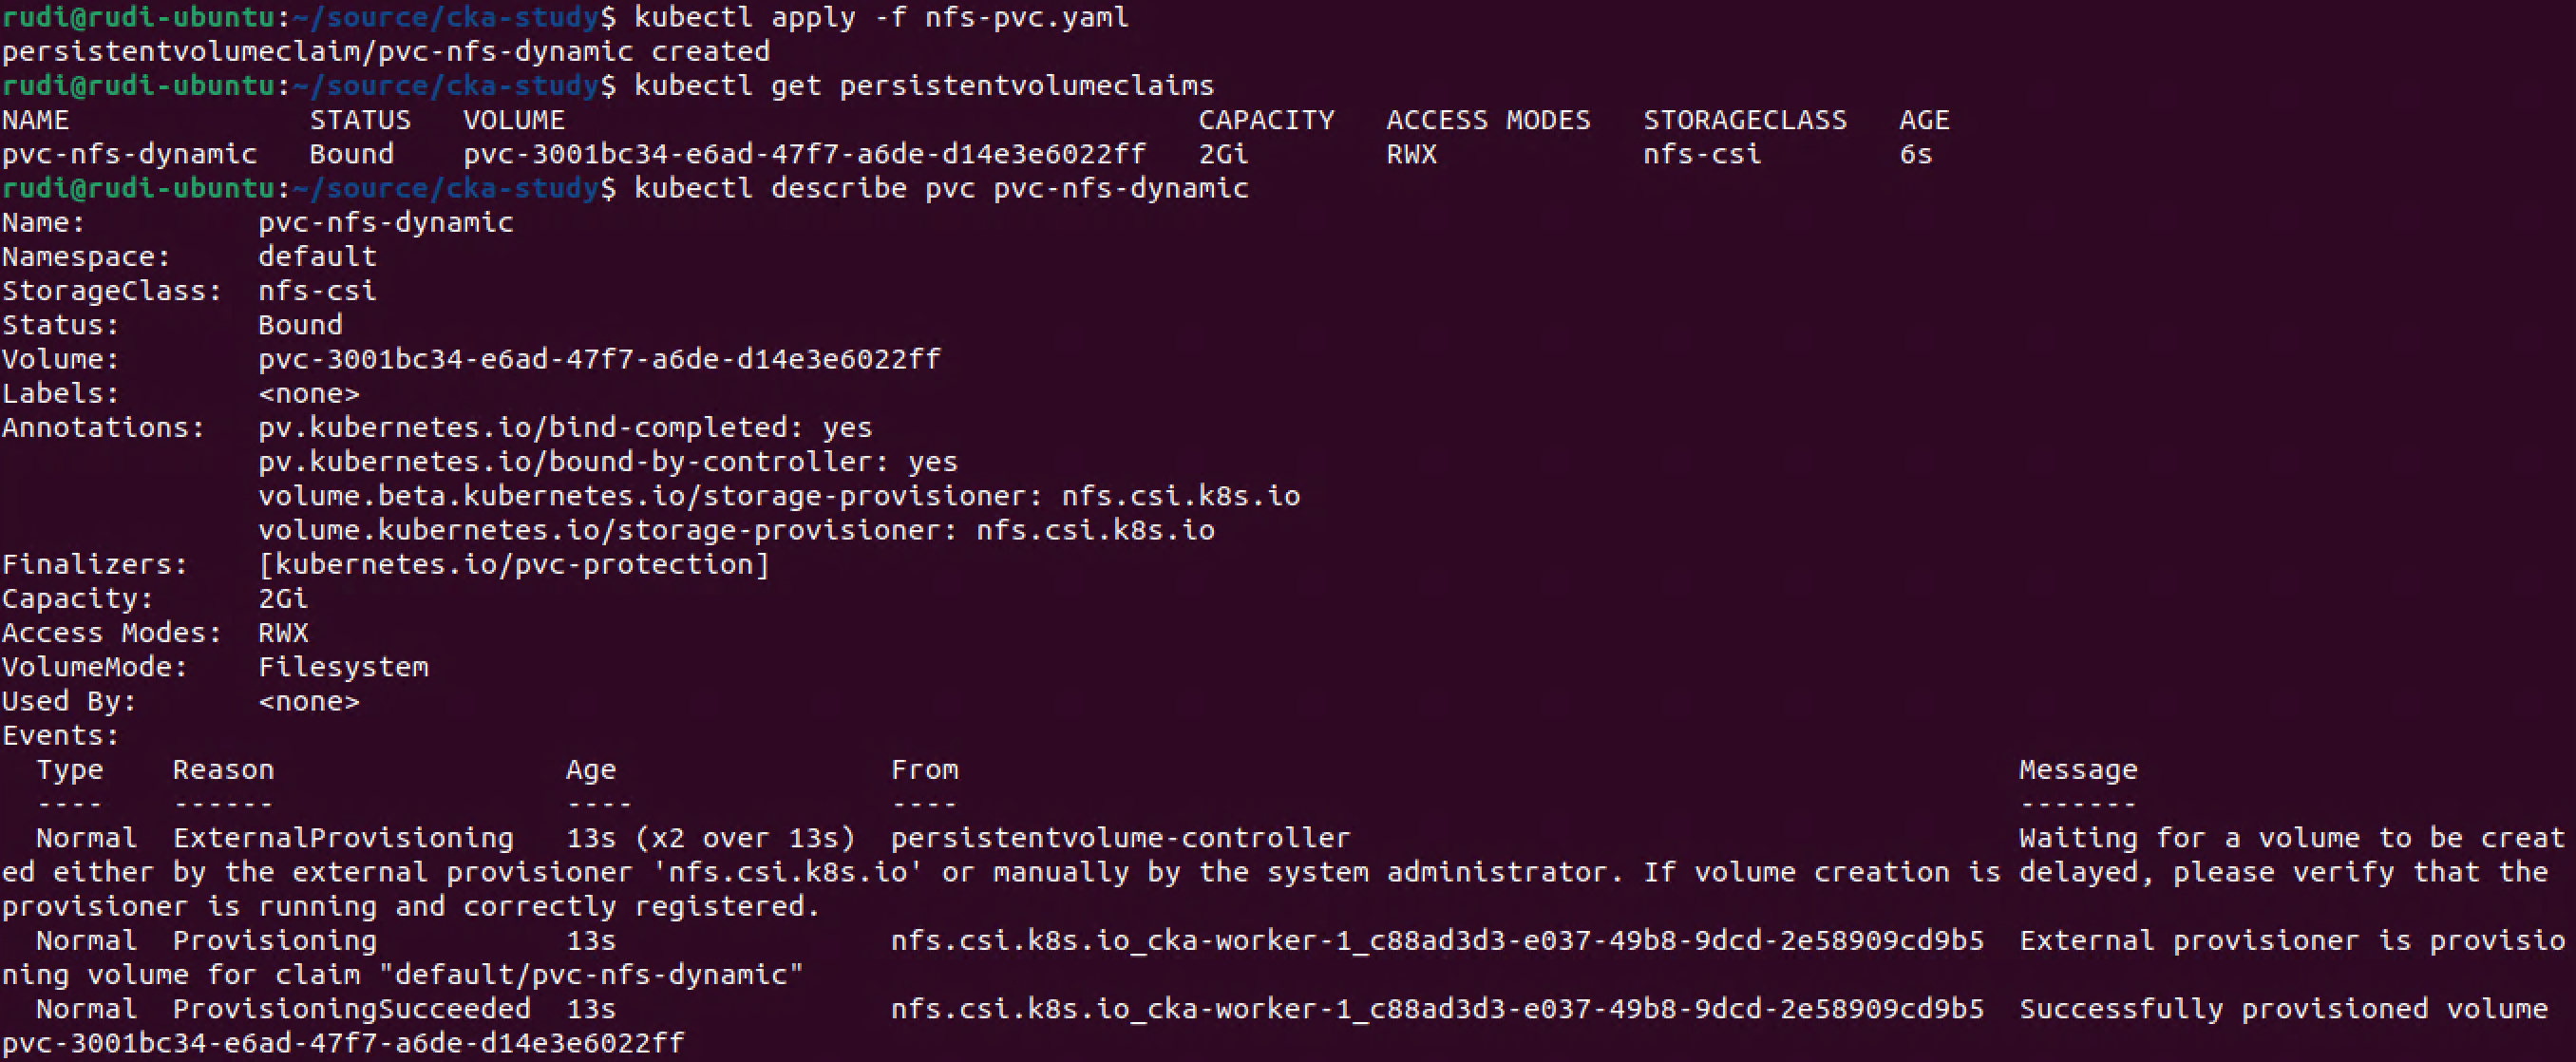
Our PVC has been successfully created!
Use PVC in Pod
Now we'll see how this can be used in a Pod.
We'll create a Pod that mounts a volume based on the PVC and instruct the container inside the Pod to write to a file that will be put on this volume. The volume will reside on our NFS server so we should be able to check the file from outside of the Pod.
The Pod spec we'll use is the same as the example found on the NFS CSI Driver Github
 1---
 2kind: Pod
 3apiVersion: v1
 4metadata:
 5  name: nginx-nfs
 6spec:
 7  nodeSelector:
 8    "kubernetes.io/os": linux
 9  containers:
10    - image: mcr.microsoft.com/oss/nginx/nginx:1.19.5
11      name: nginx-nfs
12      command:
13        - "/bin/bash"
14        - "-c"
15        - set -euo pipefail; while true; do echo $(date) >> /mnt/nfs/outfile; sleep 1; done
16      volumeMounts:
17        - name: persistent-storage
18          mountPath: "/mnt/nfs"
19          readOnly: false
20  volumes:
21    - name: persistent-storage
22      persistentVolumeClaim:
23        claimName: pvc-nfs-dynamic
As we can see the claimName maps to our newly created PVC
1kubectl apply -f nginx-pvc.yaml
2kubectl get pod

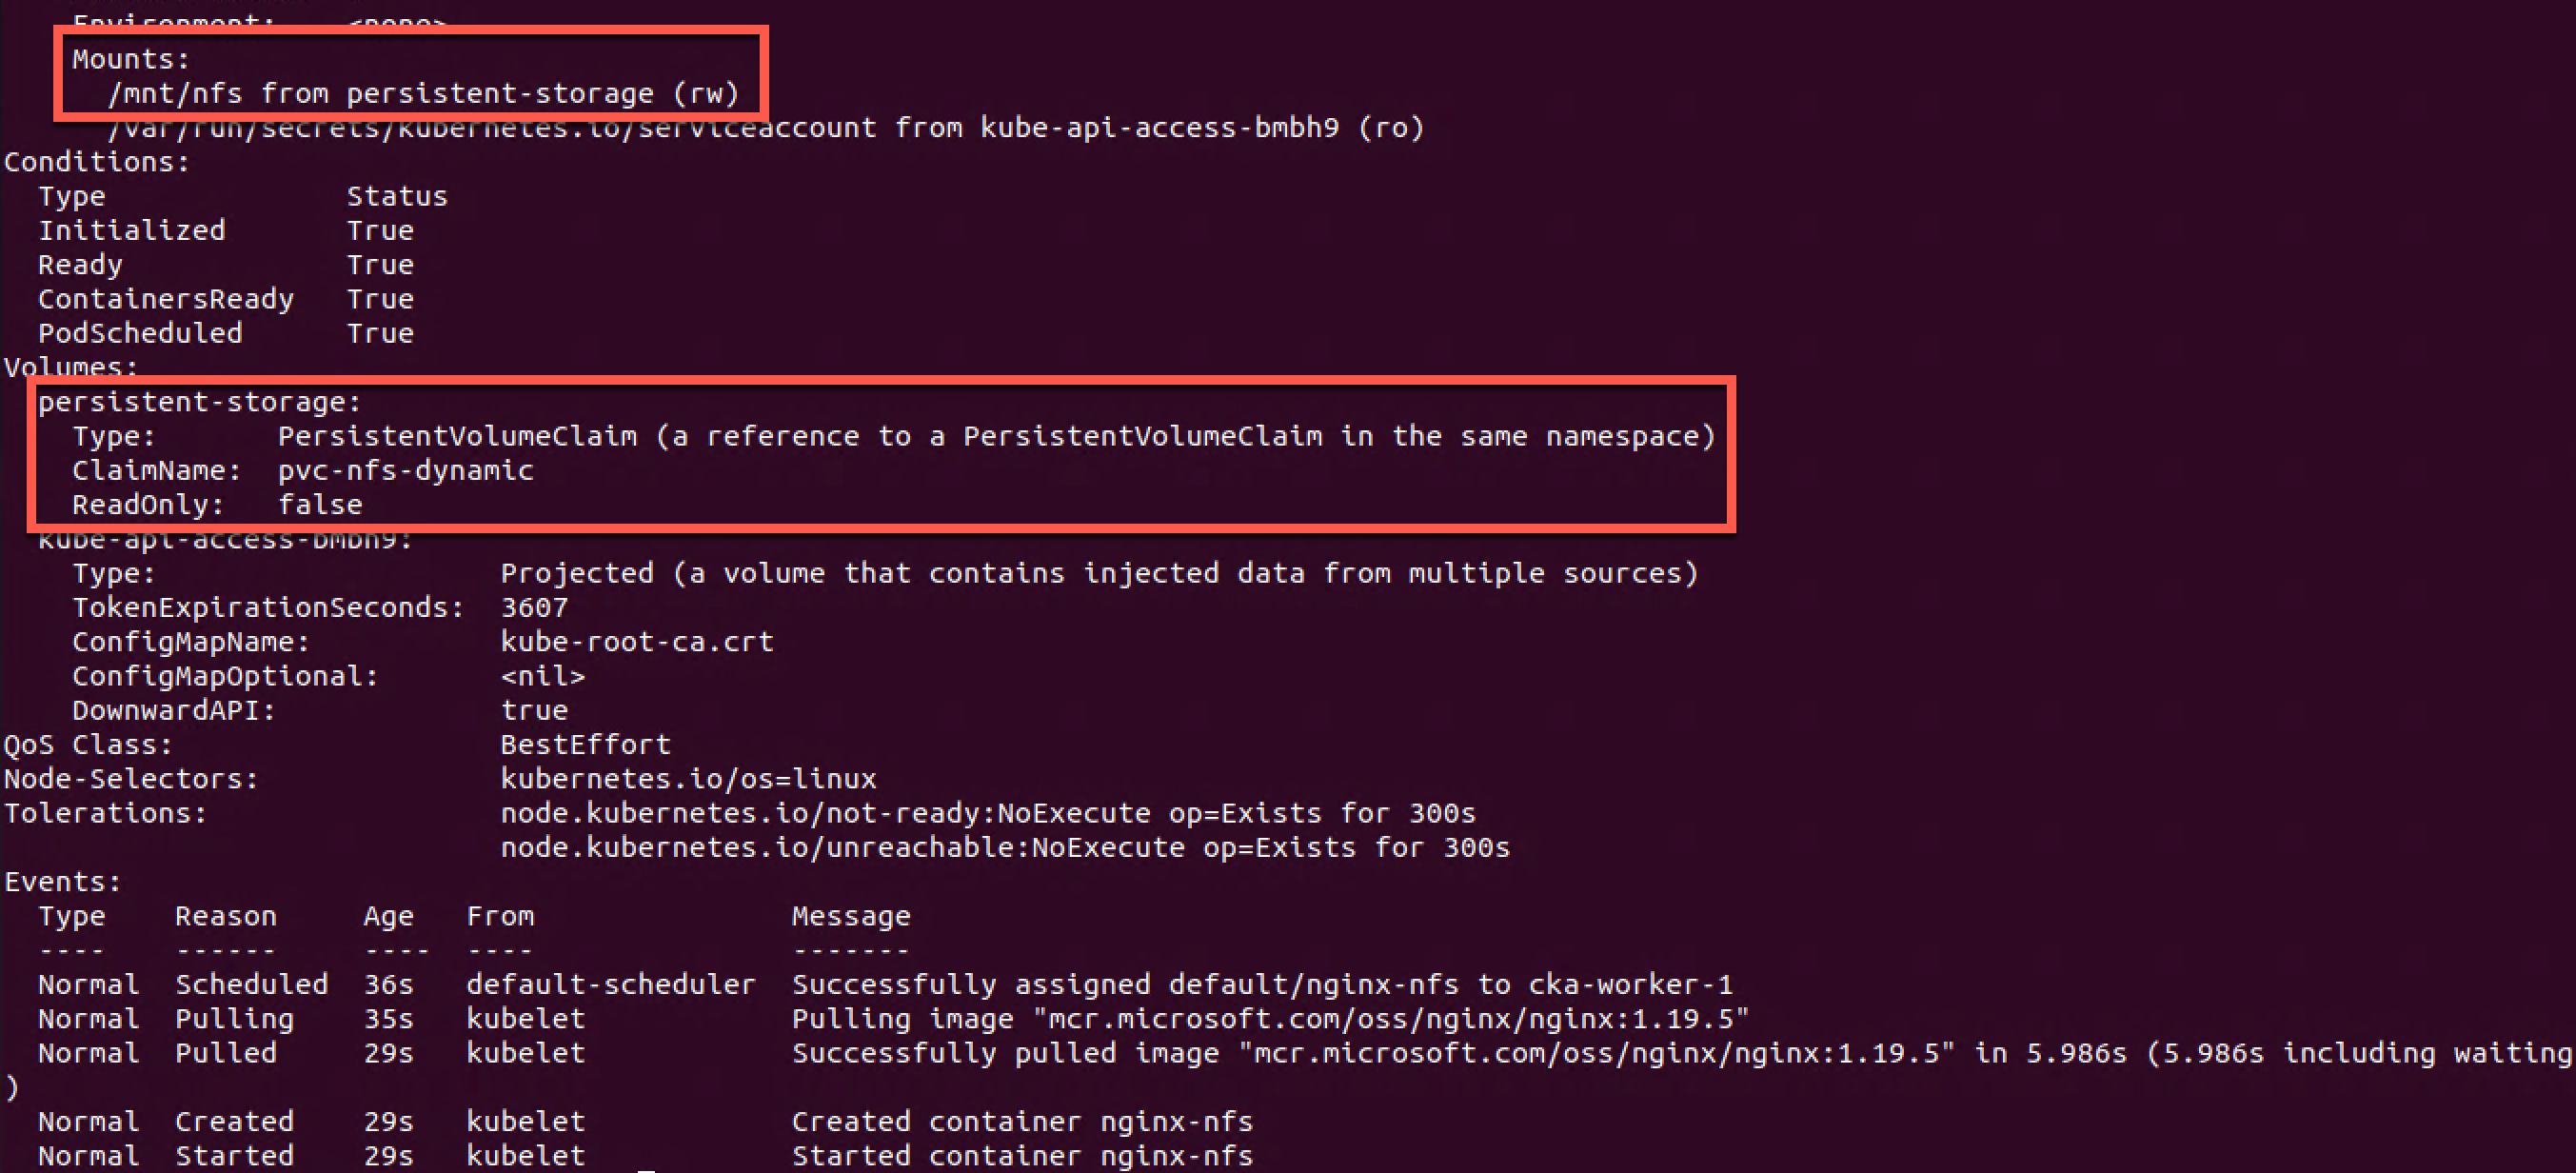
If we take a closer look at the Pod we can see that our PVC has been mounted
1kubectl describe pod nginx-nfs
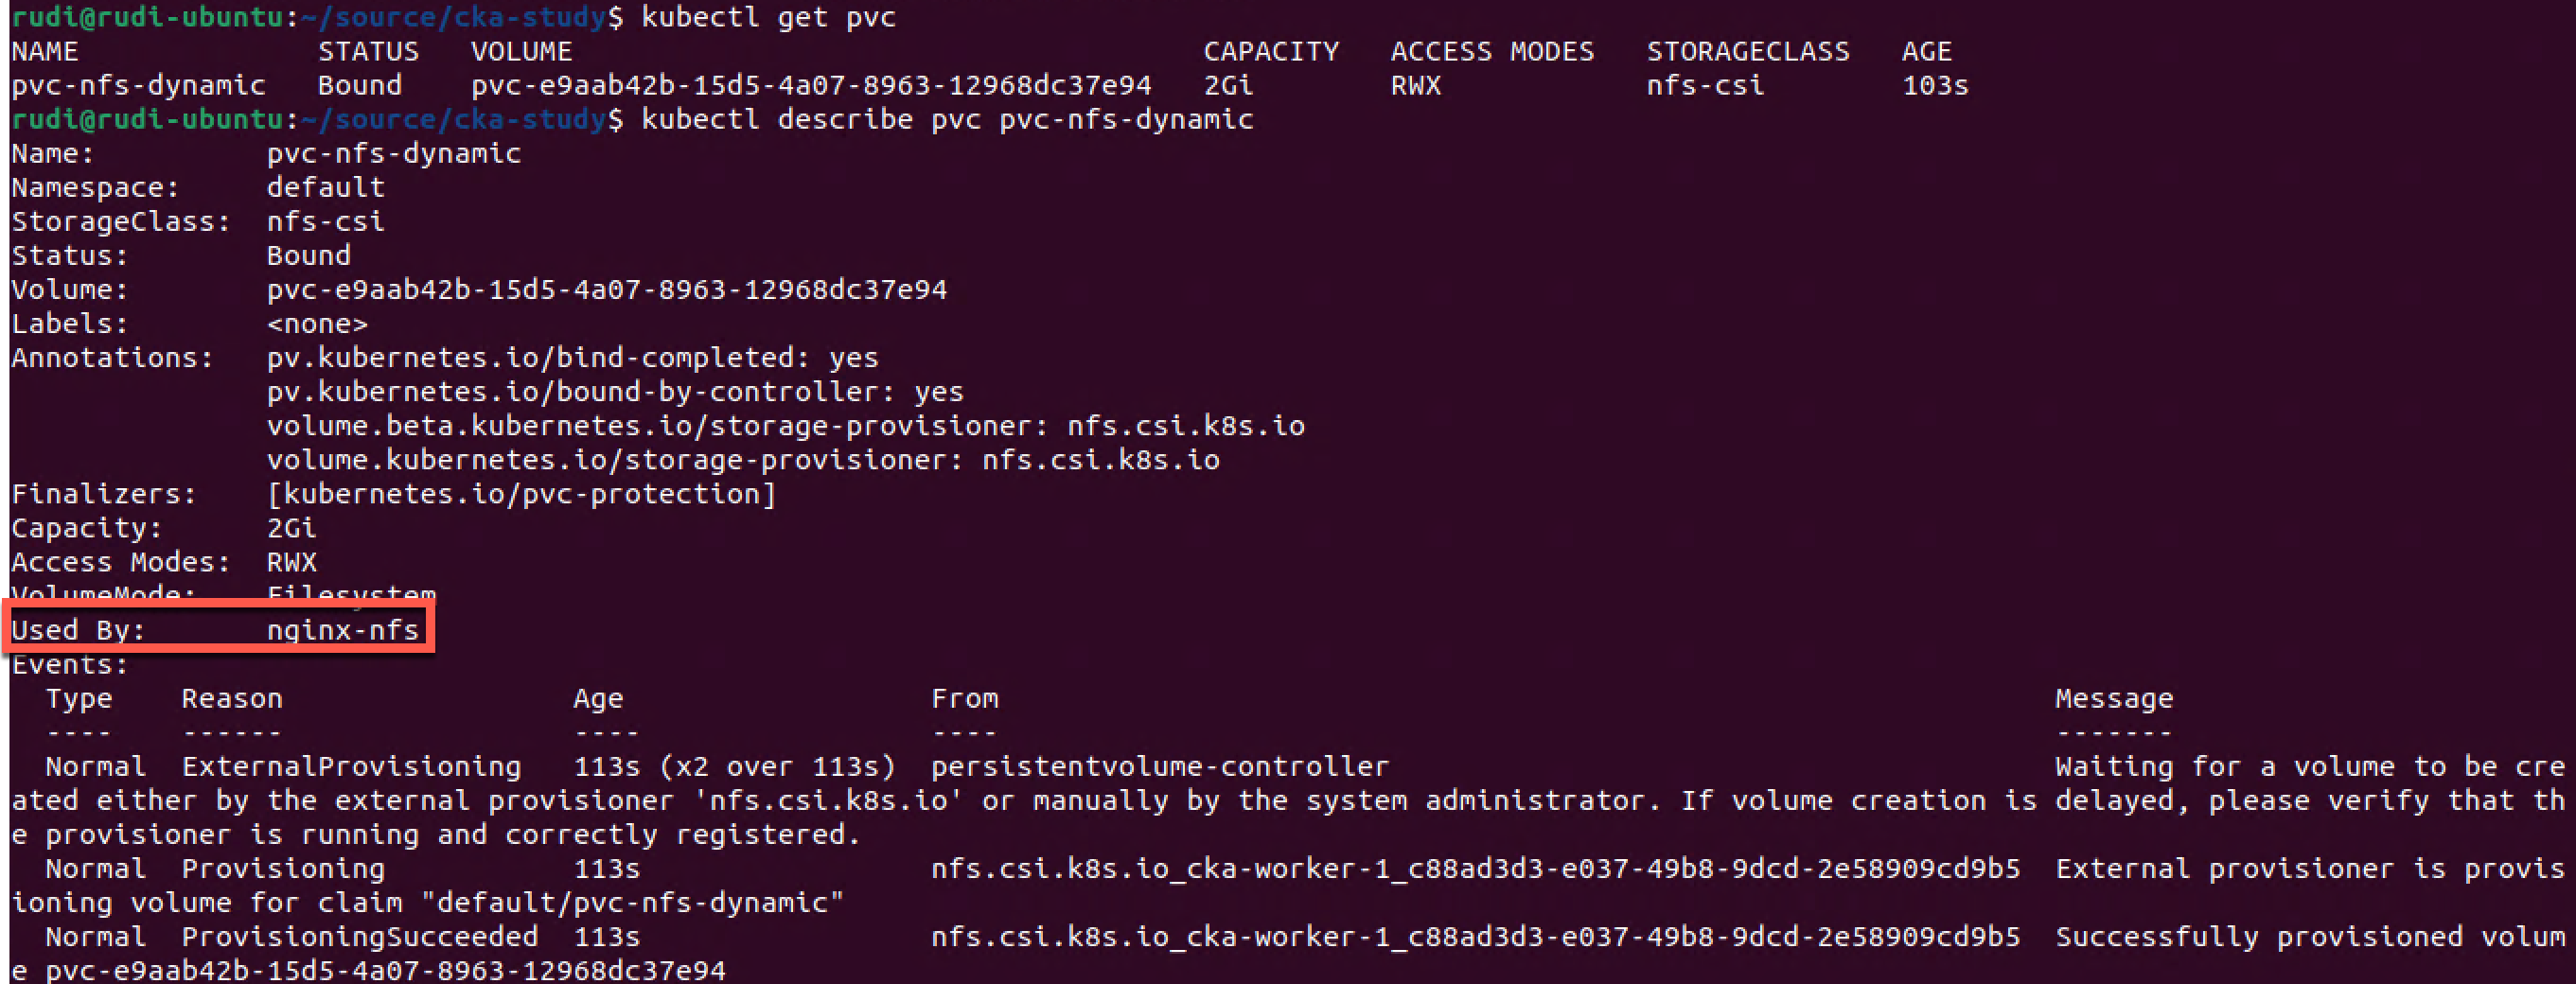
And if we go and have a look at our PVC we can see that it is now in use
1kubectl get pvc
2kubectl describe pvc pvc-nfs-dynamic
Now let's finally go to our NFS server and see what has happened there
1ls /<mount-path-from-sc>/<some-random-pvc-name>
2cat /<mount-path-from-sc>/<some-random-pvc-name>/outfile
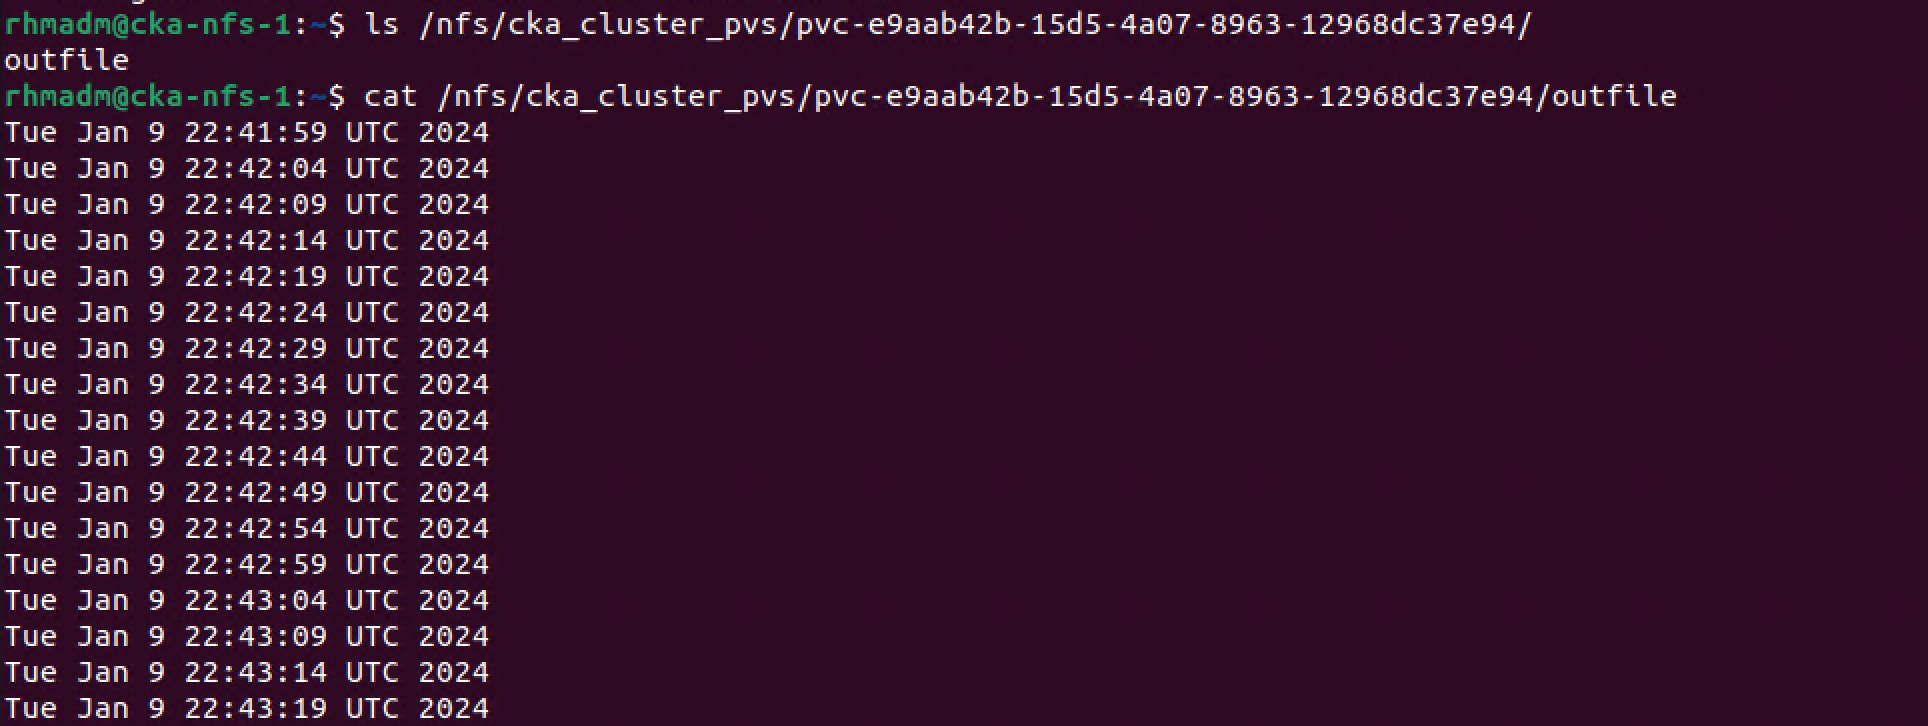
As we can see there's a folder created for our PVC, and the Pod has created and is writing to a file on the NFS server
Delete PVC
So we've seen that our PVC connected to the StorageClass automatically provisions resources on our underlying NFS server and that we have a Pod that can make use of this PVC to create files on the server.
Now let's delete the Pod and the PVC to see what happens
1kubectl delete pod nginx-nfs
2kubectl get pvc
3kubectl delete pvc pvc-nfs-dynamic

Note that deletion of the Pod doesn't delete the PVC so we'll have to do that as well if we want to get rid of the volume on the NFS server.
After deletion of the PVC let's check the NFS server
1ls /<mount-path-from-sc>
With the reclaimPolicy set to delete we see that the deletion of the PVC also will delete the volume/folder on our NFS server and the contents
Retain and WaitForFirstConsumer
Let's quickly take test two different settings concerning our Persistent Volumes, namely the reclaimPolicy:Retain and volumeBindingMode:WaitForFirstConsumer. These are set in the StorageClass, so we'll create a new with these two set
 1apiVersion: storage.k8s.io/v1
 2kind: StorageClass
 3metadata:
 4  name: nfs-csi-retain
 5provisioner: nfs.csi.k8s.io
 6parameters:
 7  server: 192.168.199.11
 8  share: /nfs/cka_cluster_pvs/
 9reclaimPolicy: Retain
10volumeBindingMode: WaitForFirstConsumer
11mountOptions:
12  - nfsvers=3
1kubectl apply -f nfs-sc-retain.yaml
2kubectl get sc

Let's create a PVC that makes use of this class instead of the first one we created
 1apiVersion: v1
 2kind: PersistentVolumeClaim
 3metadata:
 4  name: pvc-nfs-dynamic-retain
 5spec:
 6  accessModes:
 7    - ReadWriteMany
 8  resources:
 9    requests:
10      storage: 2Gi
11  storageClassName: nfs-csi-retain
1kubectl apply -f nfs-pvc-retain.yaml
2kubectl get pvc
3kubectl describe pvc pvc-nfs-dynamic-retain
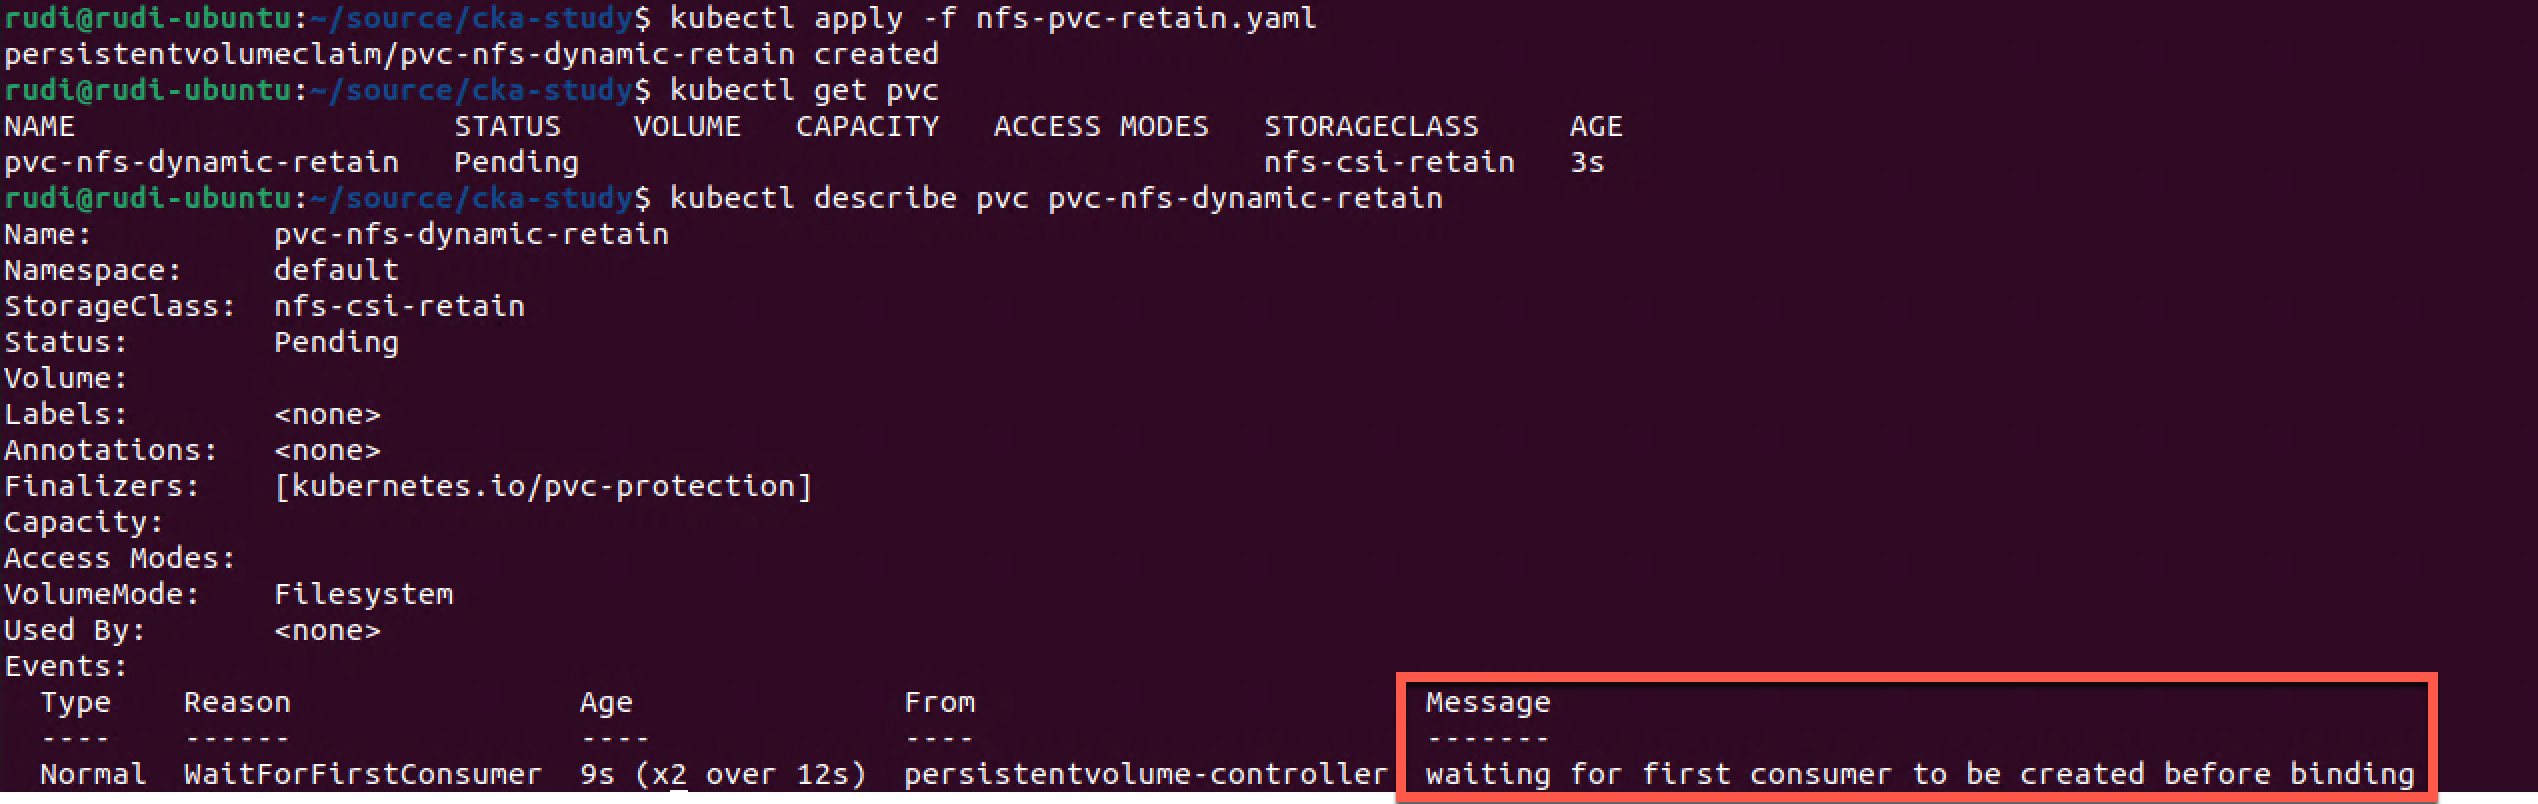
As expected the PVC gets created, but remains in a pending state as long as no Pod has requested it.
Let's re-create our nginx Pod from before, but now with the new PVC instead
 1kind: Pod
 2apiVersion: v1
 3metadata:
 4  name: nginx-nfs-retain
 5spec:
 6  nodeSelector:
 7    "kubernetes.io/os": linux
 8  containers:
 9    - image: mcr.microsoft.com/oss/nginx/nginx:1.19.5
10      name: nginx-nfs
11      command:
12        - "/bin/bash"
13        - "-c"
14        - set -euo pipefail; while true; do echo $(date) >> /mnt/nfs/outfile; sleep 5; done
15      volumeMounts:
16        - name: persistent-storage
17          mountPath: "/mnt/nfs"
18          readOnly: false
19  volumes:
20    - name: persistent-storage
21      persistentVolumeClaim:
22        claimName: pvc-nfs-dynamic-retain
1kubectl apply -f nginx-pvc-retain
2kubectl get pod

The new Pod has been created. Let's check if it has mounted the volume
1kubectl describe pod nginx-nfs-retain
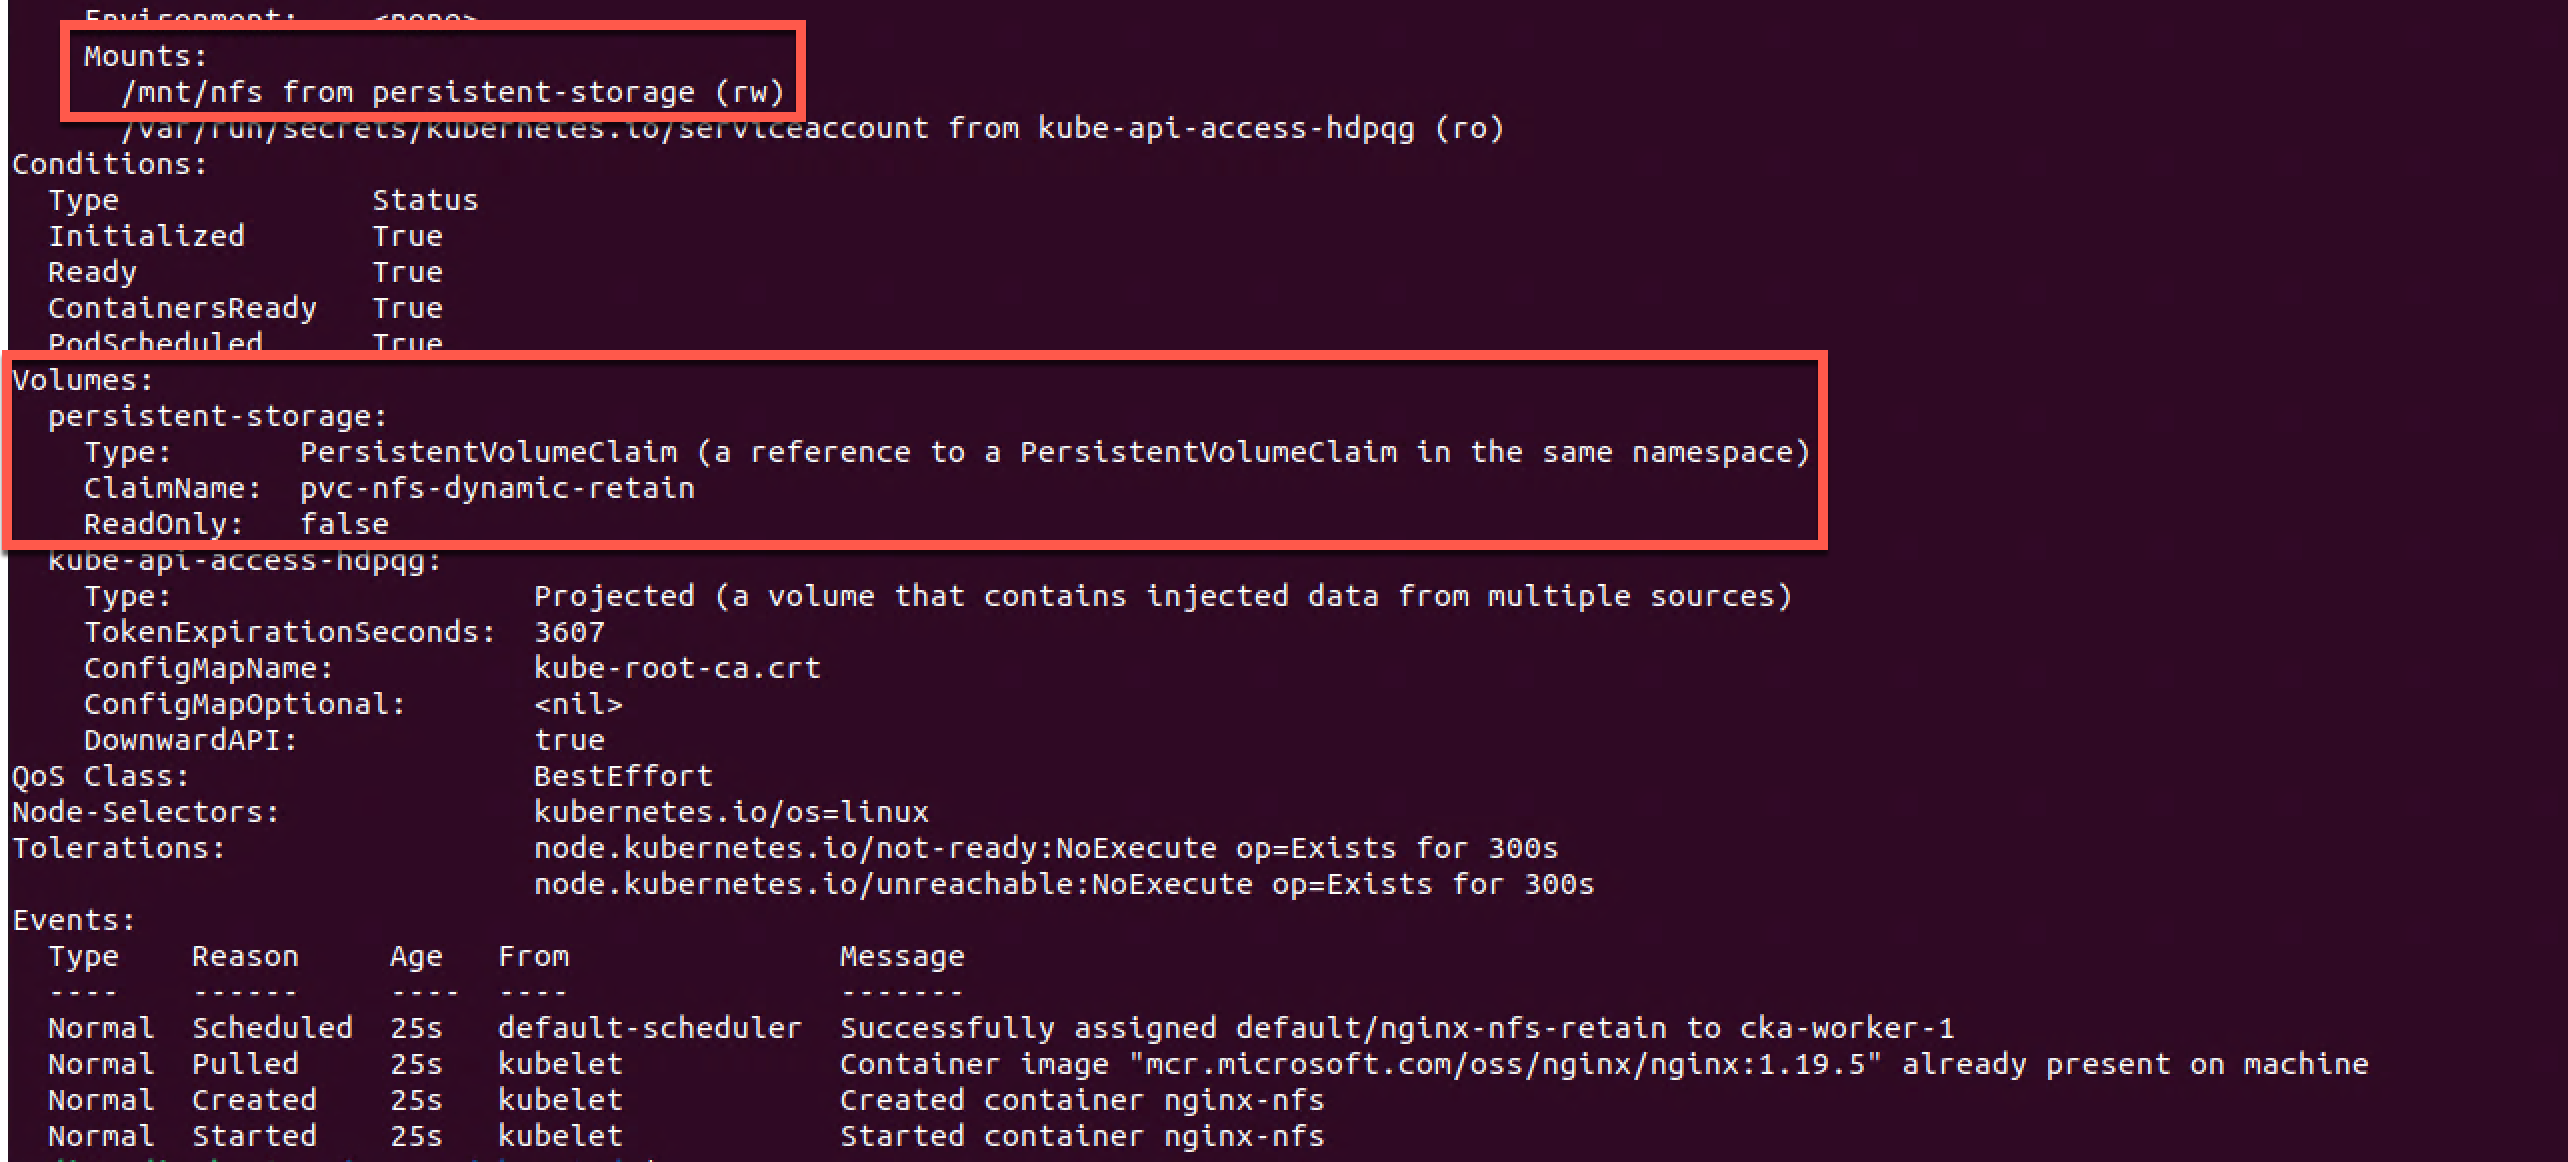
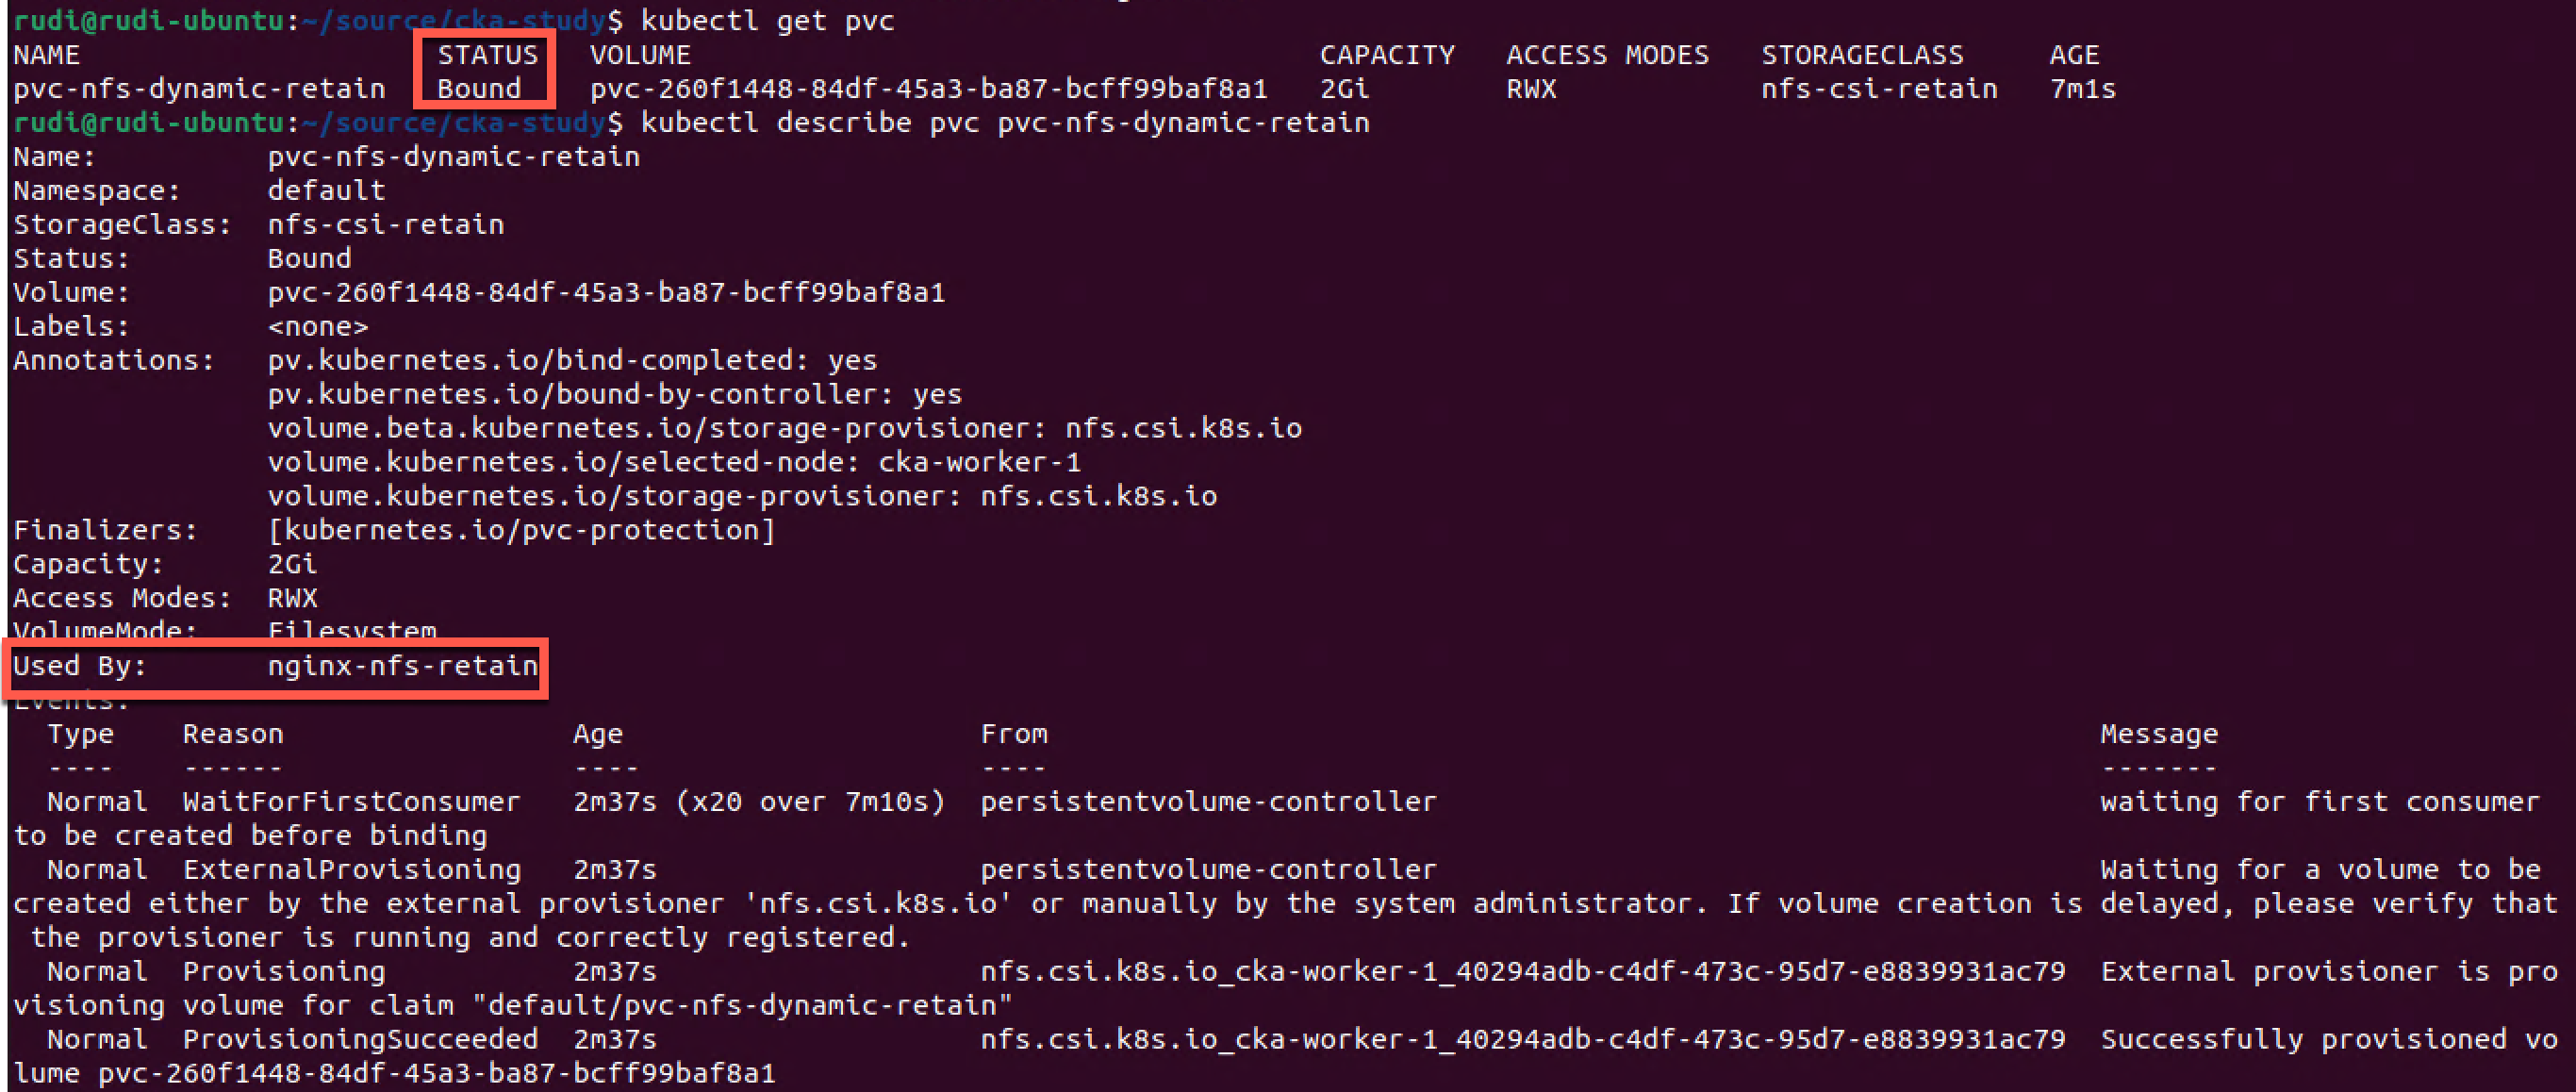
The Pod has mounted the volume so let's check the status of the PVC
1kubectl get pvc
2kubectl describe pvc pvc-nfs-dynamic-retain
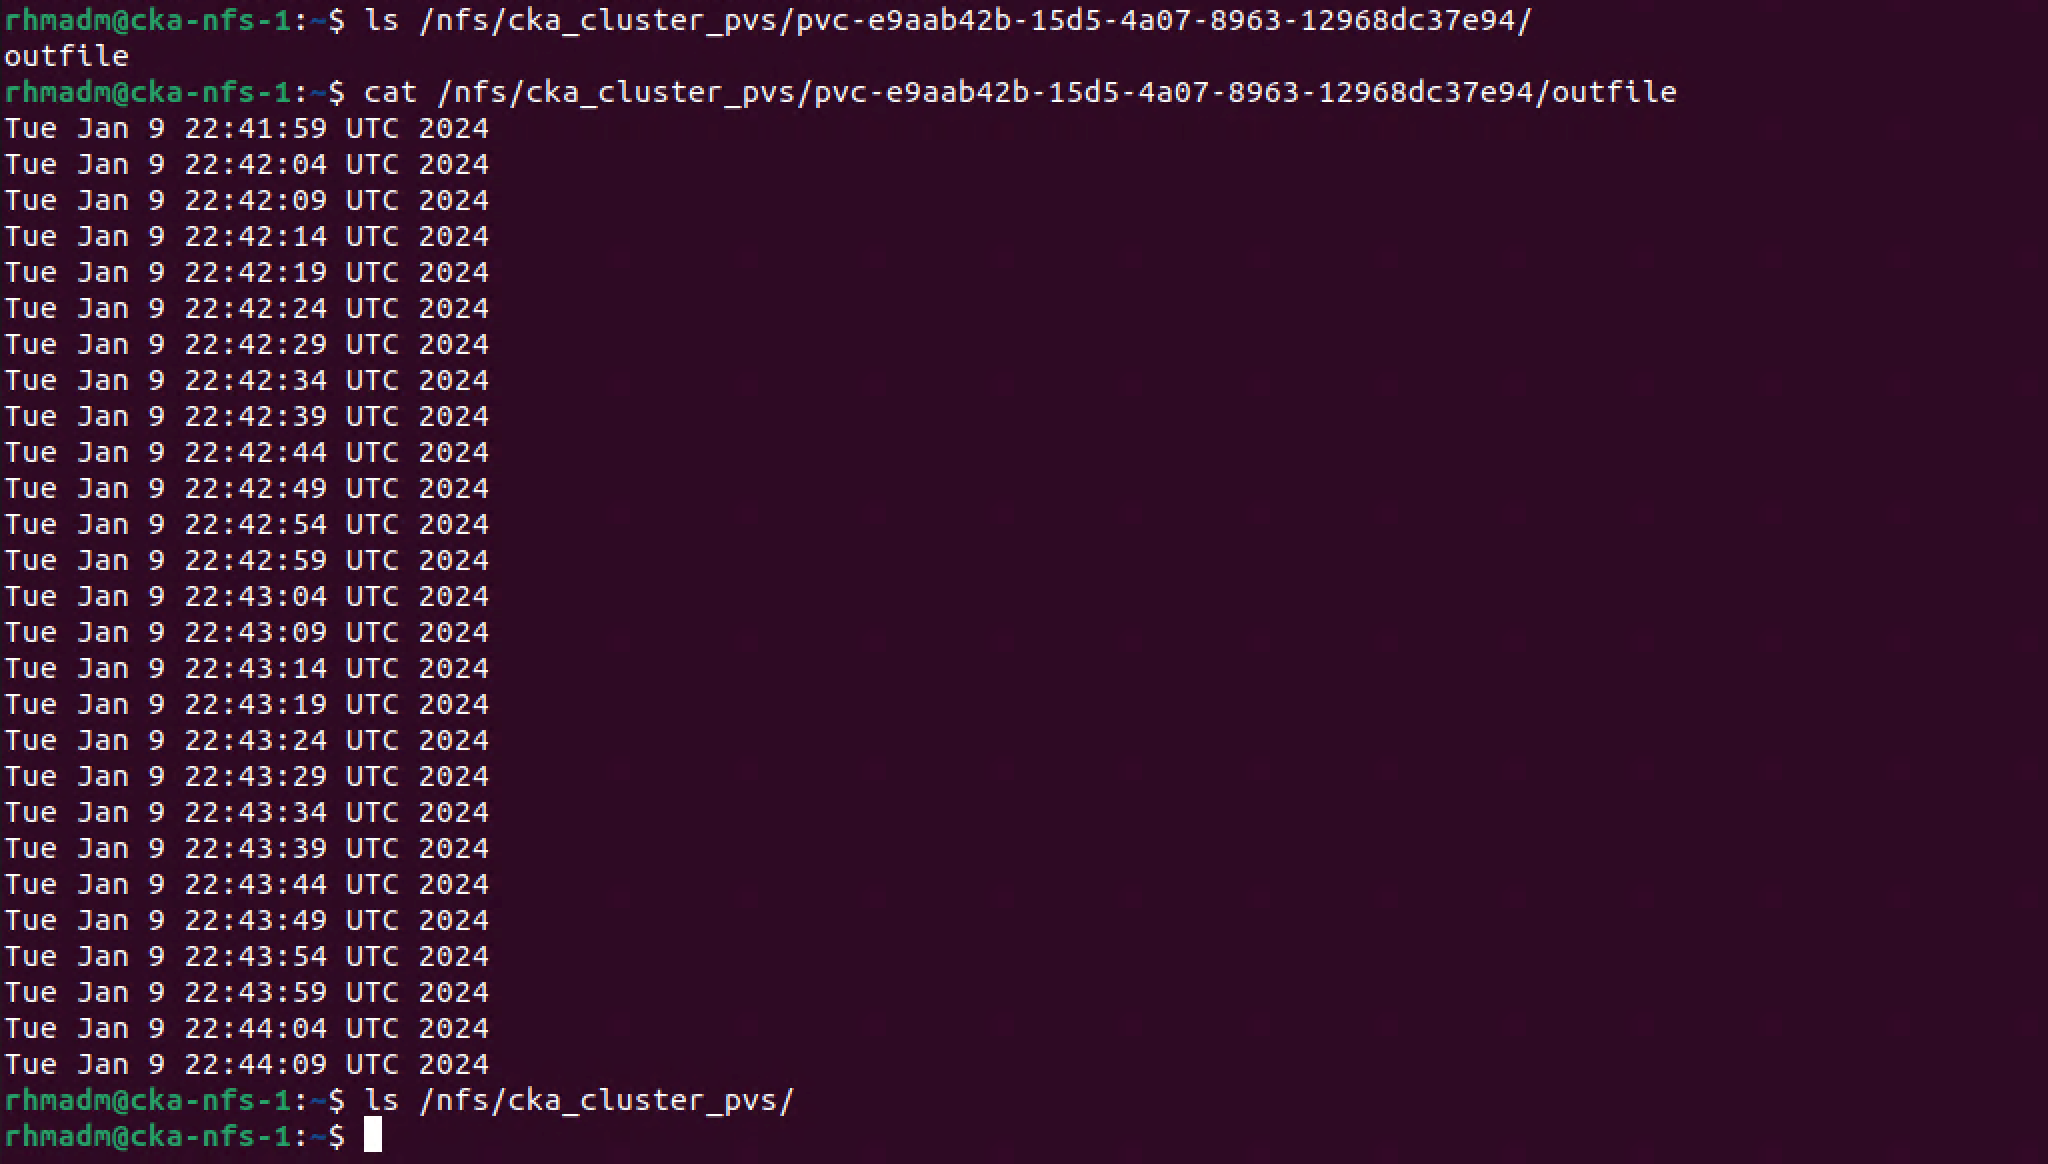
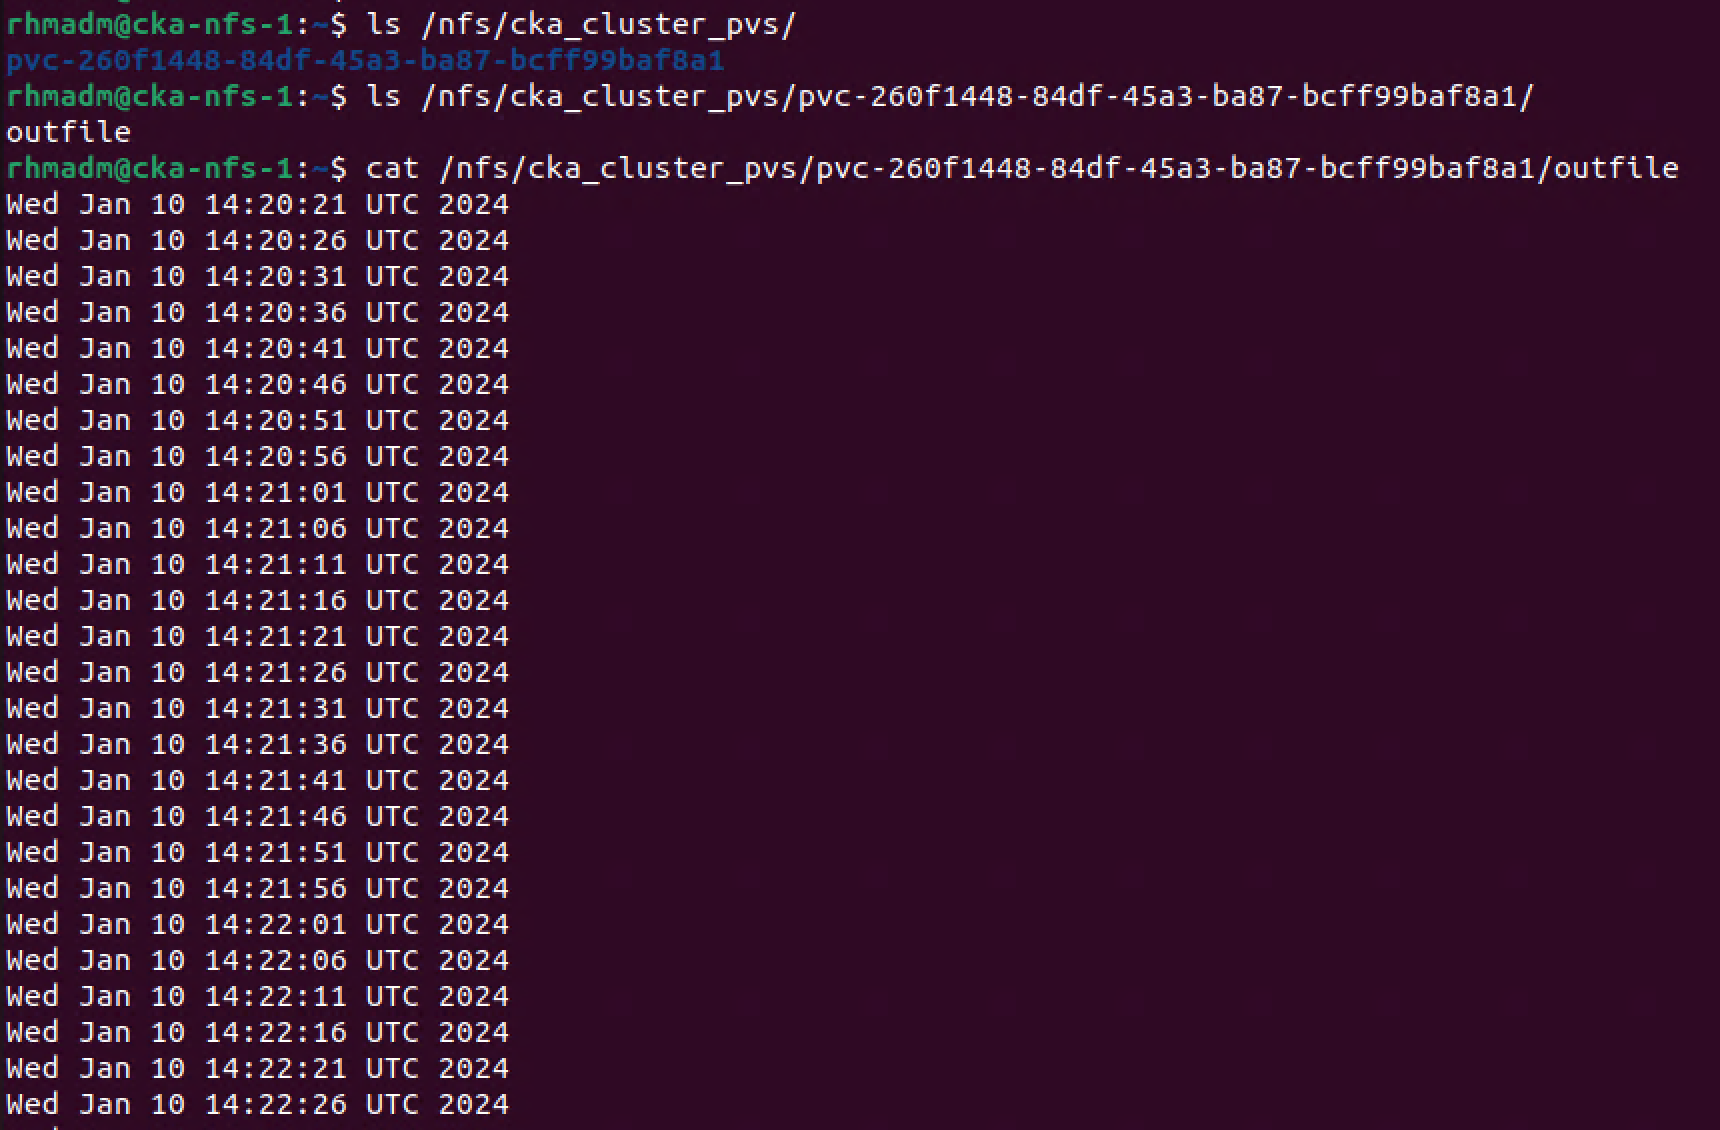
Now, let's check the NFS server
1ls /<nfs-mount-path>
2ls /<nfs-mount-path>/<dynamic-pvc-name>
3cat /<nfs-mount-path>/<dynamic-pvc-name>/outfile
So, what happens now when we delete the Pod
1kubectl delete pod nginx-nfs-retain
2kubectl get pvc
3kubectl describe pvc pvc-nfs-dynamic-retain
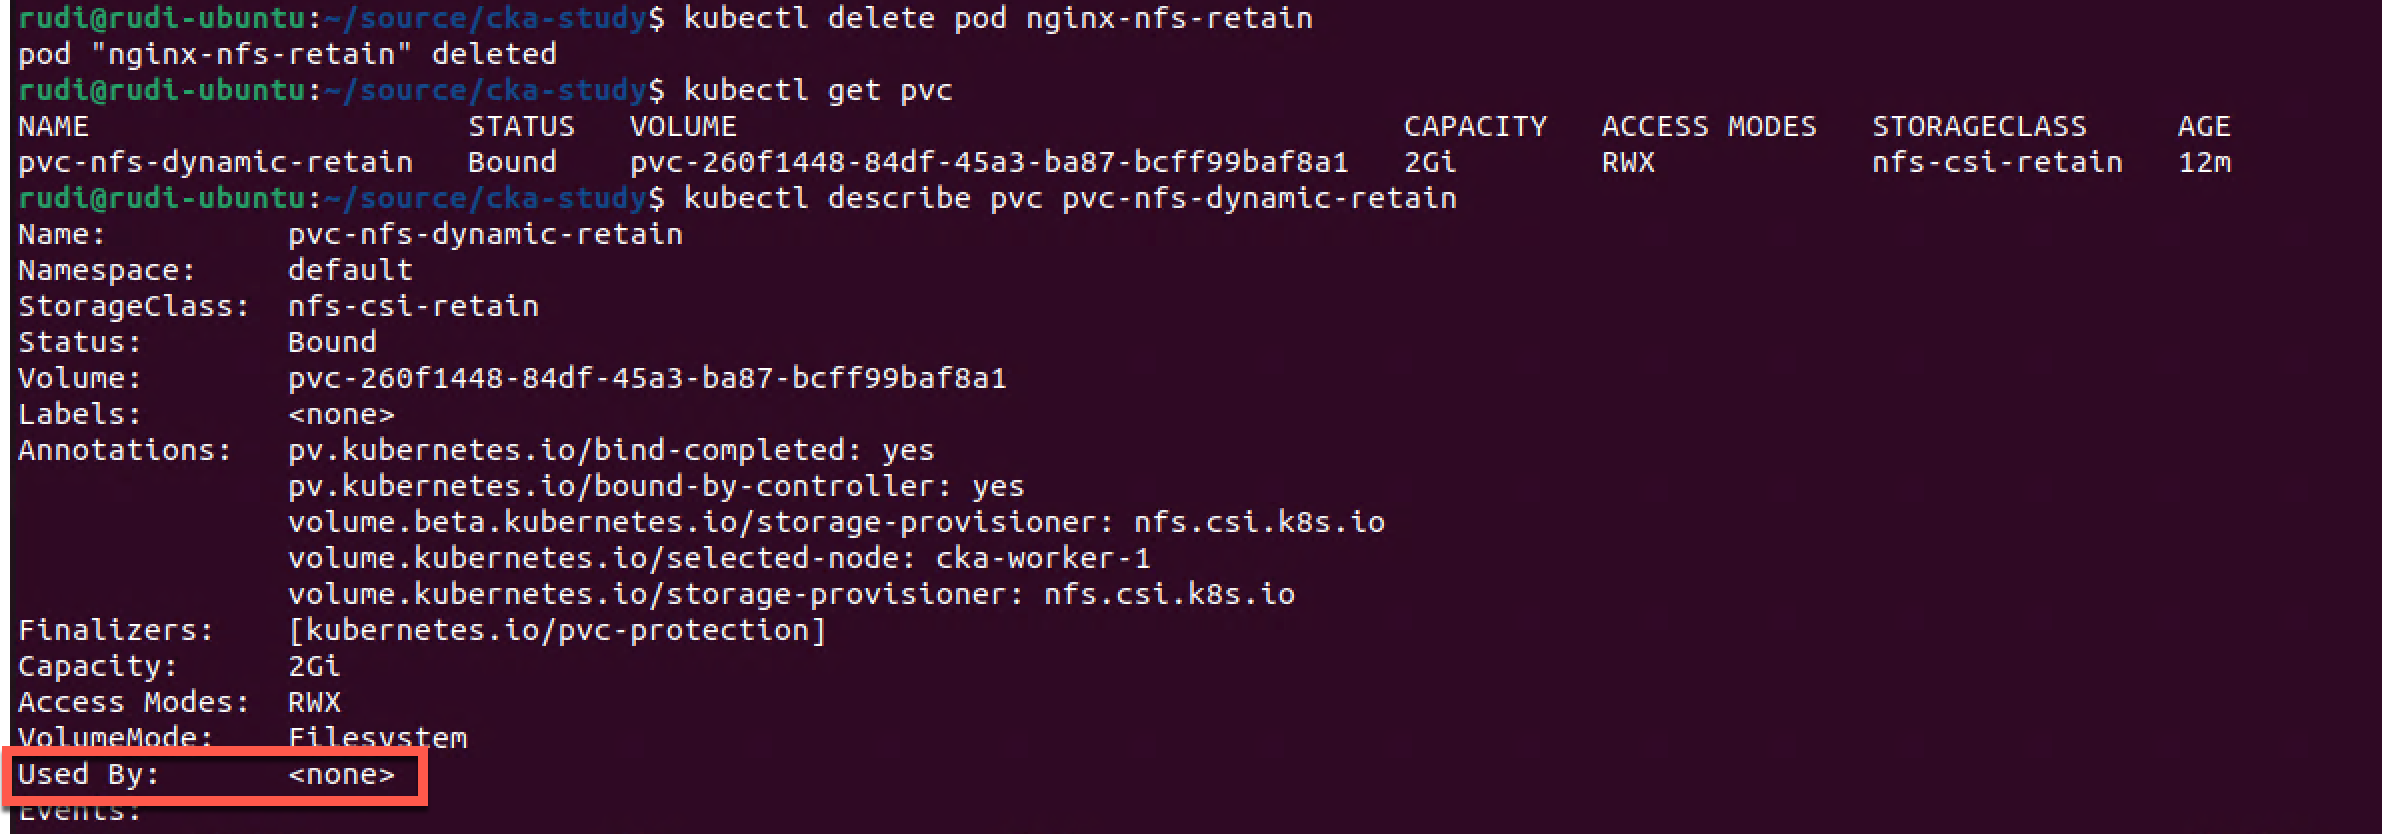
The Pod gets deleted, but the PVC still stays bound.
Now let's delete the PVC and verify the NFS server
1kubectl delete pvc pvc-nfs-dynamic-retain
2kubectl get pvc

On the NFS server
1ls /<nfs-mount-path>
2ls /<nfs-mount-path>/<dynamic-pvc-name>
3cat /<nfs-mount-path>/<dynamic-pvc-name>/outfile
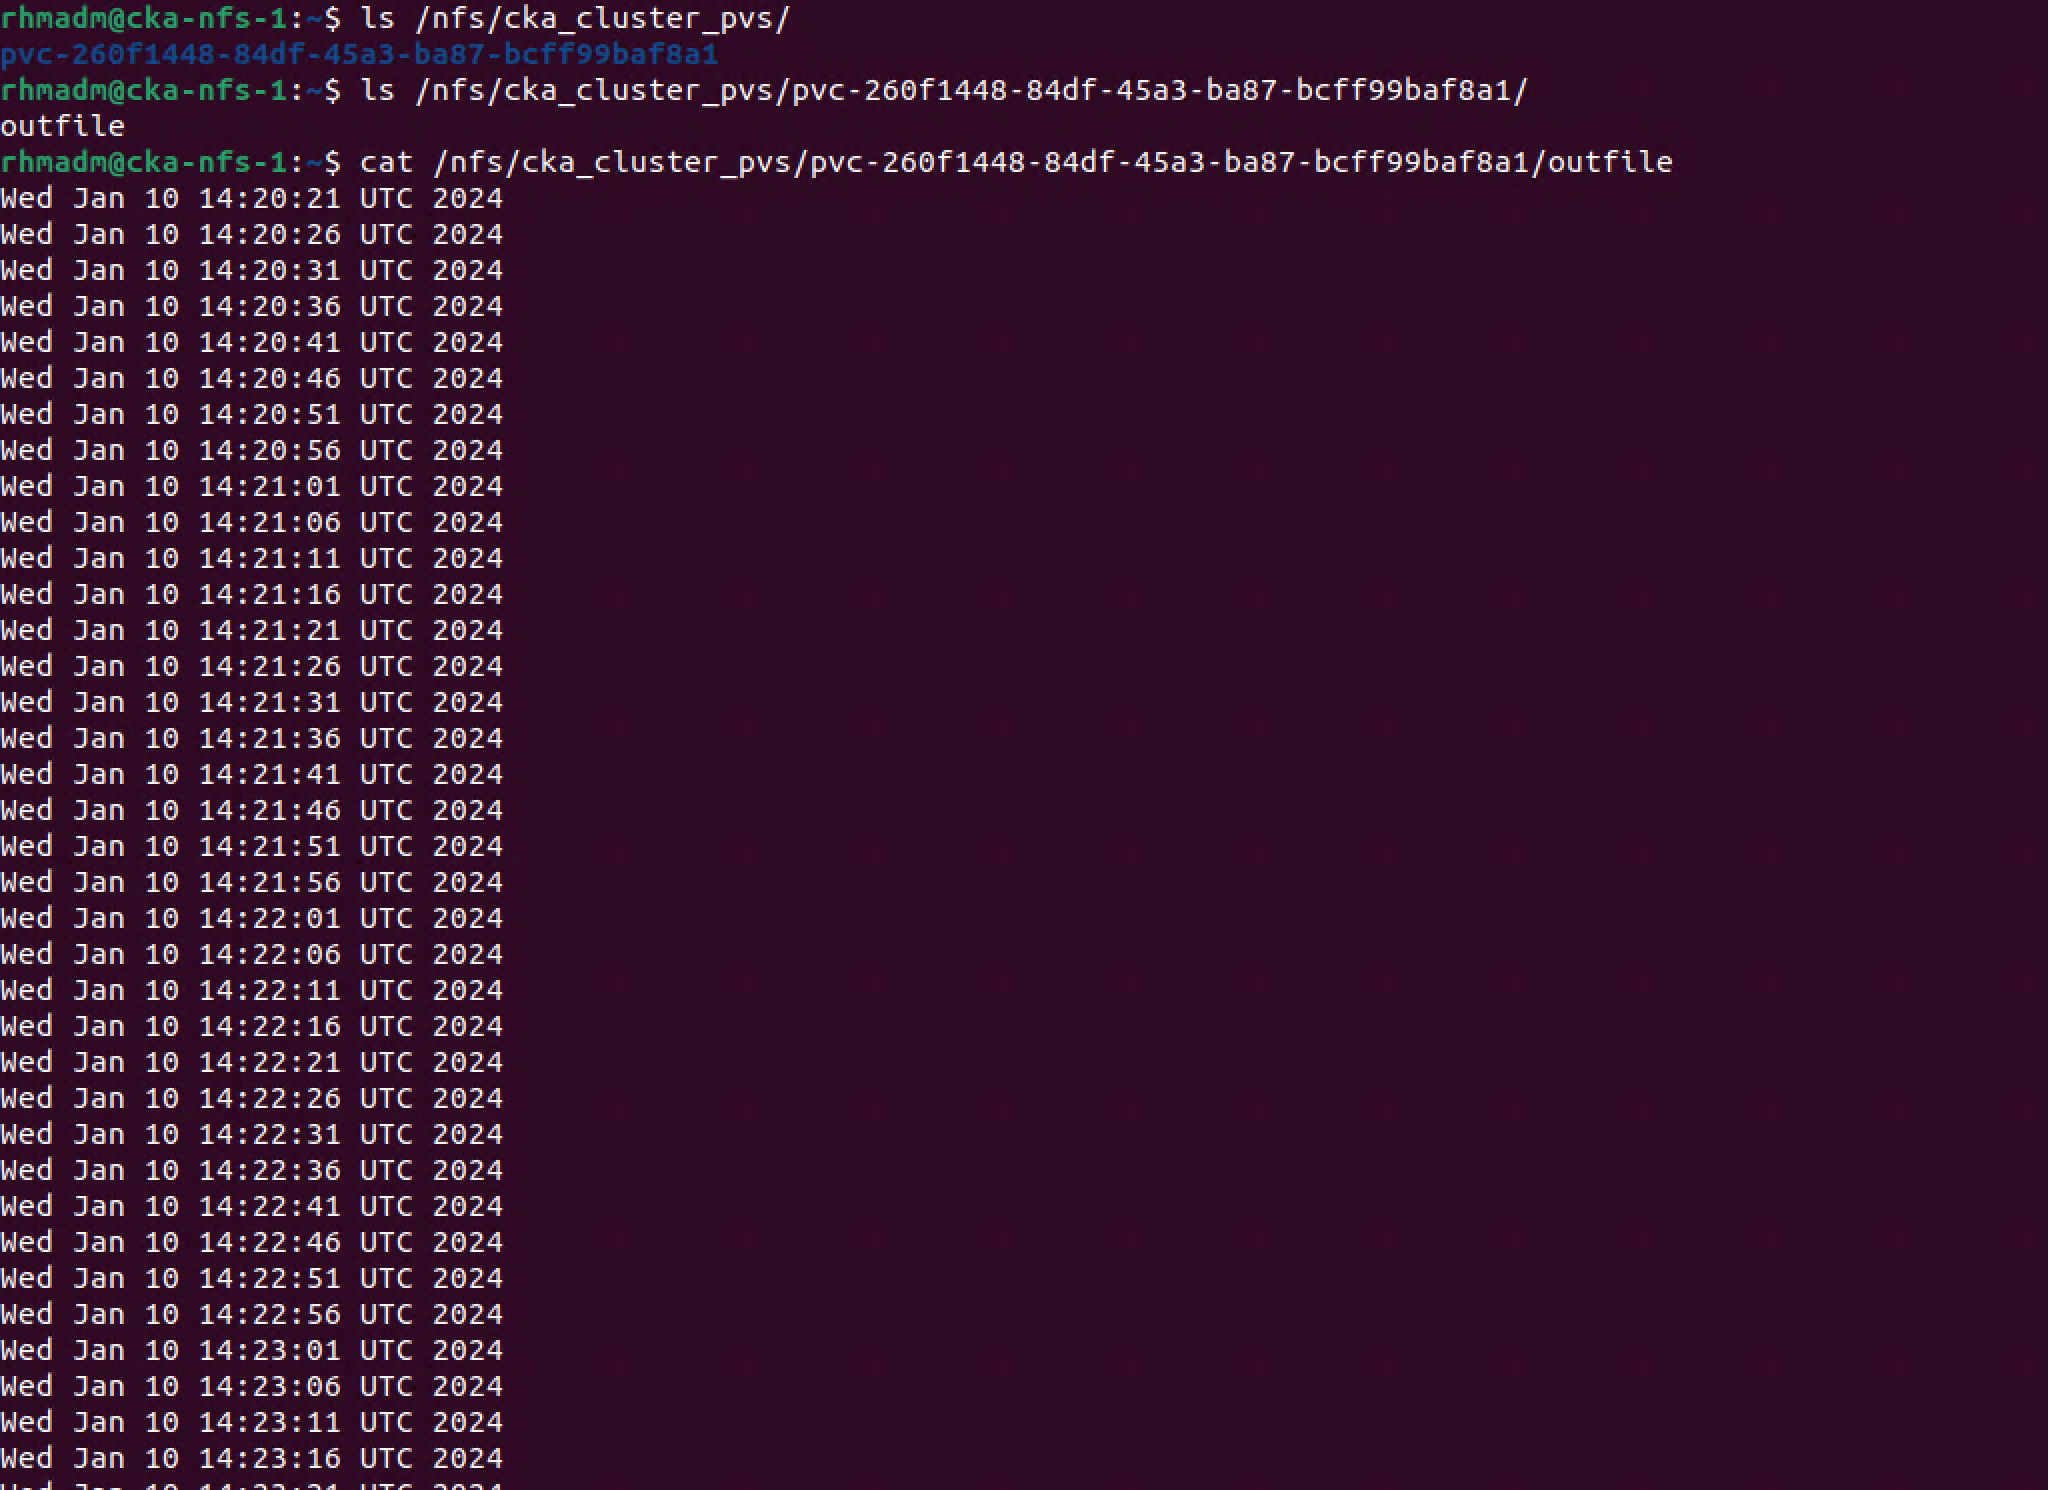
As opposed to the previous PVC this time the volume and the file with its contents are retained and accessible even after the PVC has been deleted.
This is something that might be useful if you want to keep files even after Pods and PVC's are deleted, maybe for logging or complicance reasons, but obviously you'll be left off with the responsibility to maintain this as Kubernetes no longer knows about it.
Summary
This post has been working with the NFS CSI Driver for Kubernetes. With this in place we can make use of Storage Classes to dynamically provision Persistent Volumes on a NFS server
We've seen how to work with the volumeBindingMode as well as the reclaimMode so that we can control what happens when we create or delete PVC's respectively.
Thanks for reading and if you have any questions or comments, please reach out