Scaling out a Kubernetes Cluster - 2024 edition
Overview
Intro
This is the follow up from my last post where we saw how to deploy a Kubernetes cluster on virtual machines. It's also an updated version of this post which was written back in 2020. Common for them both is that they're part of my preparation for the CKA exam.
More study notes for that exam can be found here. Note that some of the content was written back in 2020 and might not be 100% accurate for the CKA exam in 2024. I intend to update most of them as I prepare for the exam in early january.
A little warning..
This post should not be used for anything production and it is not a comprehensive write up of Kubernetes. Please refer to the official documentation and the best practices for more advise on those topics.
State of the union
In the last post we left off with one control plane node and two worker nodes. In this post we'll scale out to three control plane nodes and three worker nodes.

We also verified that the cluster was functional by deploying an application (nginx) which we scaled to run on both worker nodes, and we made it available from outside of the cluster

Prereq's
Before we add our new control plane and worker nodes we'll have to make sure we have done the steps mentioned in the VM Preparation section of the last post
In short the steps for each of the Kubernetes nodes:
- Install container runtime (containerd, runc, cni plugin)
- Configure systemd cgroup driver
- Install Kubernetes packages on the correct version
- Disable swap
- Ensure connectivity to the existing control plane and the cluster endpoint
Proxy the endpoint address
Official documentation reference
That last point from the prereq's above is where we'll start this post.
Our cluster has been configured with cka-cluster as the endpoint name, and is what our nodes (and clients) are connecting to. At the moment this name is pointing to the IP address of the single control plane node cka-control-1.
To make the cluster highly available we want to extend the control plane with more nodes. Best practice is to run 3 or 5 control plane nodes, e.g. an odd number of nodes.
For this to make sense we'll add in a proxy or a load balancer in front of the control plane nodes that can proxy the endpoint IP to either of the control plane nodes
Note that the proxy/load balancer itself should also be highly available. This post leaves us with a single HAProxy instance which will not meet this. I might explore this in a later post, but for my preparations for the CKA this is sufficient. Check the Kubernetes documentation for more information
As our proxy for the control plane endpoint we'll use the community edition of HAProxy
There are other alternatives for load balancing a Kubernetes cluster. Be sure to check out the documentation for more information.
HAProxy installation
In our previous post we listed seven machines in our setup, one of which will be our load balancer.
Note that this setup will only configure this VM as a load balancer for the cluster endpoint and not for services running inside of the cluster
Install HAProxy
On our VM destined to be our Load balancer we will install HAProxy
1sudo apt-get update
2sudo apt-get install haproxy
On my Ubuntu 22.04 machine this will install HAProxy version 2.4.22. The latest LTS version at the time of this writing is 2.8, and the latest stable version is 2.9. To install one of those versions a couple of more steps are needed, check out this page for instructions
To verify the install we'll run haproxy -v to check the version

Configure HAProxy
We'll use the configuration from the Kubernetes HA considerations page mentioned above and replace the config that comes with the HAProxy installation. We'll replace the variables in the file with the port of our endpoint 6443 and the details of our three control plane nodes.
 1# /etc/haproxy/haproxy.cfg
 2#---------------------------------------------------------------------
 3# Global settings
 4#---------------------------------------------------------------------
 5global
 6    log /dev/log local0
 7    log /dev/log local1 notice
 8    daemon
 9
10#---------------------------------------------------------------------
11# common defaults that all the 'listen' and 'backend' sections will
12# use if not designated in their block
13#---------------------------------------------------------------------
14defaults
15    mode                    http
16    log                     global
17    option                  httplog
18    option                  dontlognull
19    option http-server-close
20    option forwardfor       except 127.0.0.0/8
21    option                  redispatch
22    retries                 1
23    timeout http-request    10s
24    timeout queue           20s
25    timeout connect         5s
26    timeout client          20s
27    timeout server          20s
28    timeout http-keep-alive 10s
29    timeout check           10s
30
31#---------------------------------------------------------------------
32# apiserver frontend which proxys to the control plane nodes
33#---------------------------------------------------------------------
34frontend apiserver
35    bind *:6443
36    mode tcp
37    option tcplog
38    default_backend apiserverbackend
39
40#---------------------------------------------------------------------
41# round robin balancing for apiserver
42#---------------------------------------------------------------------
43backend apiserverbackend
44    option httpchk GET /healthz
45    http-check expect status 200
46    mode tcp
47    option ssl-hello-chk
48    balance     roundrobin
49        server control-1 192.168.199.101:6443 check
50        server control-2 192.168.199.102:6443 check
51        server control-3 192.168.199.103:6443 check

Let's restart the HAProxy service and check the status
1sudo systemctl restart haproxy
2sudo systemctl status haproxy
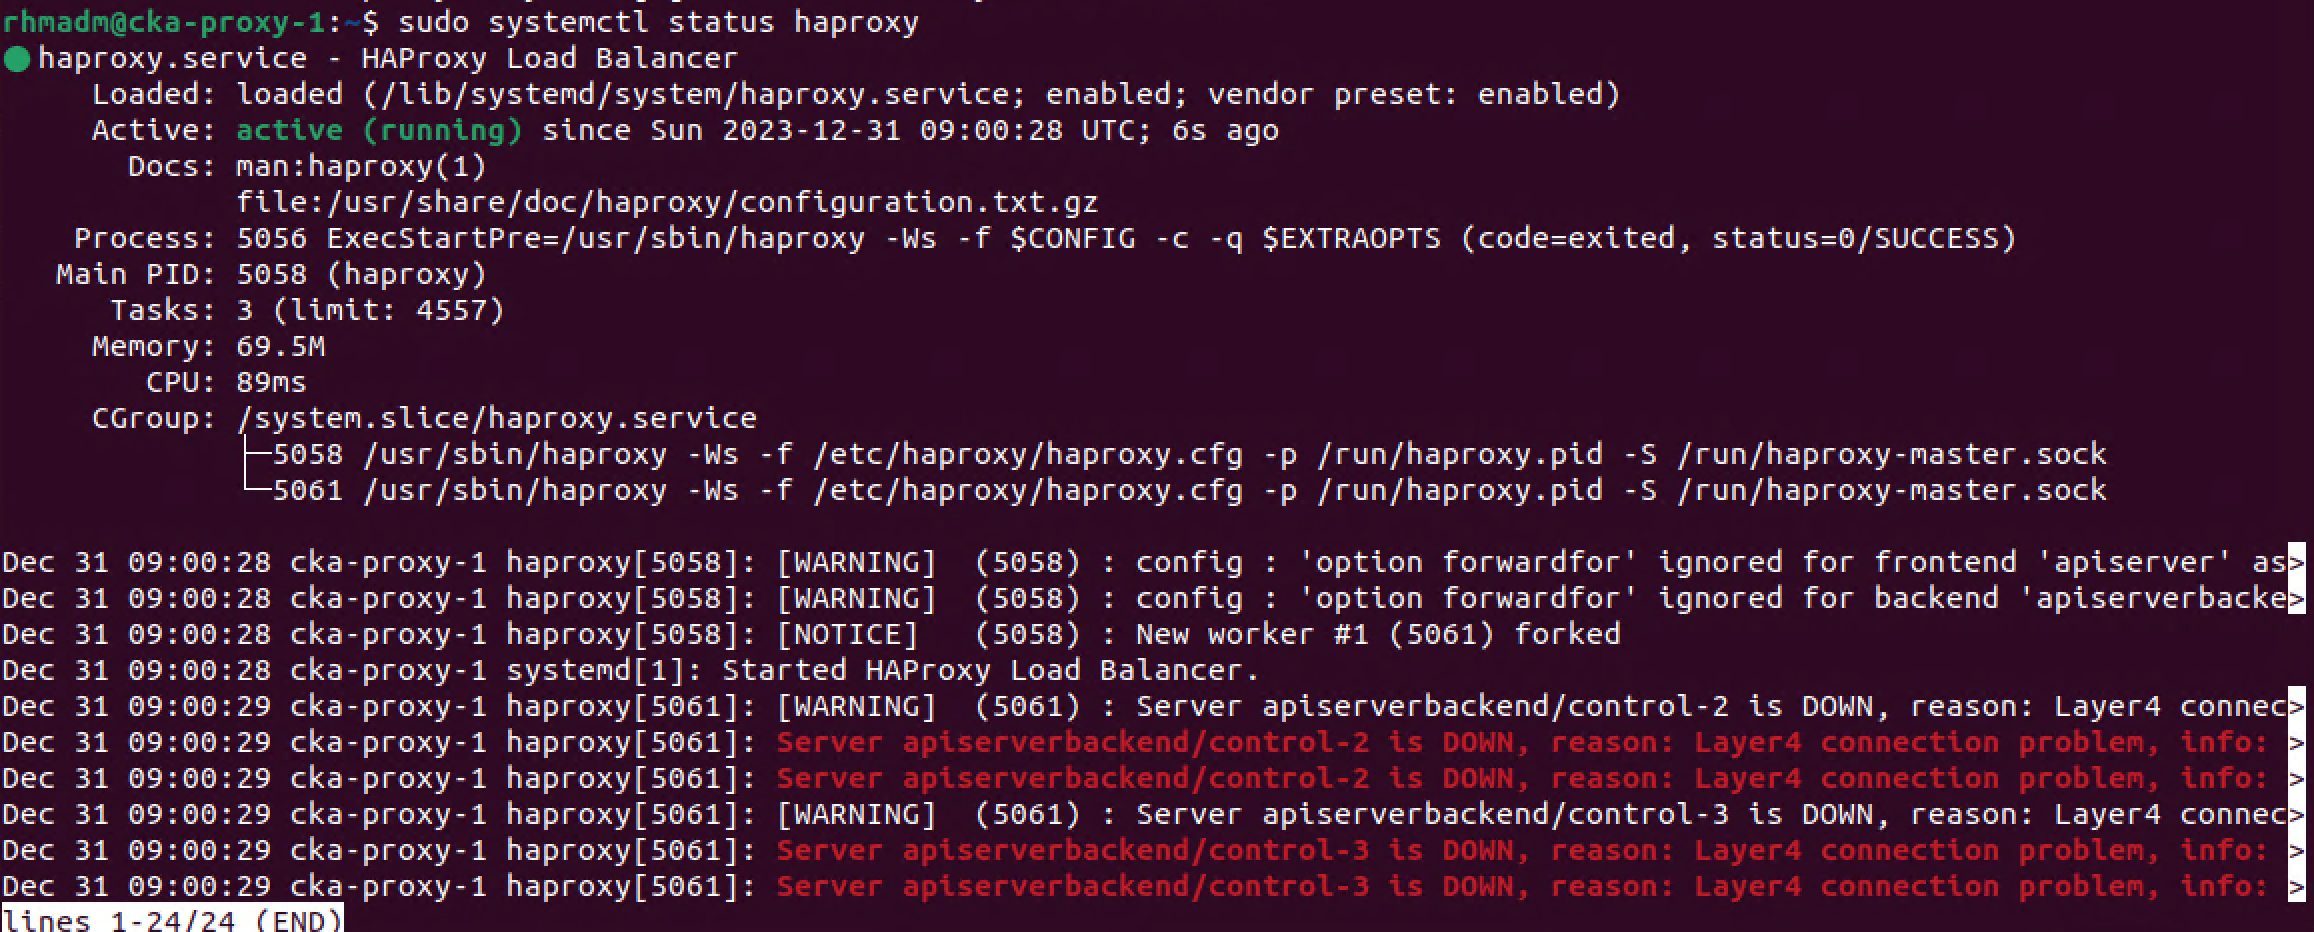
Note that HAProxy warns us that control-2 and control-3 is down. This is expected at this point as we haven't added those to the Kubernetes cluster yet
Test endpoint and update hosts files
Before proceeding with adding more control plane nodes to the cluster we want to update our existing nodes to use the new endpoint address pointing to our newly installed HAProxy node
We'll start with verifying that our HAProxy node listens to our endpoint address. We'll do this from our existing control plane node cka-control-1
1nc -v 192.168.199.100 6443

To actually use this let's update the hosts file on our nodes. We discussed this briefly in the previous post when we prepared our nodes
Note that in a real world scenario we'd want to use proper DNS resolution for our endpoint name.
1192.168.199.100 cka-cluster
2#192.168.199.101 cka-cluster

Remember to update the hosts file on all nodes
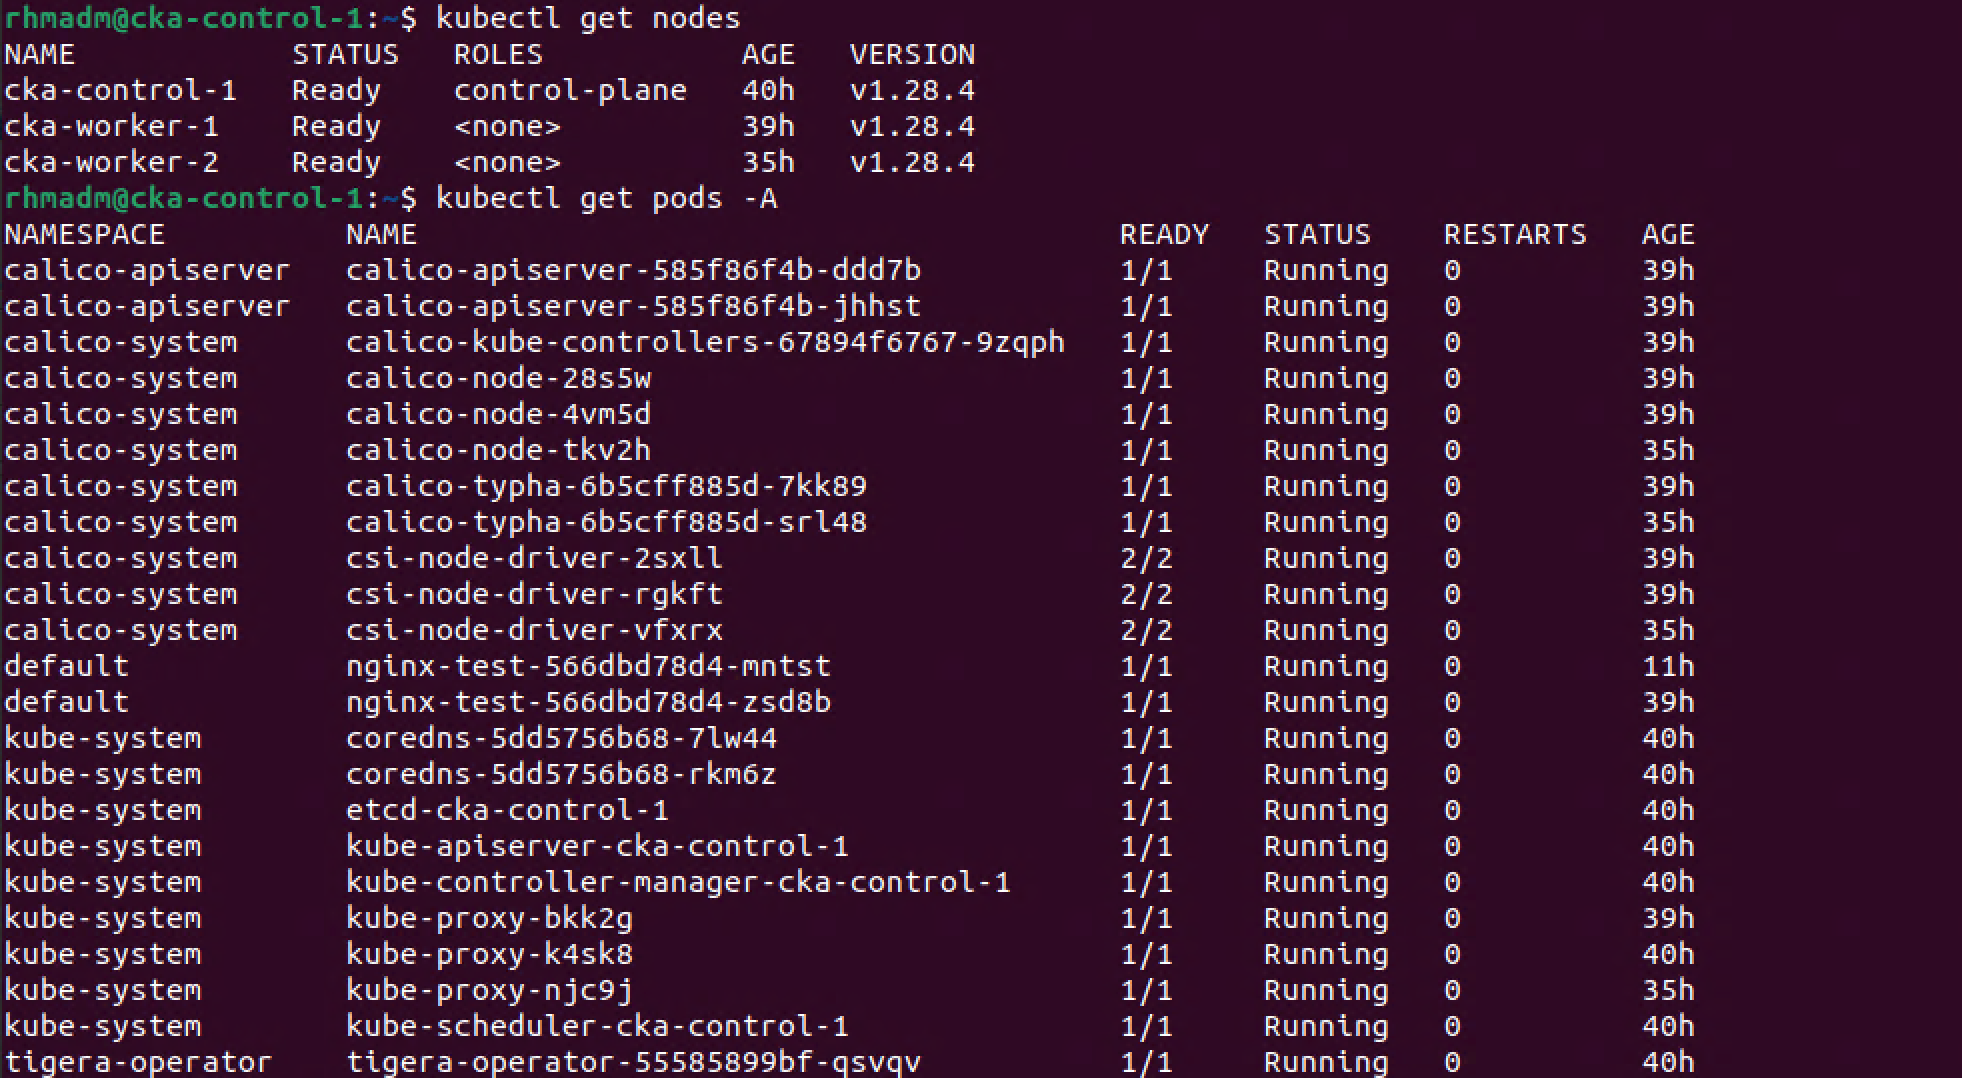
Before scaling out or cluster let's verify that our cluster has no errors on our existing nodes
1kubectl get nodes
2kubectl get pods -A
Add control plane nodes
Official documentation reference
Now we're finally ready to extend our cluster's control plane. Remember that we currently have one node and that best practice is to have an odd number of nodes, i.e. we'll add two control plane nodes to our cluster
If you followed along the previous post the nodes should be prepared with the needed configuration and packages. If not check out the VM Preparation section
Upload certs and Generate join command
In our last post we added worker nodes to the cluster with the kubeadm init command. We'll use the same command to add control plane nodes, but with the additional --control-plane switch. For this to work we also need to add a certificate key.
To get a hold of this we can issue a kubeadm init command to re-upload the certificates to the cluster config. We'll run this command on the existing control plane node
1sudo kubeadm init phase upload-certs --upload-certs

We'll also regenerate the kubeadm init command which we did in our previous post
1sudo kubeadm token generate
2sudo kubeadm token create <TOKEN-FROM-GENERATE-STEP> --ttl 1h --print-join-command

With these in place we can construct our kubeadm join command that should work on the new control plane nodes
Run kubadm join command on control plane nodes
Official documentation reference
The command to be run on the control plane nodes is constructed of the command generated by the previous print-join-command output above, the --control-plane switch, and the --certificate-key parameter followed by the certificate key generated by the upload-certs command we issued earlier
1sudo kubeadm join <control-plane-endpoint>:<control-plane-port> --token <token-from-generate-step> --discovery-token-ca-cert-hash sha256:<cert-hash> --control-plane --certificate-key <cert-key-from-upload-certs-command>

As with the first control plane node this might take some time as kubeadm will have to download the images needed for the system pods that will run on the control plane
As the
kubeadm joincommand outputs, we could prepare our node by downloading the images in beforehand with thekubeadm config images pullcommand

After a few minutes the node should hopefully be joined to the cluster
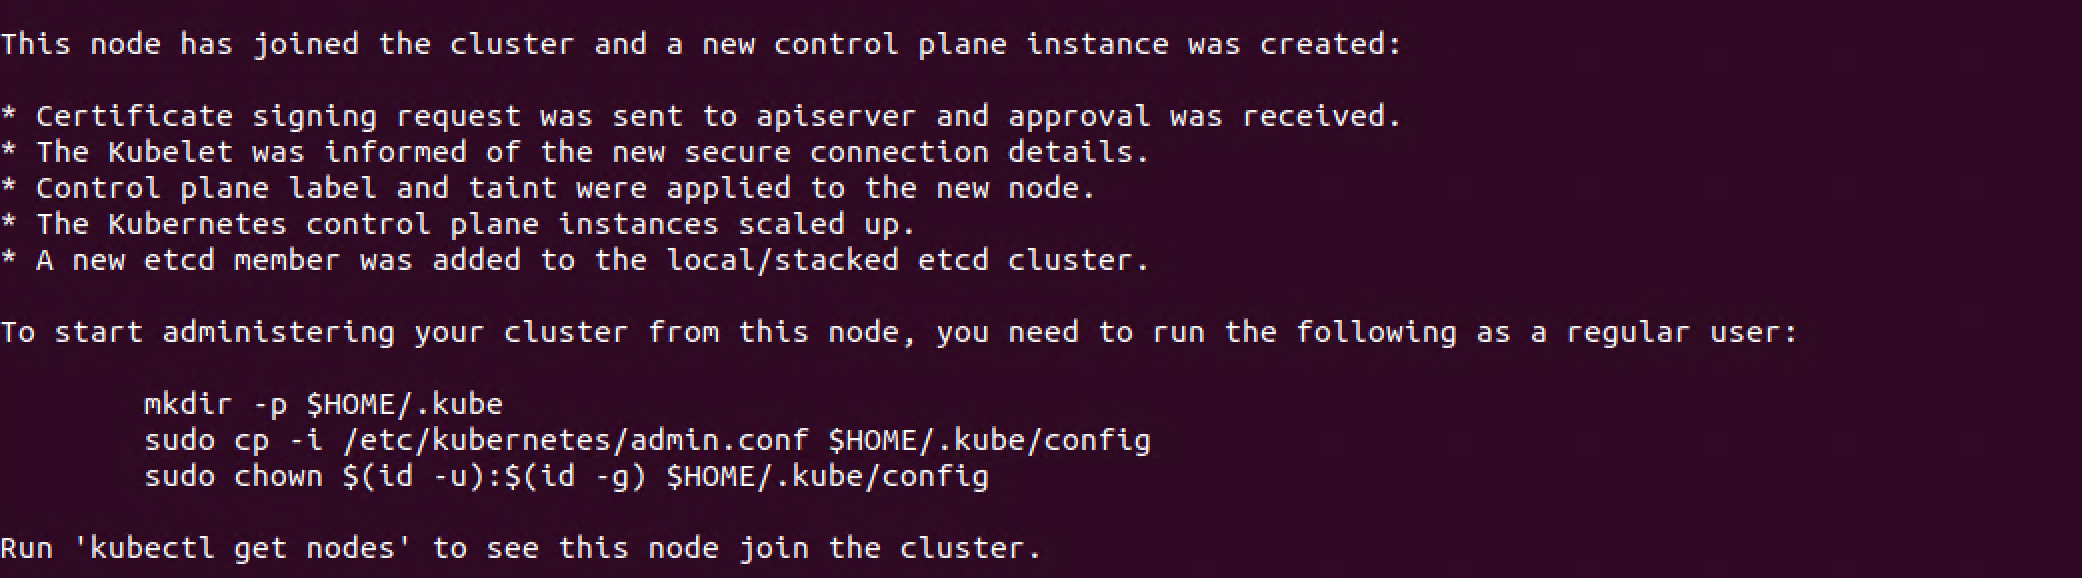
We'll run the mentioned kubeconfig commands in the output of the kubeadm join command and verify that kubectl on our new control plane node is working, that our kubeconfig is pointing to our cluster, and that our new node is ready
1mkdir -p $HOME/.kube
2sudo cp -i /etc/kubernetes/admin.conf $HOME/.kube/config
3sudo chown $(id -u):$(id -g) $HOME/.kube/config
4kubectl get nodes
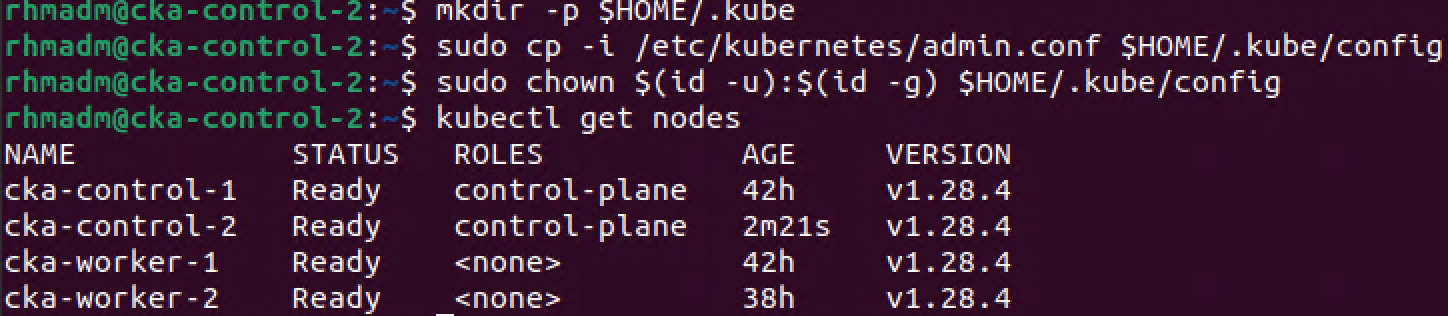
With our second control plane node added to the cluster, we can proceed with adding the third by issuing the same kubeadm join command as we did on the previous node, and after the join command has finished we can verify the cluster

Let's finally verify that our system deployments have been scaled to the new control plane nodes. We'll check the kube-apiserver and the etcd database pods. Both of which should have one replica on each of the three control plane nodes (note that these are only two of the required components that makes up our control plane)
1kubectl -n kube-system get pods -l component=kube-apiserver -o wide
2kubectl -n kube-system get pods -l component=etcd -o wide

Add worker node
Our cluster now consists of three control plane nodes and two worker nodes. We'll finalize our scale-out session by adding a third worker
If our third worker node meets the prereq's and preparations we've gone through on the other Kubernetes nodes, all we have to do is issue the kubadm join command we've seen used already in this post, but now omitting the --control-plane part
1sudo kubeadm join <control-plane-endpoint>:<control-plane-port> --token <token-from-generate-step> --discovery-token-ca-cert-hash sha256:<cert-hash>
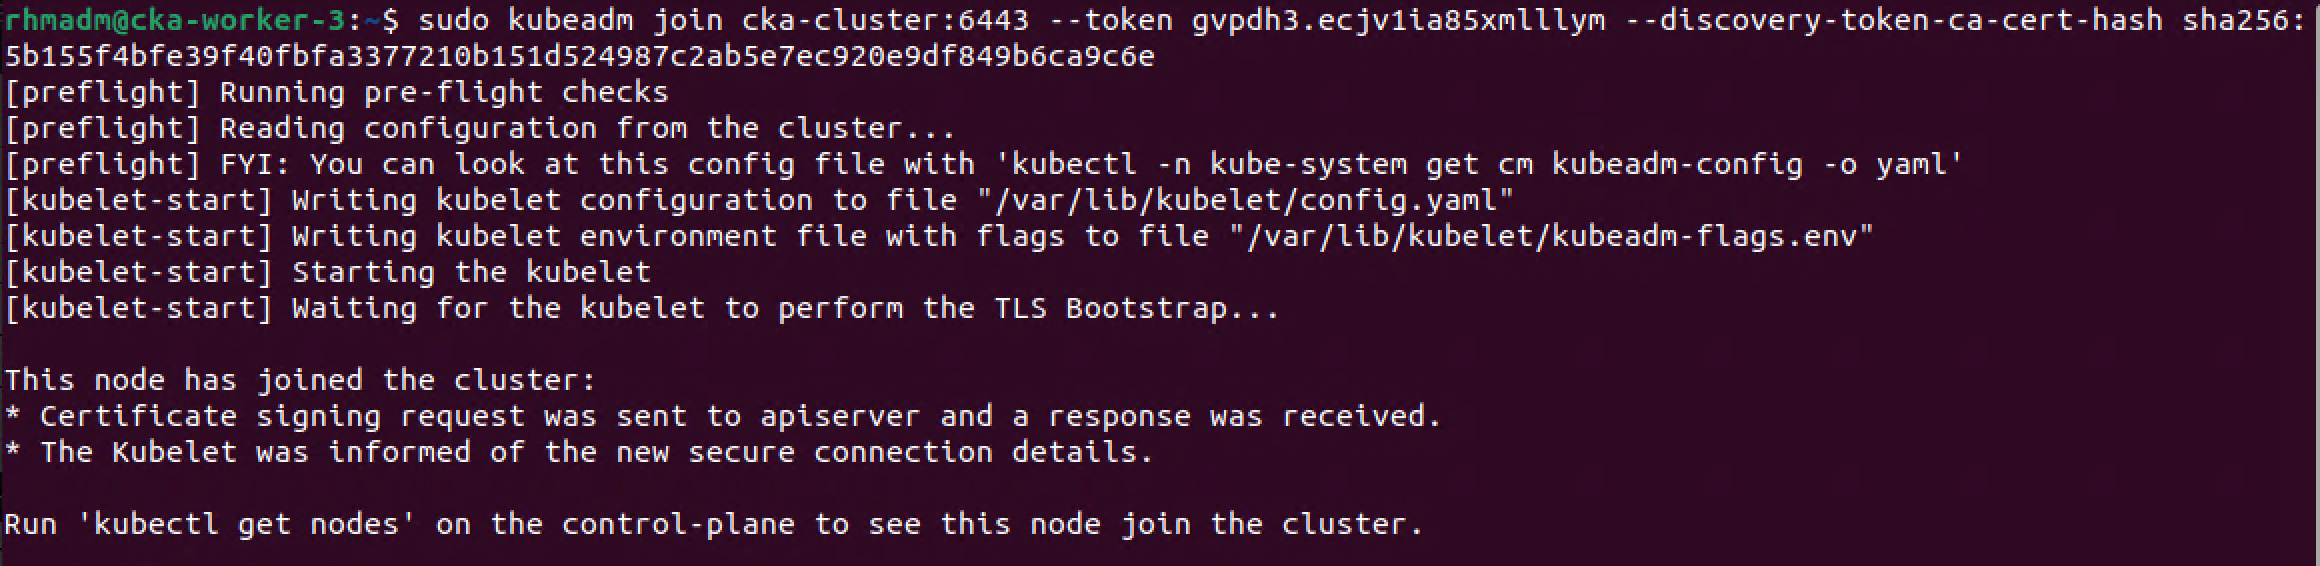
And let's verify our cluster state
1kubectl get nodes

Verify new worker
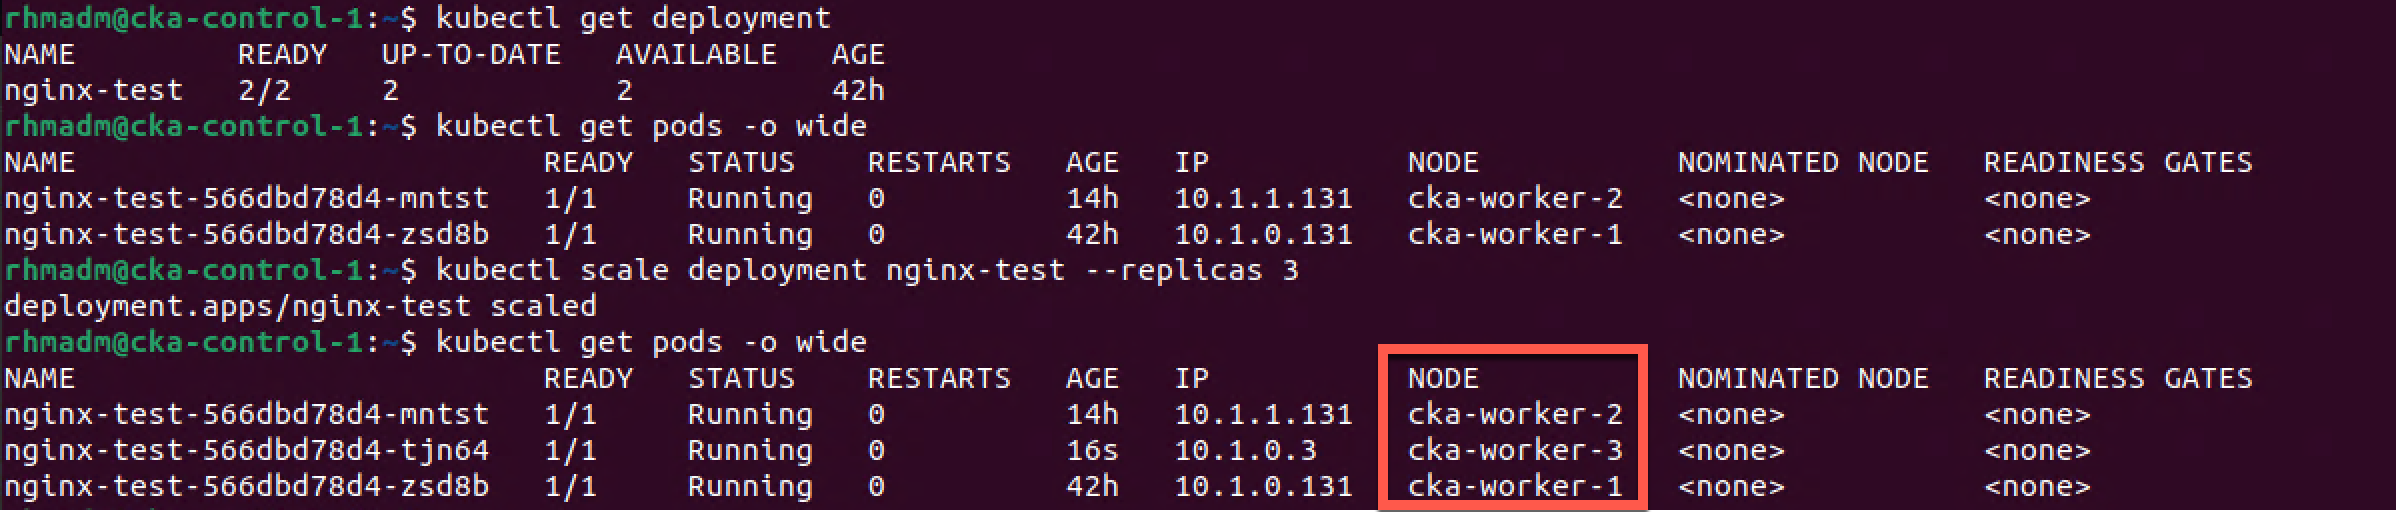
Now, let's verify that the third worker node is working by scaling our test deployment from the previous post with a third replica
1kubectl get deployment
2kubectl get pods -o wide
3kubectl scale deployment nginx-test --replicas 3
4kubectl get pods -o wide
Verify High Availability on control plane
Now, let's see if our cluster works if we shut down our initial control plane node.
We'll ping the cka-control-1 VM from our cka-control-2 VM to ensure that it's not responding
1ping cka-control-1 -c 2
Then we'll check the cluster status which will show that the cka-control-1 node is in NotReady status, but kubectl can obviously still connect to the cluster
1kubectl get nodes
We'll also check that we can get the status of our test deployment
Finally we'll stop the kubelet on the cka-control-2 node which effectively will stop Kubernetes from working on that node
1sudo systemctl stop kubelet
Still we should be able to connect to our cluster with kubectl to check the status of our nodes
1kubectl get nodes
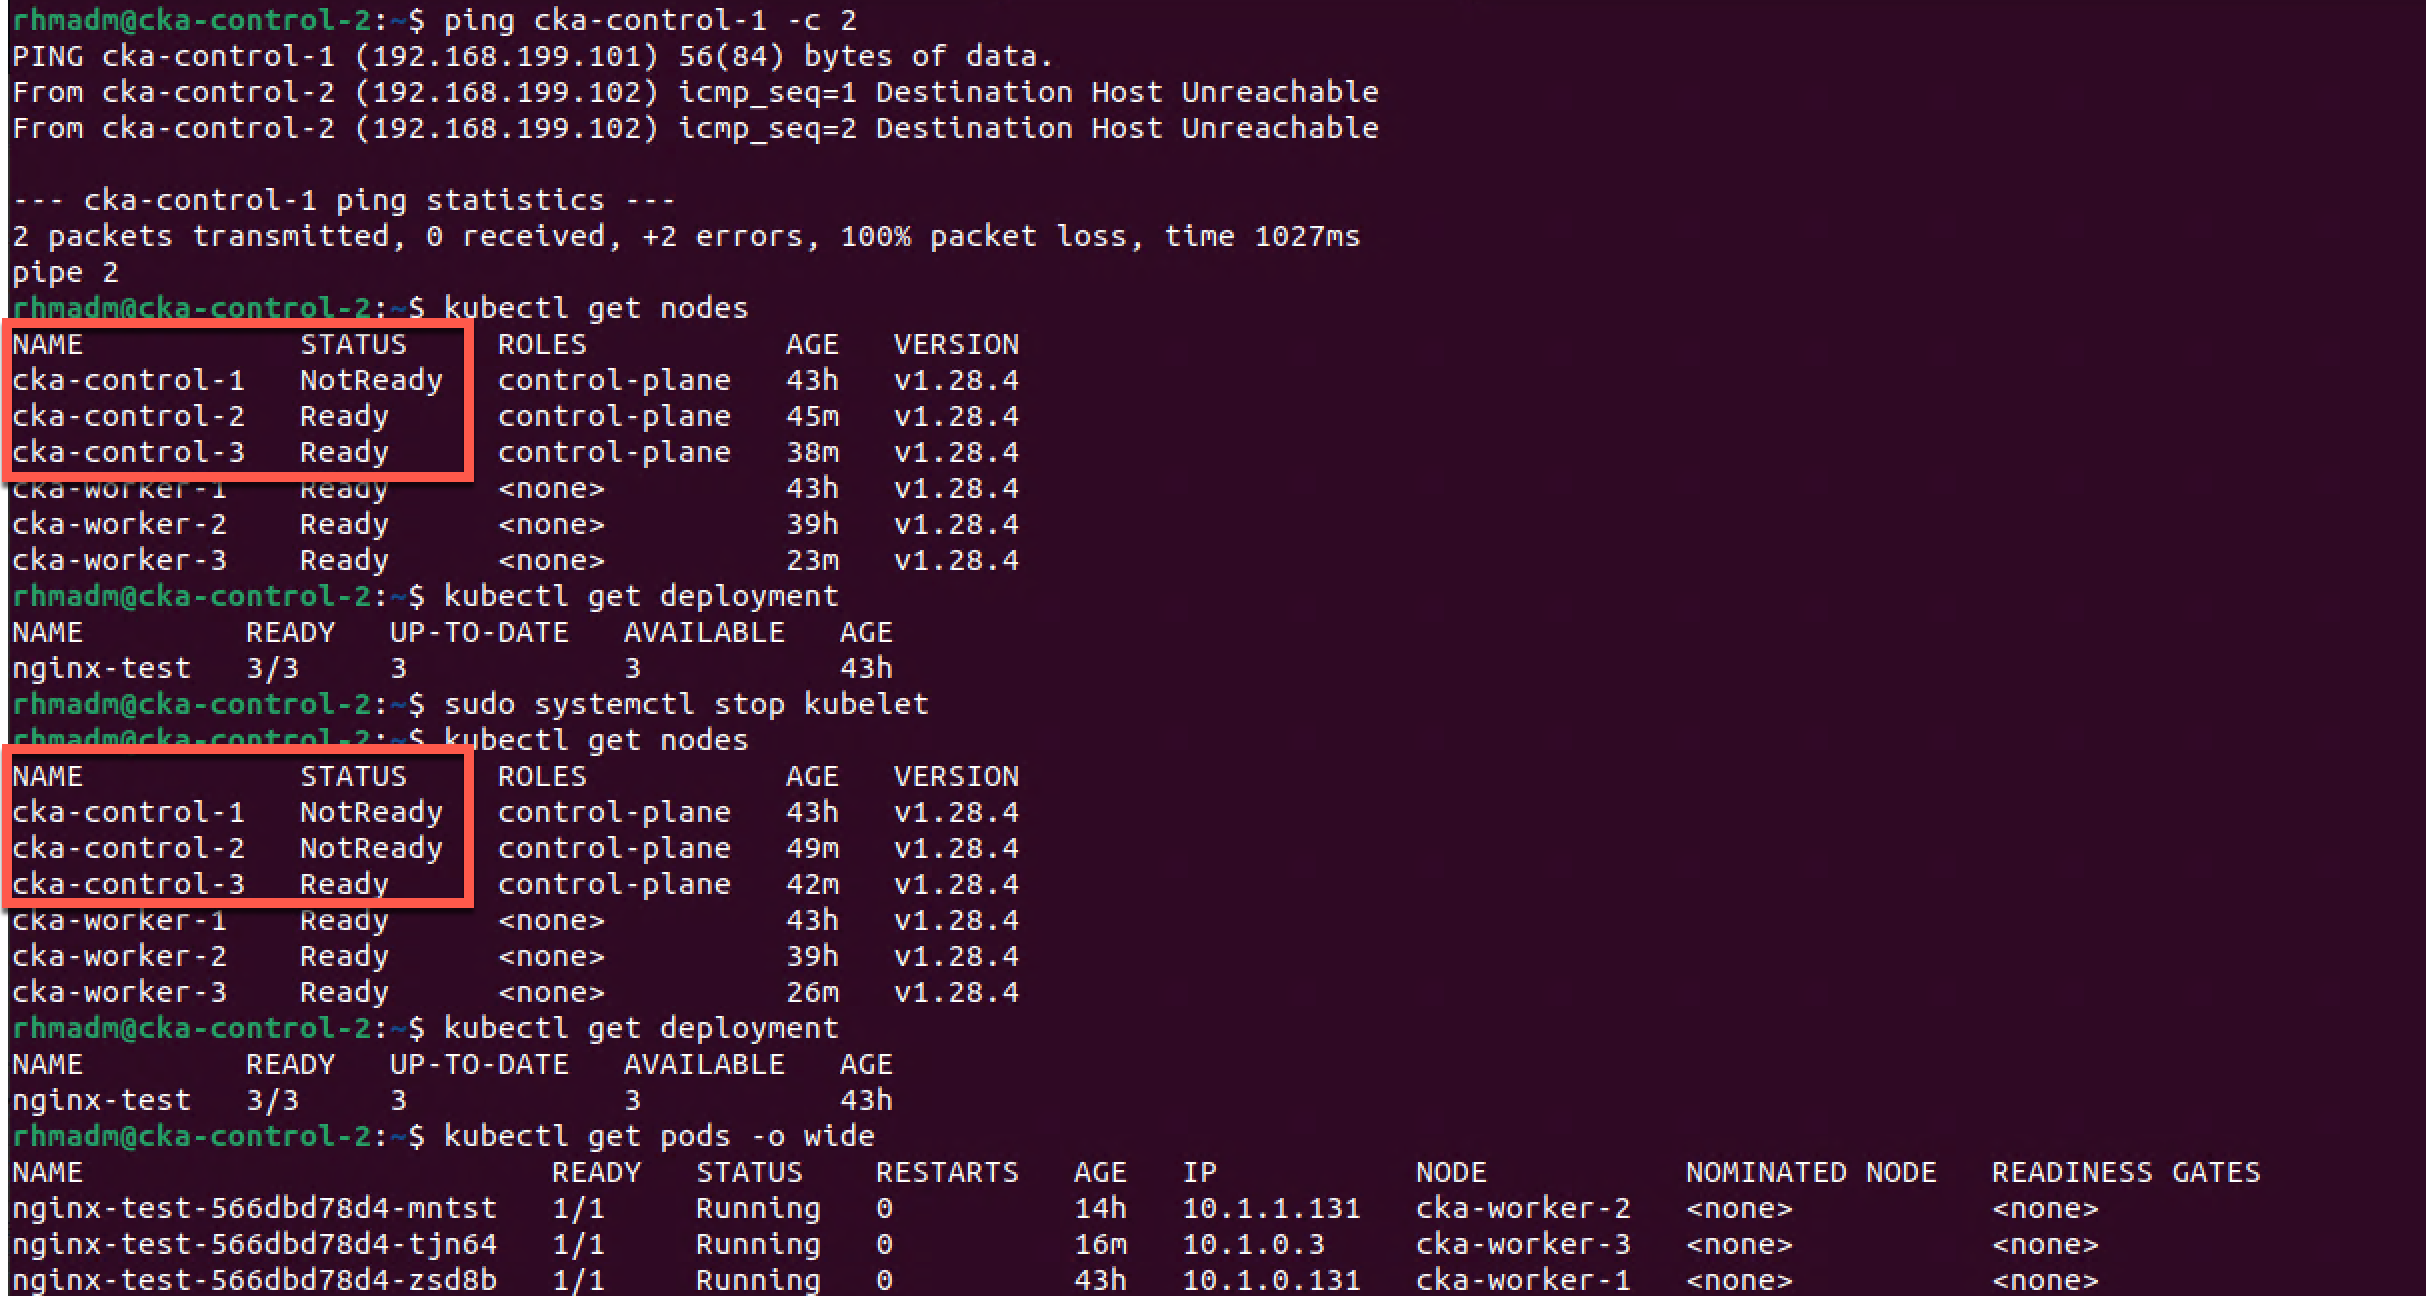
With just the one control plane node running we can still connect to the cluster and see the status of our applications.
As previously mentioned, please be aware that in our current setup we're depending on the single HAProxy VM to be running our haproxy service for the cluster to be functioning, e.g. this is a single-point-of-failure in our setup.
Summary
In this post we've seen how to scale out a Kubernetes cluster with additional control plane as well as worker nodes. Again this post is part of my preparations towards the CKA exam and not a write-up of how to set up a production ready cluster.
There's quite a few manual steps in this process which is fine when preparing for an exam and you want to really work through the setup, but in a normal environment you should look at automating this with something like Ansible or the likes.
Thanks for reading and reach out if you have any questions or comments.