Scaling Out a Kubernetes Cluster with more VM nodes
Overview
Intro
Following up on my last post where I built a Kubernetes cluster with virtual machines now the time has come to scale out the cluster with both master and worker nodes.
This post (and the previous one) is part of my study and preparation towards the Certified Kubernetes Administrator (CKA) exam where hands-on experience is key.
Update dec 2023: This post is over three years old and some things might have changed since then. An updated version of this post can be found here
A word of warning: This post should not be used for anything production and it is not a comprehensive write up of Kubernetes
The current state of the nation
In the last post we left off with a Master node and two worker nodes.
We tested the cluster by deploying a simple nginx application which we both scaled to more replicas, and we managed to access it from outside the cluster.
Scale-out the cluster
As mentioned we will add more nodes to the cluster, namely two Master nodes and one more worker node. Three masters is the recommended minimum for a production cluster to support High availability.
I have already prepared my Ubuntu VMs as part of the last post, please reference that if needed.. In short the VMs have been provisioned, and we have installed the required packages as well as the Kubernetes binaries.
Load balancer
Kubernetes documentation reference
Kubernetes haproxy configuration reference
We also provisioned a VM to act as a load balancer for our masters in the previous post. We will start of by configuring that now before installing more nodes.
The load balancer is a haproxy VM that will balance between the three masters' kube-api-server component which runs on port 6443. If you've followed the previous post the VM should be up and running and have haproxy installed so now let's go ahead and configure it.
To configure the haproxy we will open the /etc/haproxy/haproxy.cfg file
1sudo vi /etc/haproxy/haproxy.cfg
I'll use the example config from the Kubernetes GitHub repo and just modify with the correct address to my master nodes
 1# /etc/haproxy/haproxy.cfg
 2#---------------------------------------------------------------------
 3# Global settings
 4#---------------------------------------------------------------------
 5global
 6    log /dev/log local0
 7    log /dev/log local1 notice
 8    daemon
 9
10#---------------------------------------------------------------------
11# common defaults that all the 'listen' and 'backend' sections will
12# use if not designated in their block
13#---------------------------------------------------------------------
14defaults
15    mode                    http
16    log                     global
17    option                  httplog
18    option                  dontlognull
19    option http-server-close
20    option forwardfor       except 127.0.0.0/8
21    option                  redispatch
22    retries                 1
23    timeout http-request    10s
24    timeout queue           20s
25    timeout connect         5s
26    timeout client          20s
27    timeout server          20s
28    timeout http-keep-alive 10s
29    timeout check           10s
30
31#---------------------------------------------------------------------
32# apiserver frontend which proxys to the masters
33#---------------------------------------------------------------------
34frontend apiserver
35    bind *:6443
36    mode tcp
37    option tcplog
38    default_backend apiserver
39
40#---------------------------------------------------------------------
41# round robin balancing for apiserver
42#---------------------------------------------------------------------
43backend apiserver
44    option httpchk GET /healthz
45    http-check expect status 200
46    mode tcp
47    option ssl-hello-chk
48    balance     roundrobin
49        server kube-a-01 192.168.100.151:6443 check
50	    server kube-a-02 192.168.100.152:6443 check
51	    server kube-a-03 192.168.100.153:6443 check
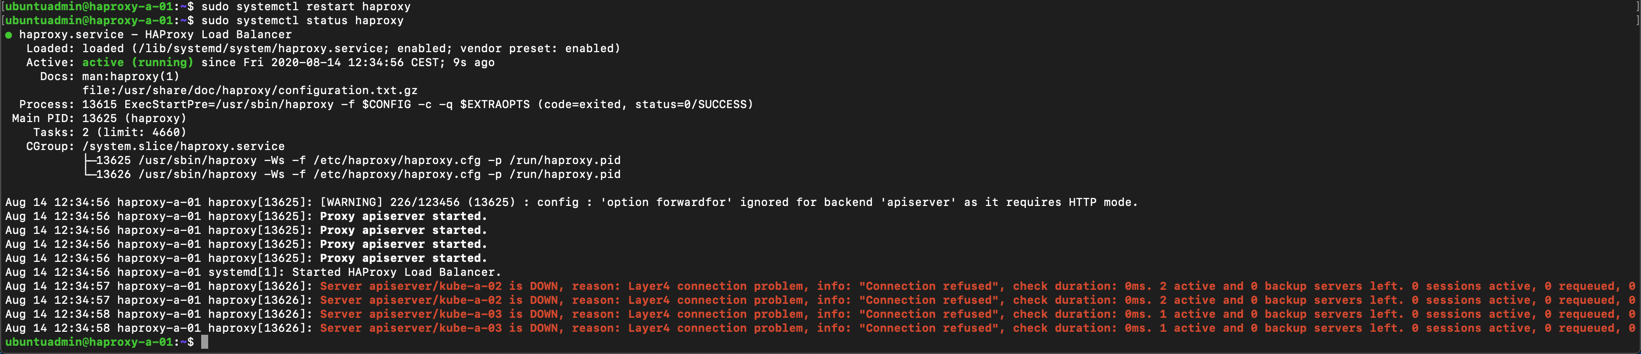
Now we'll restart the haproxy service
1sudo systemctl restart haproxy
If we run a status on the service we will get some error messages because our new nodes hasn't been installed yet
1sudo systemctl status haproxy
Now let's test that the load balancer is responding on our port

So far so good. Next step is to change the hosts file on our worker nodes to point to the new loadbalancer IP.
In the /etc/hosts file we've already added the loadbalancer IP so it's just a matter of commenting out that line (192.168.100.150 in my case), and comment the IP pointing to node 1 directly (192.168.100.151 in my case). This way we can quickly revert if anything fails
1sudo vi /etc/hosts
1192.168.100.150 kube-master
2#192.168.100.151 kube-master
Now let's verify from the node that the loadbalancer works on both IP and name
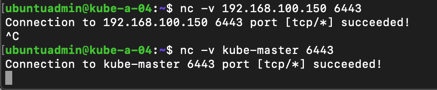
Remember to change this on all nodes
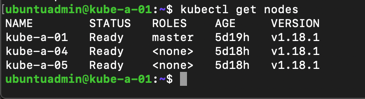
Finally we'll do a quick kubectl get nodes to see that there's no errors on our nodes
1kubectl get nodes
Add master nodes
Now we can finally add in our new master nodes!
In the previous post we installed docker and got the Kubernetes binaries. Now we'll have to run the kubeadm utility to join our nodes to the cluster.
Fetch certificate key, hash and token
Kubernetes documentation reference
As we did in the previous post, when we added the worker nodes, we need to have a token and it's certificate hash for this command. When it comes to adding more masters (control-plane) we also need the key of the control-plane certificates. This was generated when the cluster was installed, and is uploaded to the kubeadm-certs secret, but we can regenerate this key by re-uploading the certs
1sudo kubeadm init phase upload-certs --upload-certs

Let's generate a new discovery token like we did in the previous post
1sudo kubeadm token create

And fetch the certificate hash
1openssl x509 -pubkey -in /etc/kubernetes/pki/ca.crt | \
2  openssl rsa -pubin -outform der 2>/dev/null | \
3  openssl dgst -sha256 -hex | sed 's/^.* //'

Update 2020-12-30 - Print join command
I came across the --print-join-command flag to the kubeadm token create command which actually prints out the kubeadm join command for you, i.e. no need to find the certificate hash and construct the command your self (although as in a learning process it's good to know that step as well)
1sudo kubeadm token generate #We need to generate a new token
2sudo kubeadm token create <TOKEN-FROM-GENERATE-STEP> --ttl 1h --print-join-command
3#This will output the full kubeadm join command for a worker node
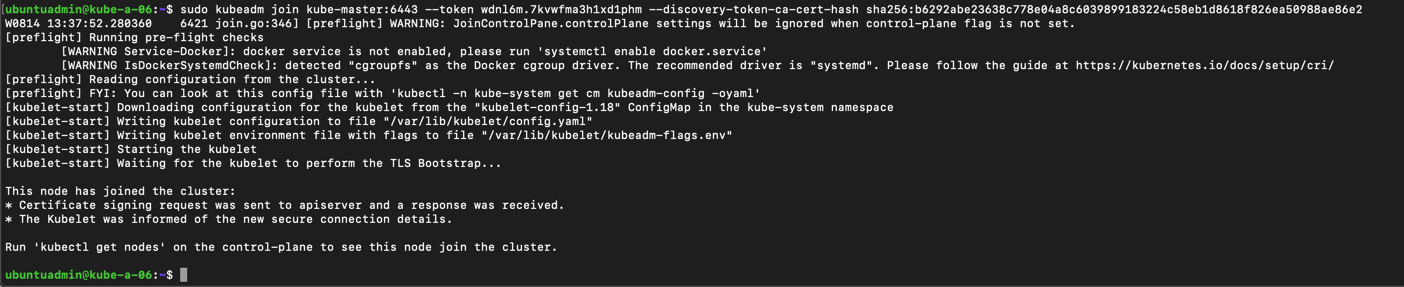
Join new node to the cluster
Now we have all we need to build our kubadm join command which we will run on our two new master nodes. Per the documentation it is supported to run this in parallel from 1.15 onwards, but since I only have two new nodes I'll run it one by one
1sudo kubeadm join <control-plane-host>:<control-plane-port> --token <token> --discovery-token-ca-cert-hash sha256:<cert hash> --control-plane --certificate-key <cert key>
Note that the difference between this join command and the one used for worker nodes is that for a new master we add the --control-plane and --certificate-key parameters

After a while the master have joined the new cluster and we get a success message

We'll run the three commands on the new master to be able to run kubectl from this node as well

Let's test that we can use kubectl from this node by checking the node status
1kubectl get nodes
Remember also to set up bash completion on your nodes
1echo 'source <(kubectl completion bash)' >>~/.bashrc
2source <(kubectl completion bash)
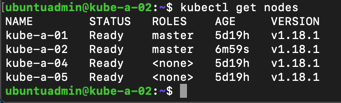
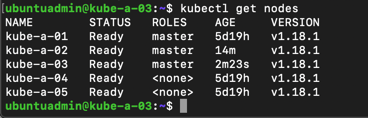
If all is good we'll replicate this on the second of our two new masters, and finally check the current status of our cluster
Add worker nodes
With those two new masters our cluster consists of three masters and two workers. Now we'll add a third worker to the cluster. The process is very similar to the process of adding masters, we just leave out the --control-plane and certificate-key parameters from the join command.
We added workers in the previous post so we'll quickly replicate that. We'll run the kubeadm join command with our new token and cert hash.
1sudo kubeadm join --token <token> <control-plane-host>:<control-plane-port> --discovery-token-ca-cert-hash sha256:<hash>
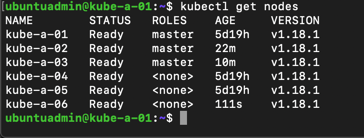
Let's check the status of our nodes with the third master
To test our new worker we'll scale up our existing nginx deployment with some new pods.

We'll add one new replica and check which nodes the pods are running on

In my example the pods are spread to all three worker nodes. I have seen that one of the nodes didn't get that third replica, but when scaling up to four replicas it got a pod. Not sure what caused that, but if you're testing, it can be wise to test scaling additional replicas to make sure.
Summary
To summarize this post we have seen how we can scale out a Kubernetes cluster with additional master and worker nodes. Again this post is part of my preparations towards the CKA exam and not a production ready cluster.
There's quite a few manual steps in this process which is fine when preparing for an exam and you want to really work through the setup, but in a normal environment you should look at automating this with something like Ansible or the likes.
For us VMware guys Mark Brookfield (@virtualhobbit) have written a blog post on how to deploy this with vRealize Automation which is something I'm planning to look at later on.
Thanks for reading and reach out if you have any questions or comments.