Revisiting ESXi Provisioning
Previously I've written some posts on how to provision ESXi hosts through PXE booting and scripts. This has worked well and we have been using this to provision lots of physical ESXi hosts. There's however a couple of drawbacks to this approach in our environment. There is some complexity involved in setting up and maintaining the server(s) needed, and in our network setup in doesn't scale very well.
I had considered using Custom ISOs previously, but stopped because of two reasons: With creating a iso image for a specific host we would need to have 350+ MB images for x hosts lying around and I can imagine that we could get in some unessecary discussions with some support engineers over using "custom" images.
Of course we can delete the images after provisioning and then not worry about the first point, but a nice benefit by only creating specific boot and ks.cfg files is that you will have the opportunity to redeploy quite easily if needed. You could come around this problem with deduplication on the storage as well as it's actually only one file that's different between the images.
These days we are in the process of creating a new platform that has little connections in to the existing one. Of course we want to be able to provision hosts unattended there as well, but with the current solution that would require a new server for DHCP/PXE services and the setup and overhead that comes with that.
After some consideration we ended up with trying the custom image route.
There are multiple articles available that describes this and related stuff. I've listed the ones I've used and would recommend checking them out:
https://www.altaro.com/vmware/scripted-deployment-esxi-part-2/
https://www.virtuallyghetto.com/2019/07/automated-esxi-installation-to-usb-using-kickstart.html (This post is for USB creation specifically, but has lots of valid pointers)
Requirements
To give a quick overview over what's needed to get this to working (nothing different from the PXE/TFTP boot approach):
An ESXi image, either the VMware standard or your hardware vendors custom image
A kickstart script (KS.CFG) where you specify the details for your host
A boot file (BOOT.CFG) that points to the kickstart script
You also need to have a way to create a iso file. More details on this to come.
Customizing files
Update 19-09-04: Please note that the cfg file names needs to be capitalized
ks.cfg
The KS.CFG has multiple supported locations and this is where we differ from the PXE boot solution. Instead of having this on a network location we will provide it directly in the image. The KS.CFG file it self is exactly the same as before and is specific to each host.
 1vmaccepteula
 2install --firstdisk=local --overwritevmfs
 3reboot
 4
 5network --bootproto=static --ip=192.168.100.11 --netmask=255.255.255.0 --gateway=192.168.100.1 --hostname=host-001 --nameserver=192.168.100.1
 6rootpw VMware1!
 7
 8%firstboot --interpreter=busybox
 9
10# enable & start SSH
11vim-cmd hostsvc/enable_ssh
12vim-cmd hostsvc/start_ssh
13
14# enable & start ESXi Shell
15vim-cmd hostsvc/enable_esx_shell
16vim-cmd hostsvc/start_esx_shell
17
18# Suppress ESXi Shell warning
19esxcli system settings advanced set -o /UserVars/SuppressShellWarning -i 1
There are lots of things that can be done in the KS.CFG file, I've written about how I built this before. Also check out the documentation if you want to get more details.
boot.cfg
So in the BOOT.CFG file we now change the kernelopt line to point to ks=cdrom://KS.CFG instead of the PXE/TFTP server. With this we now can use the same boot.cfg file for each host as the location of the ks.cfg file will be the same.
1bootstate=0
2title=Loading My very Special ESXi installer
3timeout=5
4prefix=
5kernel=/b.b00
6kernelopt=ks=cdrom:/KS.CFG
7modules=/jumpstrt.gz --- /useropts.gz --- /features.gz --- /k.b00 --- /chardevs.b00 --- /user.b00 --- /procfs.b00 --- /uc_intel.b00 --- /uc_amd.b00 --- /uc_hygon.b00 --- /vmx.v00 --- /vim.v00 --- /sb.v00 --- /s.v00 --- /ata_liba.v00 --- /ata_pata.v00 --- /ata_pata.v01 --- /ata_pata.v02 --- /ata_pata.v03 --- /ata_pata.v04 --- /ata_pata.v05 --- /ata_pata.v06 --- /ata_pata.v07 --- /block_cc.v00 --- /bnxtnet.v00 --- /bnxtroce.v00 --- /brcmfcoe.v00 --- /char_ran.v00 --- /ehci_ehc.v00 --- /elxiscsi.v00 --- /elxnet.v00 --- /hid_hid.v00 --- /i40en.v00 --- /iavmd.v00 --- /igbn.v00 --- /ima_qla4.v00 --- /ipmi_ipm.v00 --- /ipmi_ipm.v01 --- /ipmi_ipm.v02 --- /iser.v00 --- /ixgben.v00 --- /lpfc.v00 --- /lpnic.v00 --- /lsi_mr3.v00 --- /lsi_msgp.v00 --- /lsi_msgp.v01 --- /lsi_msgp.v02 --- /misc_cni.v00 --- /misc_dri.v00 --- /mtip32xx.v00 --- /ne1000.v00 --- /nenic.v00 --- /net_bnx2.v00 --- /net_bnx2.v01 --- /net_cdc_.v00 --- /net_cnic.v00 --- /net_e100.v00 --- /net_e100.v01 --- /net_enic.v00 --- /net_fcoe.v00 --- /net_forc.v00 --- /net_igb.v00 --- /net_ixgb.v00 --- /net_libf.v00 --- /net_mlx4.v00 --- /net_mlx4.v01 --- /net_nx_n.v00 --- /net_tg3.v00 --- /net_usbn.v00 --- /net_vmxn.v00 --- /nfnic.v00 --- /nhpsa.v00 --- /nmlx4_co.v00 --- /nmlx4_en.v00 --- /nmlx4_rd.v00 --- /nmlx5_co.v00 --- /nmlx5_rd.v00 --- /ntg3.v00 --- /nvme.v00 --- /nvmxnet3.v00 --- /nvmxnet3.v01 --- /ohci_usb.v00 --- /pvscsi.v00 --- /qcnic.v00 --- /qedentv.v00 --- /qfle3.v00 --- /qfle3f.v00 --- /qfle3i.v00 --- /qflge.v00 --- /sata_ahc.v00 --- /sata_ata.v00 --- /sata_sat.v00 --- /sata_sat.v01 --- /sata_sat.v02 --- /sata_sat.v03 --- /sata_sat.v04 --- /scsi_aac.v00 --- /scsi_adp.v00 --- /scsi_aic.v00 --- /scsi_bnx.v00 --- /scsi_bnx.v01 --- /scsi_fni.v00 --- /scsi_hps.v00 --- /scsi_ips.v00 --- /scsi_isc.v00 --- /scsi_lib.v00 --- /scsi_meg.v00 --- /scsi_meg.v01 --- /scsi_meg.v02 --- /scsi_mpt.v00 --- /scsi_mpt.v01 --- /scsi_mpt.v02 --- /scsi_qla.v00 --- /sfvmk.v00 --- /shim_isc.v00 --- /shim_isc.v01 --- /shim_lib.v00 --- /shim_lib.v01 --- /shim_lib.v02 --- /shim_lib.v03 --- /shim_lib.v04 --- /shim_lib.v05 --- /shim_vmk.v00 --- /shim_vmk.v01 --- /shim_vmk.v02 --- /smartpqi.v00 --- /uhci_usb.v00 --- /usb_stor.v00 --- /usbcore_.v00 --- /vmkata.v00 --- /vmkfcoe.v00 --- /vmkplexe.v00 --- /vmkusb.v00 --- /vmw_ahci.v00 --- /xhci_xhc.v00 --- /elx_esx_.v00 --- /btldr.t00 --- /esx_dvfi.v00 --- /esx_ui.v00 --- /esxupdt.v00 --- /weaselin.t00 --- /lsu_hp_h.v00 --- /lsu_inte.v00 --- /lsu_lsi_.v00 --- /lsu_lsi_.v01 --- /lsu_lsi_.v02 --- /lsu_lsi_.v03 --- /lsu_lsi_.v04 --- /lsu_smar.v00 --- /native_m.v00 --- /qlnative.v00 --- /rste.v00 --- /vmware_e.v00 --- /vsan.v00 --- /vsanheal.v00 --- /vsanmgmt.v00 --- /tools.t00 --- /xorg.v00 --- /imgdb.tgz --- /imgpayld.tgz
8build=
9updated=0
Create a custom iso
We have an ESXi image, a ks.cfg file and a BOOT.CFG where we've specified the boot process to use the ks.cfg file. To put this together we need to use a 3rd-party iso creator tool. This differs between operating systems, there are multiple different applications available.
On Windows I have tested the evaluation version of UltraISO, on Linux you can use something like makeisofs (this is used in the link above from VMware Docs).
The location of your customized BOOT.CFG differs a bit based on if you want to use legacy BIOS boot (SYSLINUX) or UEFI boot. The ks.cfg should reside in the root in both cases.
Legacy BIOS: Replace the BOOT.CFG file in the root of the image
UEFI: Replace the BOOT.CFG file in the \EFI\BOOT folder on the image
I have seen multiple posts (including my own) specifying that you need to copy that BOOT.CFG file to both locations, as well as saving a copy of the BOOTx64.efi to mboot.efi in the root of the image. However as far as I've tested there's only need for copying BOOT.CFG to the specific location described above if you won't need to support both Legacy and UEFI boot. Of course, if you want to support both you need to replace both places.
In UltraISO you open the ESXi image (File->Open), then you copy your customized ks.cfg and BOOT.CFG file to their locations (see above). In this example I'm creating an image for UEFI boot.
\
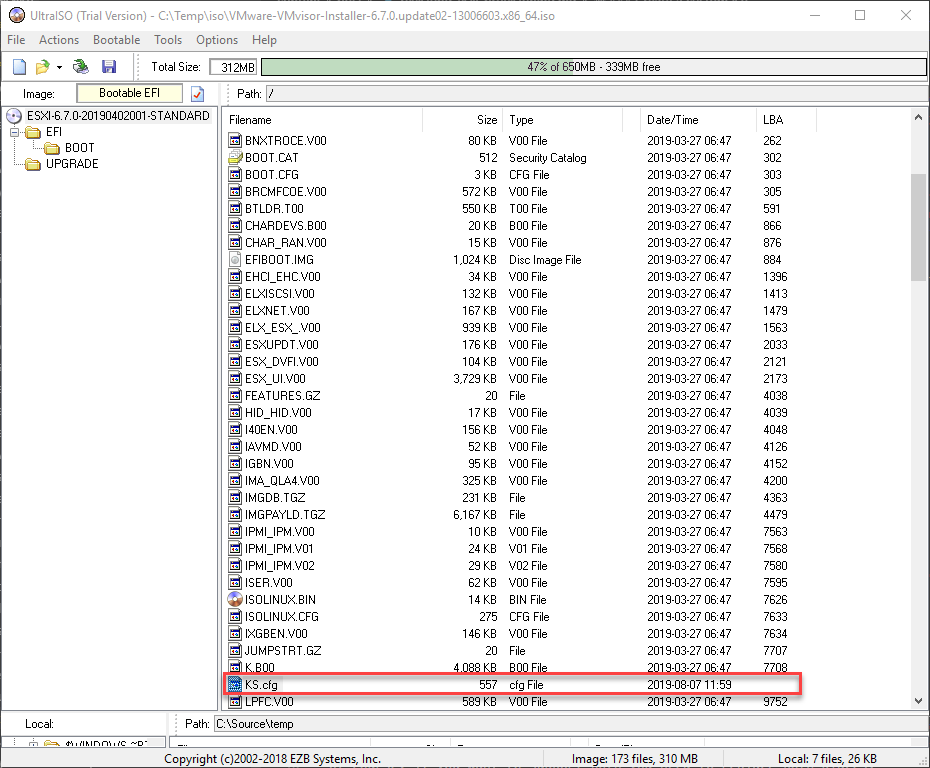
Open ISO and add ks.cfg
\
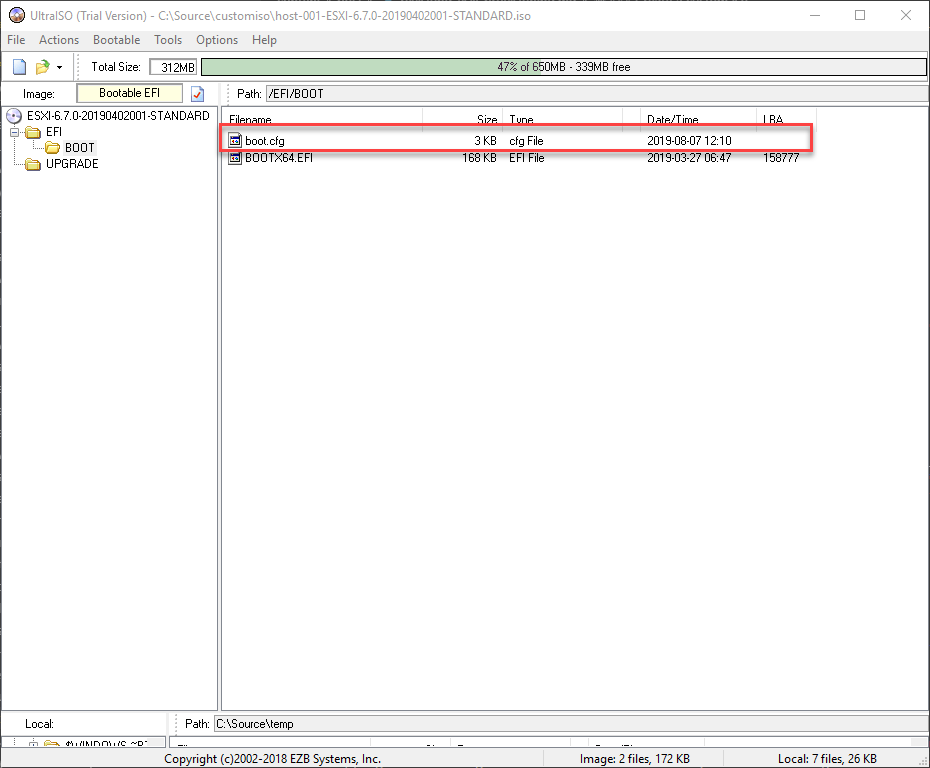
Add BOOT.CFG, verify where you need to put it
\
With this in place we can save (File->Save as) the image to create our own custom image tailored to our host.
\
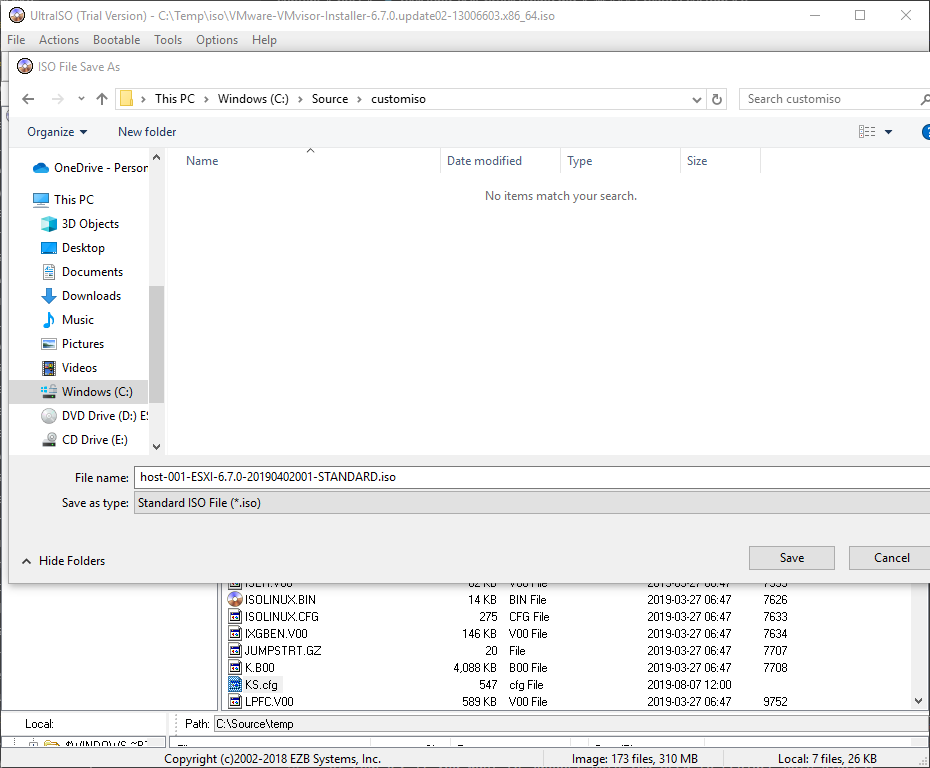
Save new ISO
\
The nice thing with UltraISO is that you can perform these steps from the command line as well. Note that I am copying the boot.cfg file to \EFI\BOOT and that you need to navigate to the folder and provide the directory separators in "the Linux way".
\

Create ISO via command line
\
We can now hook this up to our host, boot it up and see the magic happen
\
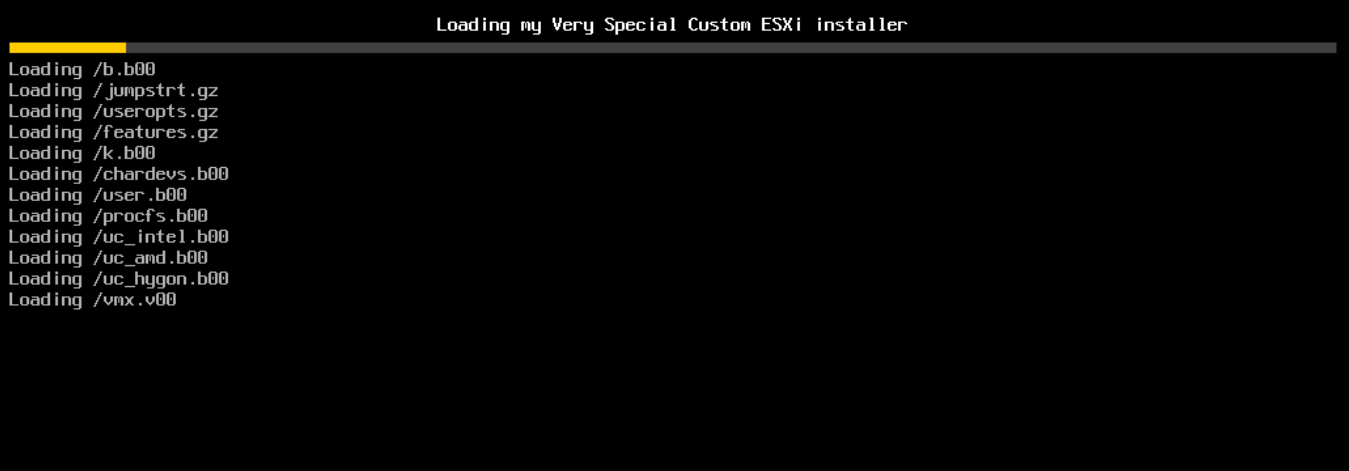
Installer starting, note the title
\
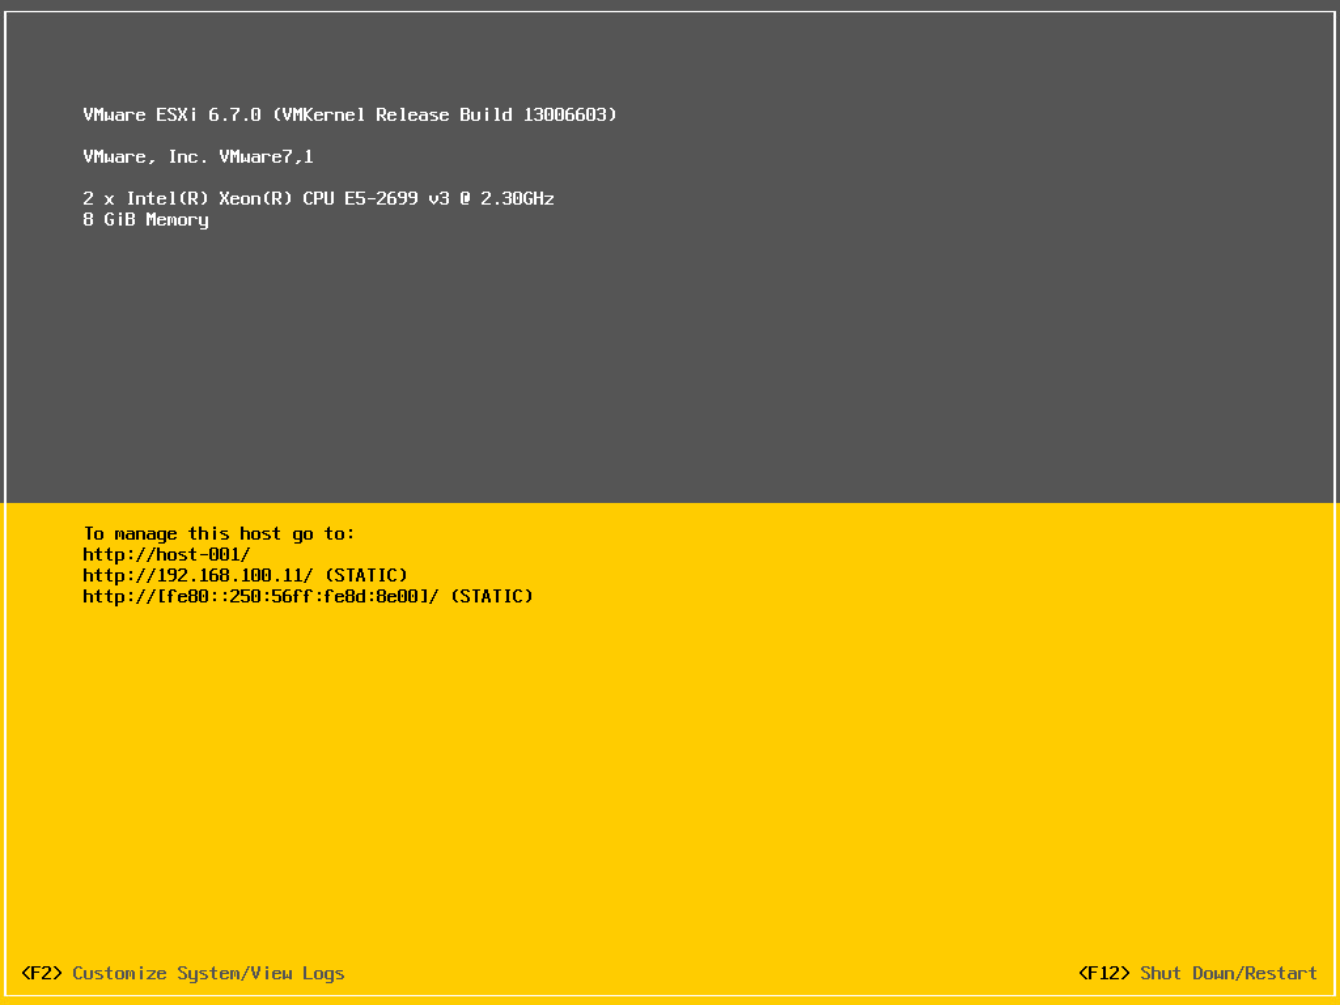
Installer finished, note hostname and IP
Summary
This post has shown how you can create your own custom ISO image with customization scripts that sets the correct IP, host name etc on your ESXi host without any user interaction. Note that I've used the standard VMware ESXi image, but you can use your vendor specific images as well or you might want to add some patches, vibs etc.
As this post and my other posts on the same subject also shows that there are multiple ways to accomplishing the same. I hope the content can help you in selecting the best approach for your specific environment and needs. Feel free to reach out if you have any questions, either on Twitter or by email info[at]rudimartinsen.com