CKA Study notes - Daemon Sets vs Replica Sets vs Deployments - 2024 edition
Overview
This will post will be part of my Certified Kubernetes Administrator series and will cover the concepts of Pods, Daemon Sets, Replica sets and Deployments, and the differences between them.
This is an updated version of a similar post I created around three years ago.
Note #1: All documentation references are pointing to version 1.28 as this is the current version of the CKA exam.
Note #2: This is a post covering my study notes preparing for the CKA exam and reflects my understanding of the topic, and what I have focused on during my preparations.
Concepts
Kubernetes Documentation reference
Pods
We have Pods which is the smallest component Kubernetes schedules. A pod can consist of one or more containers. Pods can be part of a Daemon Set or a Replica Set which can control how and where they are run (more on this later in this post). Pods and Replica Sets can be a part of a Deployment.
Note that even though we say a Pod "can be a part of" or "exist in" or even "controlled by" they are actually their own master and can live on their own. You can create a Pod without a Daemon-/Replicaset or a Deployment and you can even delete one of the latter without deleting the pods they previously managed.
A Pod is connected to a Daemon-/Replicaset or a Deployment by matching on its selectors.
Both Daemon Sets, Replica Sets and Deployments are declarative, meaning that you describe how you want things to be (e.g. I want a Replica set containing two of these Pods), Kubernetes will make it happen (e.g. deploy two Pods matching the PodTemplate in the specified Replica set)
A big note on running Pods outside of Replica Sets and Deployments. Although you can run Pods outside of RS or Deployment, in most cases you'd want to run them through those higher level concepts which are managed by controllers. Reasons for this would be self-healing, scaling and more.
A Pod can also be started with a Job. A Job is a task that runs a pod until it completes. We can also create a CronJob which runs the same Job according to a schedule.
A Pod can be scheduled with the Pod manifest
 1apiVersion: v1
 2kind: Pod
 3metadata:
 4  name: nginx
 5spec:
 6  containers:
 7  - name: nginx
 8    image: nginx:1.25.3
 9    ports:
10    - containerPort: 80
This Pod manifest specifies the kind of resource (Pod), some metadata labels (name: nginx), and the specification for what should be running inside the Pod. In this example one container based on the nginx:1.25.3 image, and the container should expose port 80 outside of the Pod.
A Pod can also run multiple containers, and this is often the case in some real-world applications. Reasons for this might be separation of concern, for example that one container can serve a web page, while another container could be responsible for synchronizing the HTML that the web container should serve. This sync container is often referred to as a Sidecar container.
Note that the containers inside the same Pod share resources and the runtime environment, e.g. Volumes, IP Address etc.
Daemon sets
Kubernetes Documentation Reference
A Daemon set is a way to ensure that a Pod is present on a defined set of Nodes. Oftentimes that will probably mean all of your nodes, but it could also be just a subset of nodes.
Typical usecases might include running a Pod for log collection on all nodes or a monitoring pod. Or maybe you have different hardware configuration on your nodes and you want to make that available to a specific set of pods, e.g. GPUs, flash disks etc
A Daemon set will automatically spin up a Pod on a Node missing an instance of said Pod. E.g. if you are scaling out a cluster with a new node.
To run a Pod only on a select set of nodes we use the nodeSelector or the affinity parameters. reference
To see an example of a Daemon set we can check our default kube-system namespace
1kubectl -n kube-system get daemonsets

The kube-proxy is running pods in a Daemon set. In the example above we can se that the Node selector is selecting Linux based hosts.
We can verify this by checking the Daemon set spec
1kubectl -n kube-system describe daemonset/kube-proxy

Here we can see that the NodeSelector is infact the one we saw from the kubectl -n kube-system get daemonsets output. Also notice that the daemon set keeps track of both the desired number of nodes and the current status.
Let's check the config of one of our nodes to check it's labels
1kubectl describe node cka-control-3

Here we can verify that this node in fact has a label matching the NodeSelector used in the Daemon set config
From the Daemon set config we also saw the label used for the Pods so let's try to check which nodes the pods are running on. We'll use that label we found to filter the output
1kubectl -n kube-system get pods -l k8s-app=kube-proxy -o wide

As we can see there's one kube-proxy Pod running on each node
Replica sets
Kubernetes Documentation Reference
The Replica set controller is used to ensure that a specific set of Pods is running at all times. Kind of like a watch dog.
The Replica set can contain one or more pods and each pod can have one or more instances. Meaning you can create a Replica set containing only one Pod specifying to run only one instance of that Pod. The use case for this is that the Replica set will ensure that this one Pod always runs, and it also enables scaling mechanisms if you later on need to scale out that pod.
As mentioned previously a Pod can be added to a Replica set after its creation (you can create the Pod first and have a new Replica set "discover" the Pod), the Replica set will find its pods through the selector
Normally you'll not create Replica Sets yourself, this is done through a Deployment
Deployments
Kubernetes Documentation Reference
Finally let's look at Deployments.
In newer versions of Kubernetes a Deploymentis the preferred way to manage pods. A Deployment actually uses Replica Sets to orchestrate the Pod lifecycle. Meaning that instead of manually creating Replica Sets you should be using Deployments.
Deployments adds [to a replica set] the ability to do rolling updates and rollback functionality amongst other things.
Let's see a few quick examples
Working with Deployments
Create a deployment
Kubernetes Documentation reference
First we'll verify that there's no Deployments or Replica sets in our default namespace. Then we'll create a Deployment and see what happens
1kubectl get replicasets
2kubectl get deployments
3
4kubectl create deployment nginx-test --image=nginx:1.24-alpine
5
6kubectl get deployments
7kubectl get replicasets
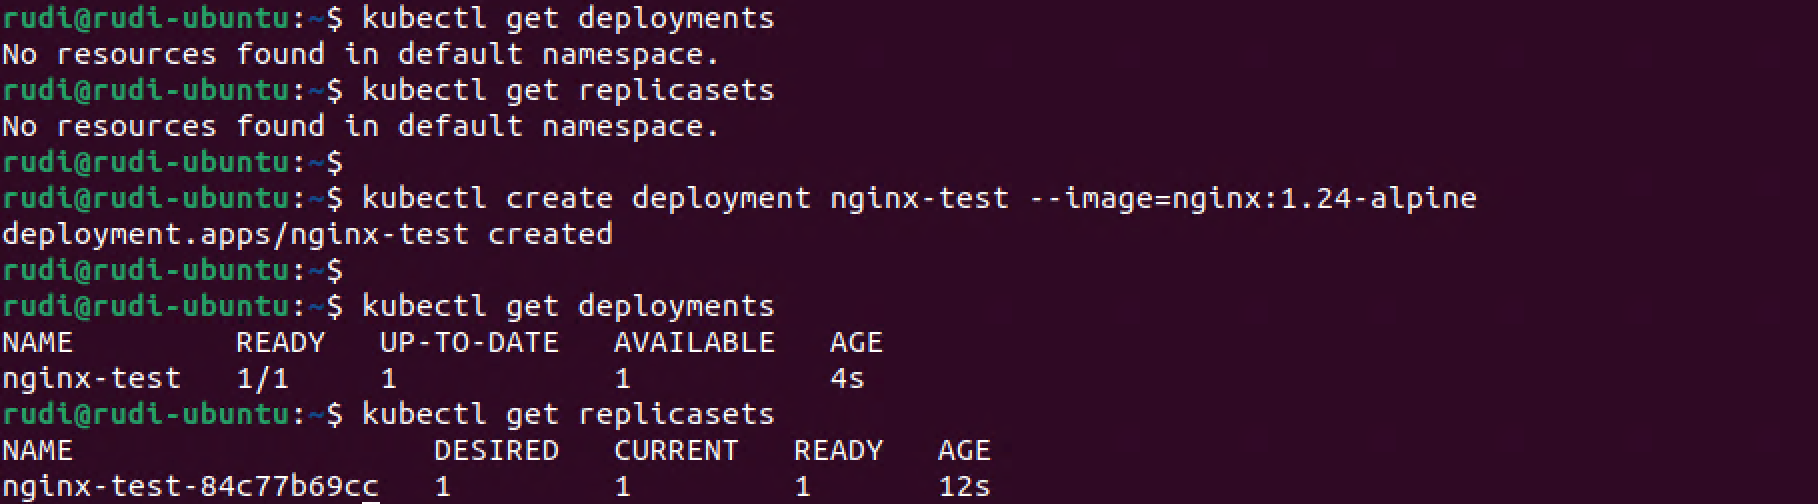
From this we can see that our new Deployment actually created a Replica set and we have one Pod running with the specified Nginx image!
Scale a deployment
Kubernetes Documentation reference
Now let's scale up the deployment to 6 replicas
1kubectl scale deployment/nginx-test --replicas=6
2
3kubectl get deployments
4kubectl get replicasets
5kubectl get pods -o wide
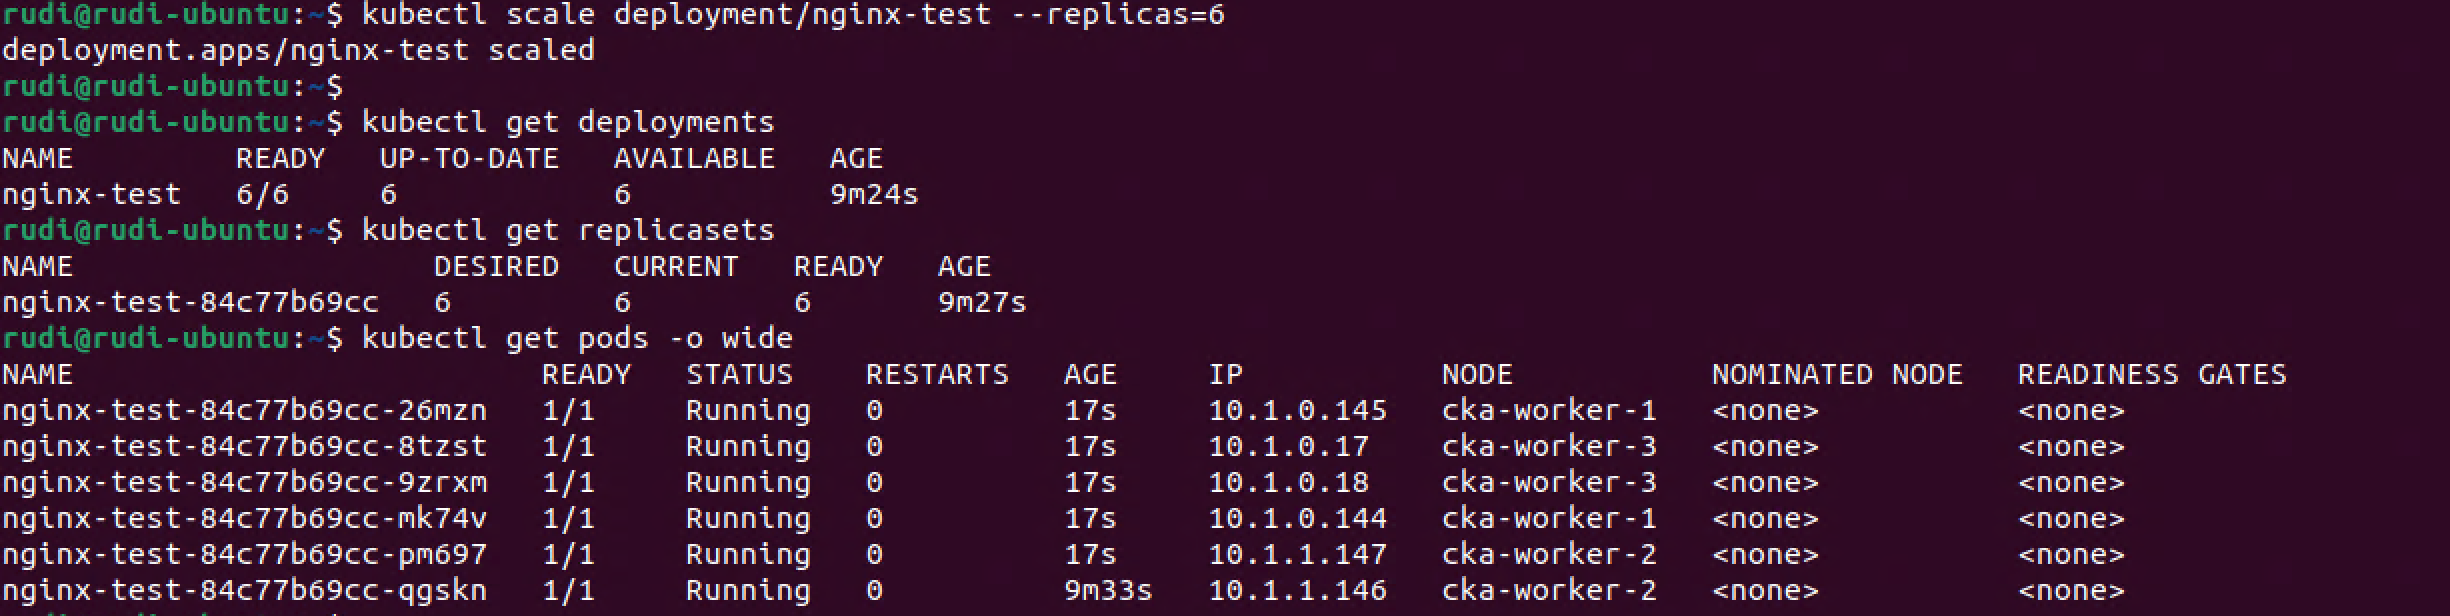
Nice. We have scaled up our deployment and that instructed the replica set to provision five more pods. We also notice that these are spread evenly with two pods on each of our three worker nodes.
We can just as easily scale down the deployment
1kubectl scale deployment/nginx-test --replicas=3
2
3kubectl get deployments
4kubectl get replicasets
5kubectl get pods -o wide

Note that now there's three replicas of my pod. Actually there's two pods running on one of my workers, and one on a second worker, but none on the third worker. This proves that the Kubernetes scheduler doesn't schedule just based on amount of Pods on a node. Instead it looks at utilization and so forth.
There's more scaling options available in a Deployment, both Autoscaling and Proportional scaling. Check the documentation for more
Now let's take a quick look at updates and finally rollbacks, but first let's quickly discuss Pod selection
A note on Pod selection
As previously mentioned a Pod is managed by a Replica set [and a Deployment] through selectors.
Let's start with the Deployment
1kubectl describe deployment nginx-test
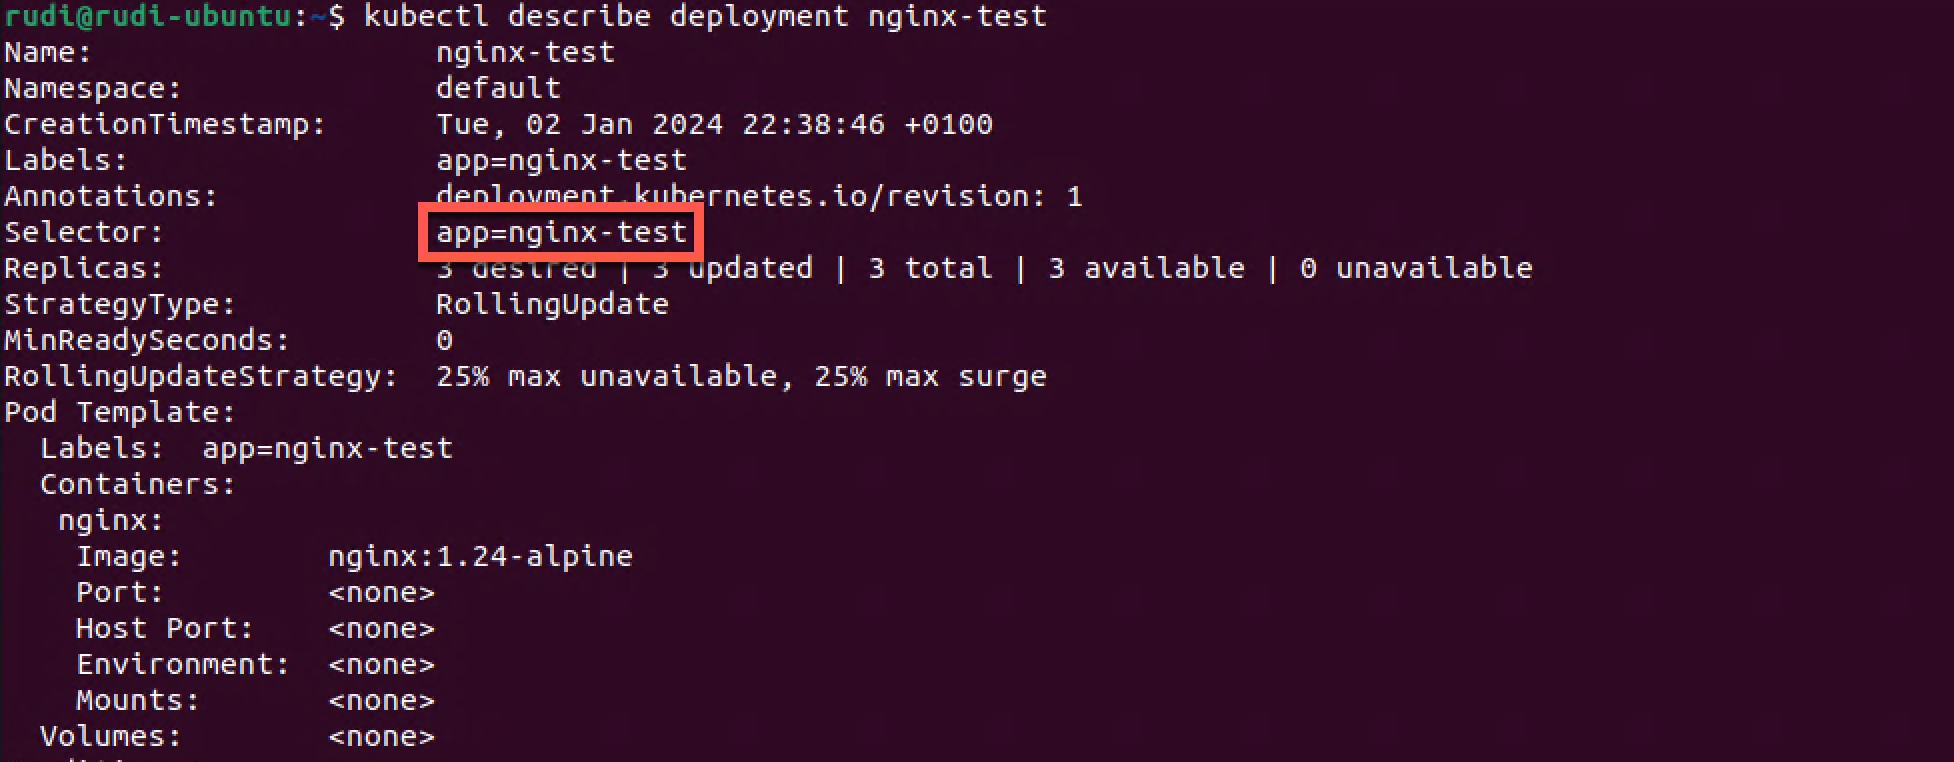
Our Deployment has a selector of app=nginx-test
Now, let's check the Replica Set
1kubectl describe replicaset nginx-test
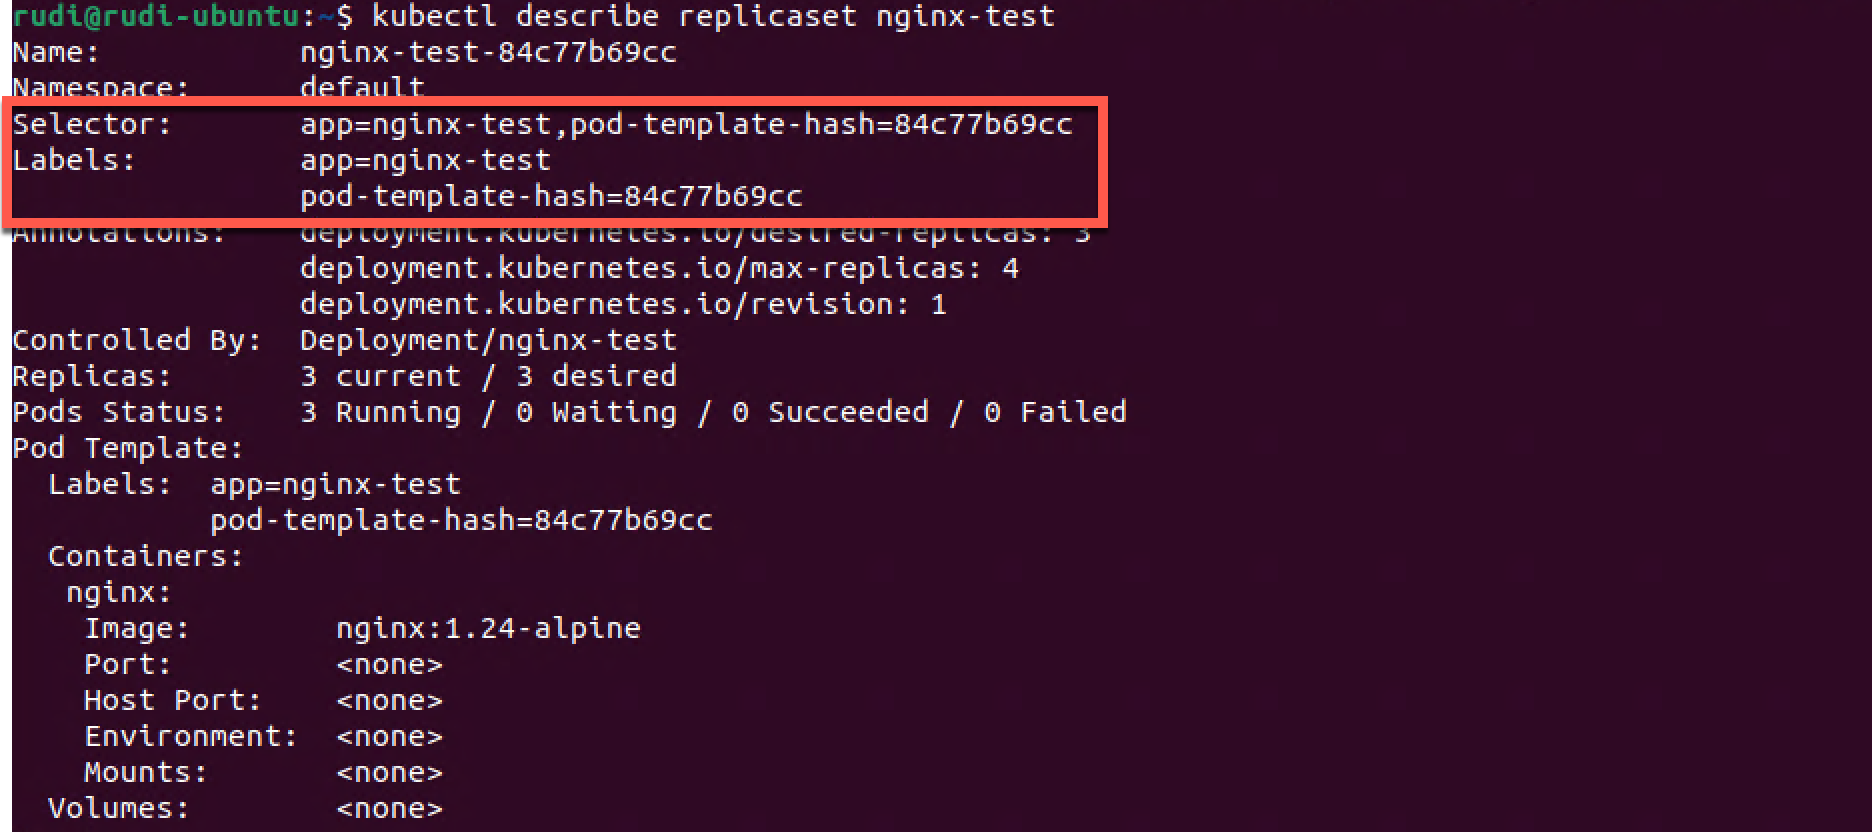
The Replica Set has a corresponding label of app=nginx-test. It has it's own selector, in fact it has two, app=nginx-test and pod-template-hash=84c77b69cc.
The pod-template-hash is created to prevent us from accidentaly create a pod with the same selector and be added to the Replica set.
So, let's finally check one of the Pods
1kubectl describe pod nginx-test-84c77b69cc-qgskn
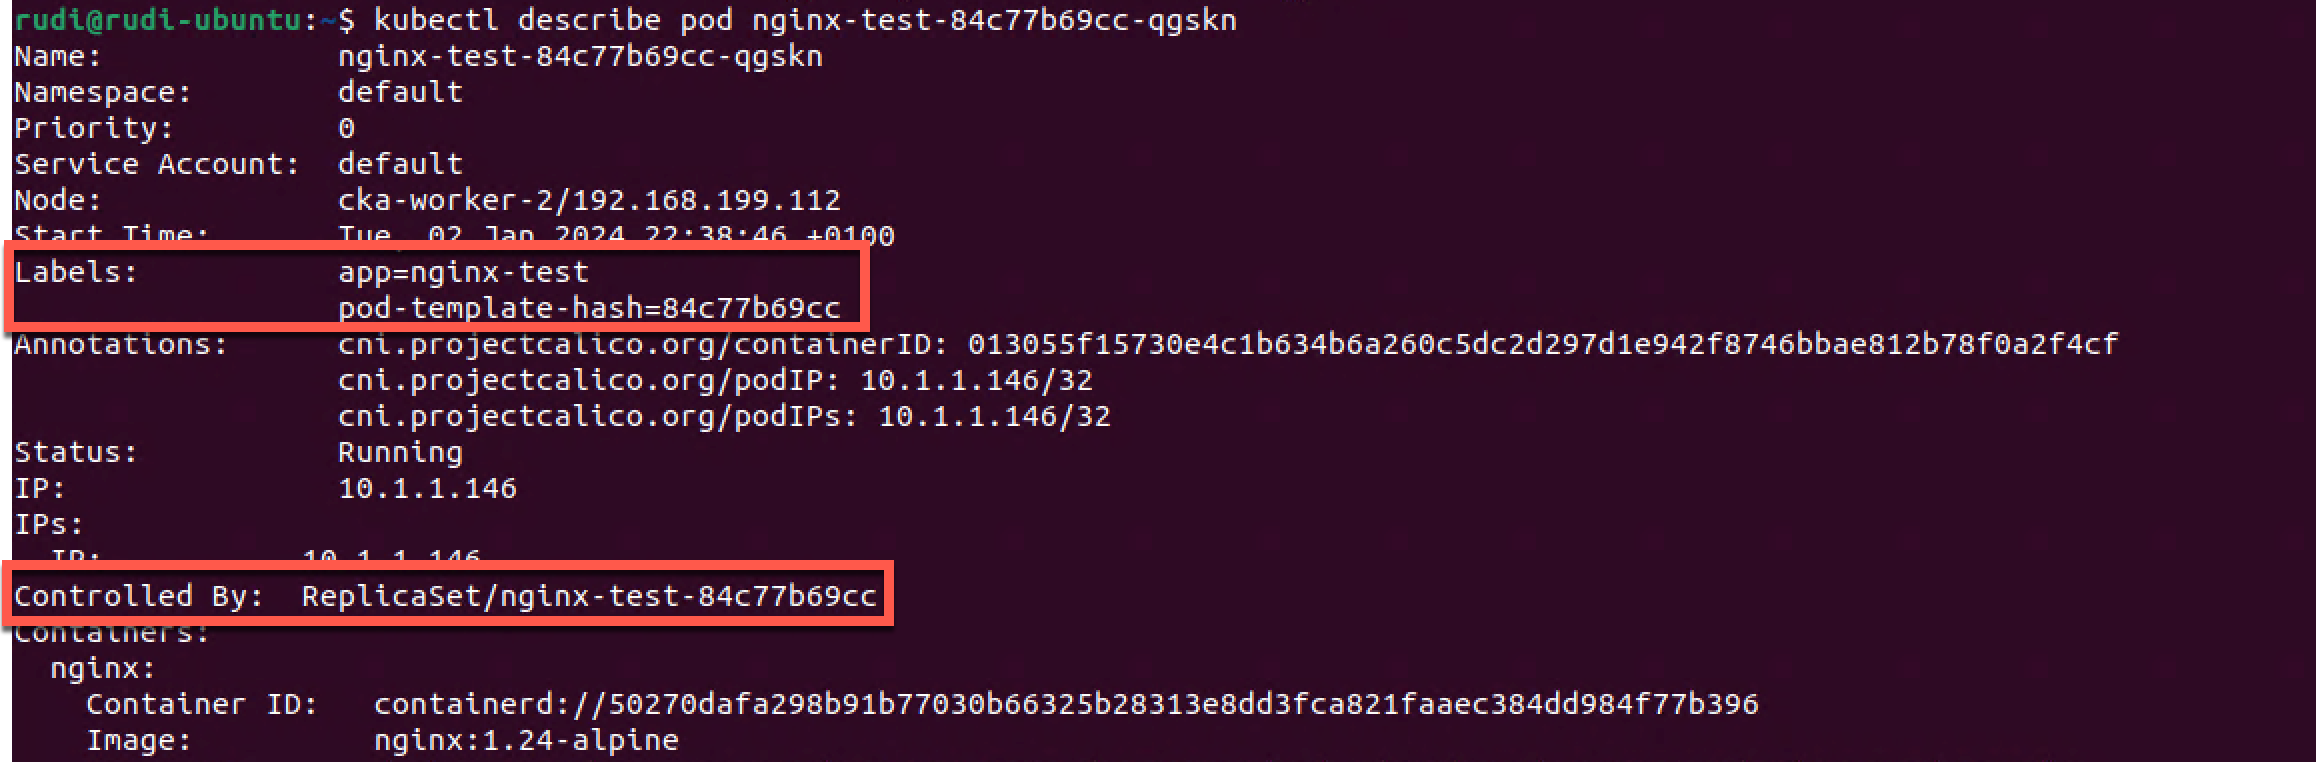
Here we can see that the Pod has two labels, both matching the selector from the Replica Set. We also notice that there's a Controlled By field in the Pod details which refers to the Replica set
Update a deployment
Kubernetes Documentation reference
Now, let's change the nginx image version used from 1.24-alpine to 1.25.0-alpines
1kubectl set image deployment/nginx-test nginx=nginx:1.25.0-alpine
Let's also check the status of our deployment
1kubectl get deployments
2kubectl get repliasets
3kubectl rollout status deployment nginx-test

Interestingly we notice that our deployment looks the same at first sight (Age is 21m). We verify the rollout status which says it's finished. When we then look at the Replica set we can see that it was actually deployed a new Replica set, and we notice that the two Replica sets have different Pod template hashes.
Let's check one of the pods just to make sure the new image is used
1kubectl get pods -o wide
2kubectl describe pod nginx-test-7f857b6796-nrmwq
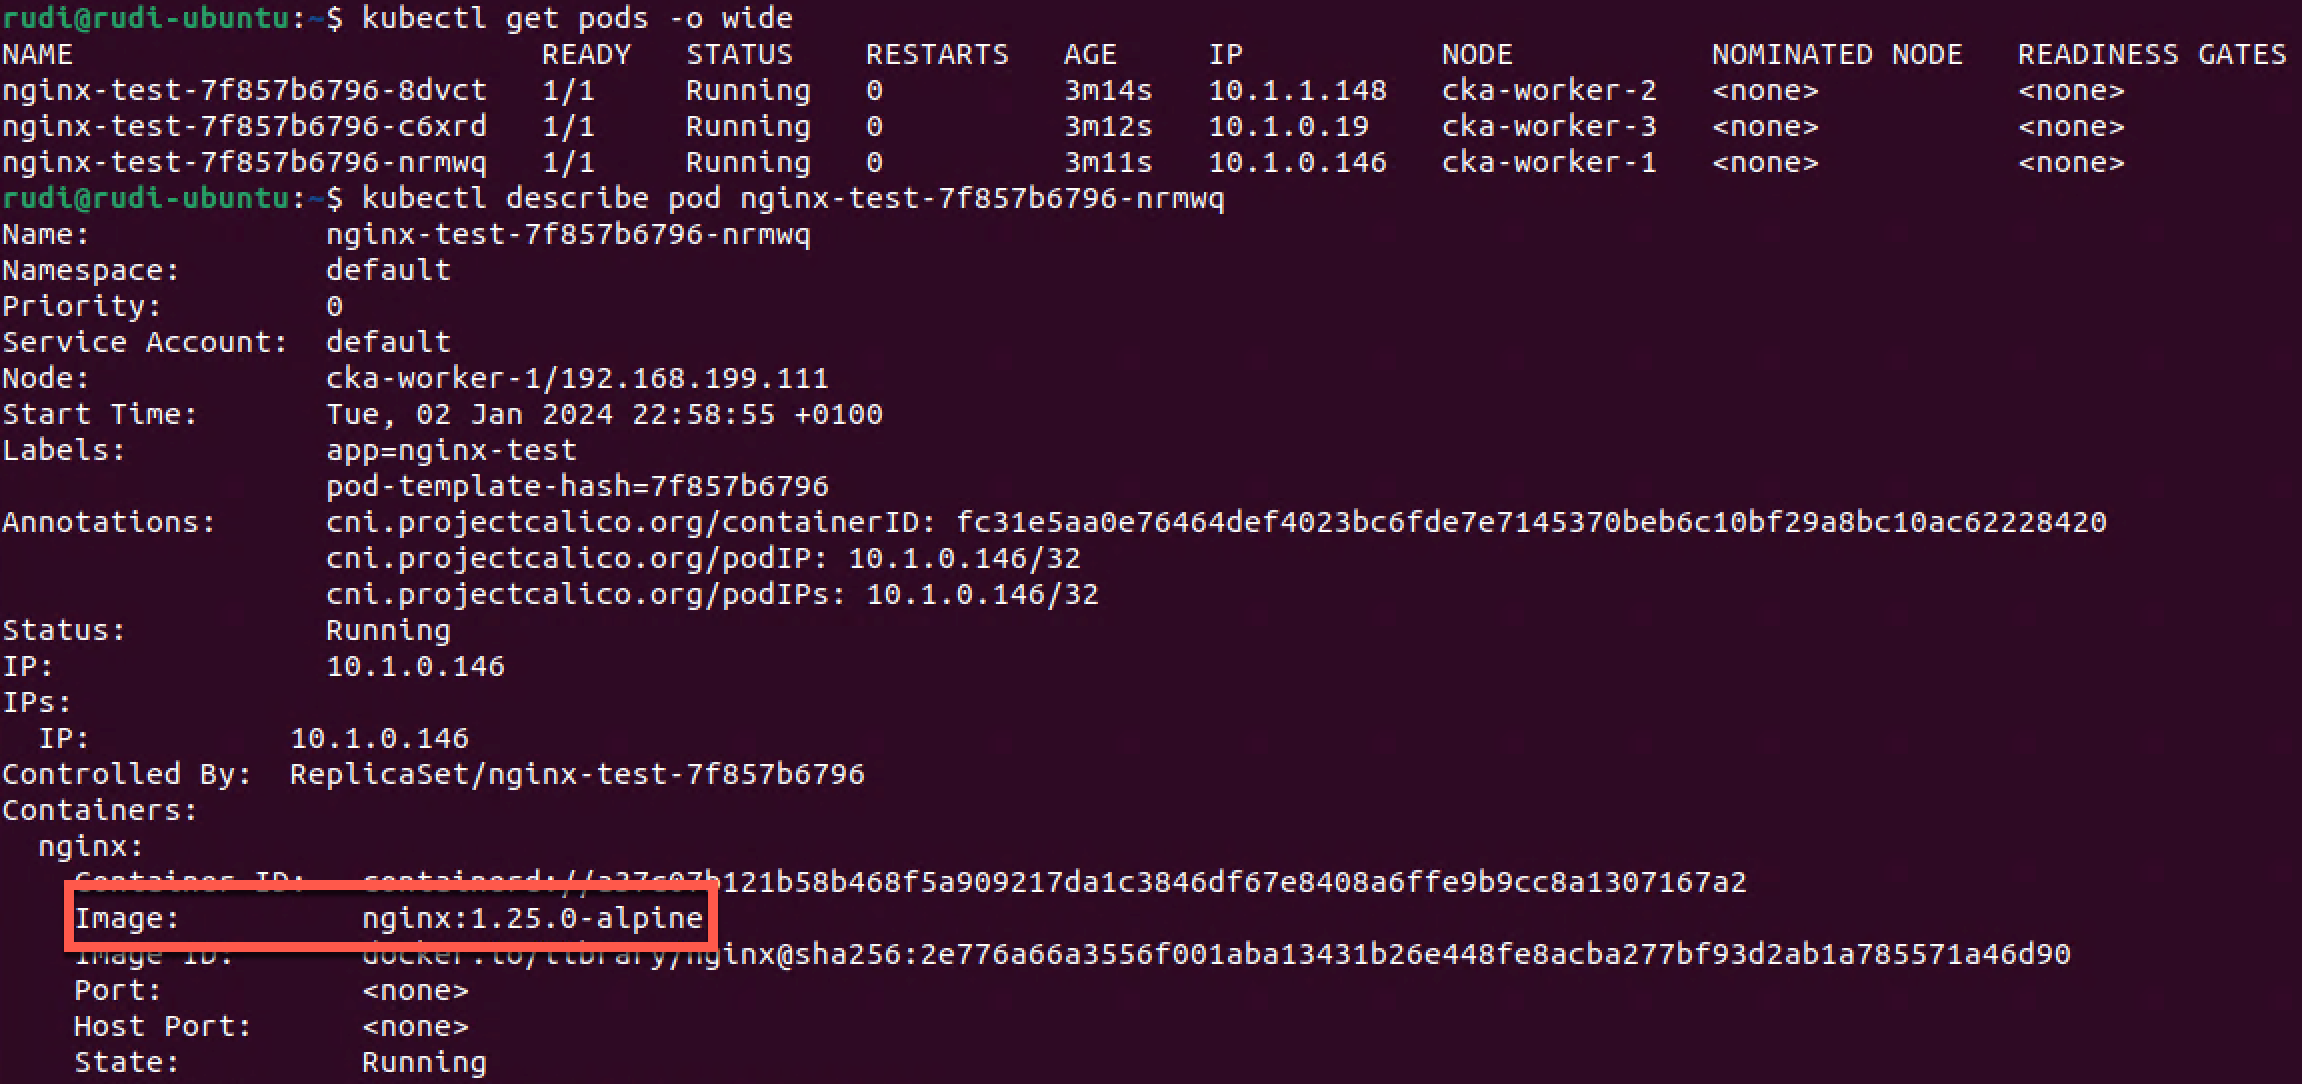
We see that we have three Pods all with the same Pod template hash. We also check one of them to verify that we're now using the new version of the image.
Rollback a deployment
Kubernetes documentation reference
So, let's say that this version broke something in our application and we need to roll back to the previous version.
First let's check the rollout history
1kubectl rollout history deployment nginx-test

Previously we could add the --record parameter to the command that updated the image but this is now deprecated. I'm not quite sure what is the best practice now, but there is a way to update the change-cause column by setting the annotations of the Deployment.
1kubectl annotate deployment/nginx-test kubernetes.io/change-cause="update image version to nginx:1.25.0-alpine"
2kubectl rollout history deployment nginx-test

Normally we won't update deployments by changing the image version with that
kubectl set imagecommand. The best practice would be to update theDeploymentspec in a yaml file which is controlled by a source control system. This would also make it possible to take advantage of GitOps and solutions like ArgoCD
Now if I want to rollback to the previous verson I'll run the rollout undo command. Note that we could also specify a specific revision with the --to-revision flag
1kubectl rollout undo deployment nginx-test

Let's take a closer look at what happened
1kubectl rollout history deployment nginx-test
2kubectl get deployments
3kubectl get replicasets
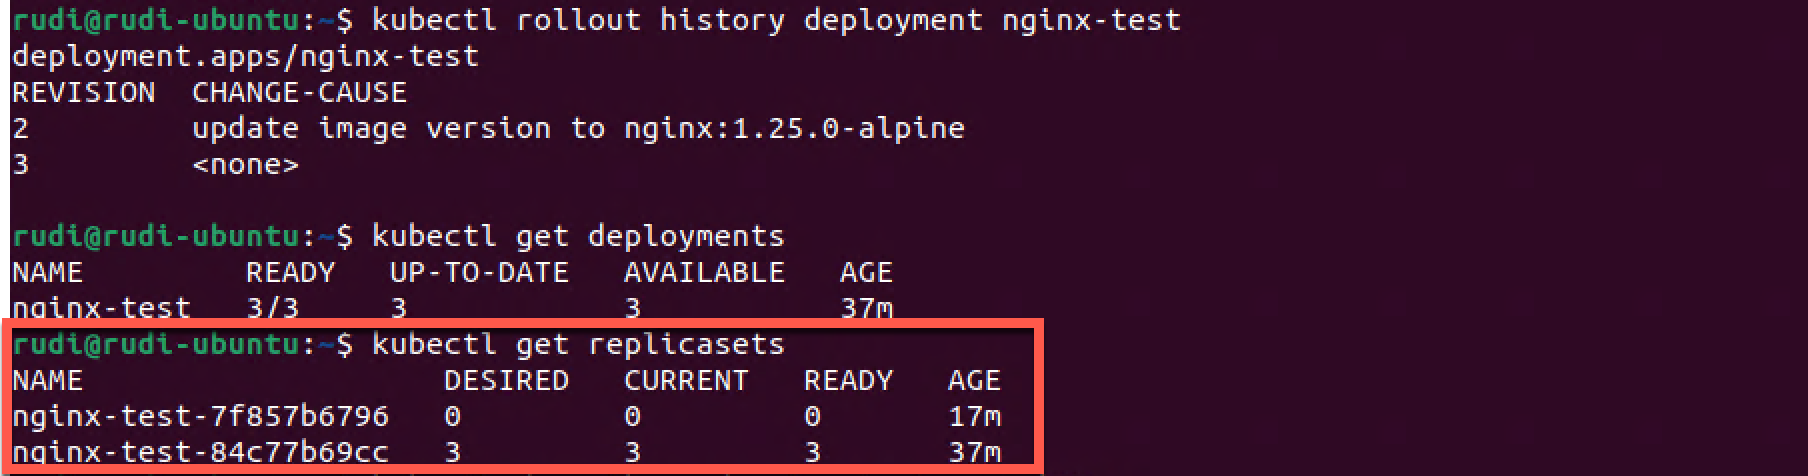
As we can see we have a new rollout version. Interestingly we can see that there wasn't created a new Replica set, Kubernetes did actually just scale down the version running the 1.25 image to 0 replicas (pods) and then scaled up the old version running on 1.24 to three replicas.
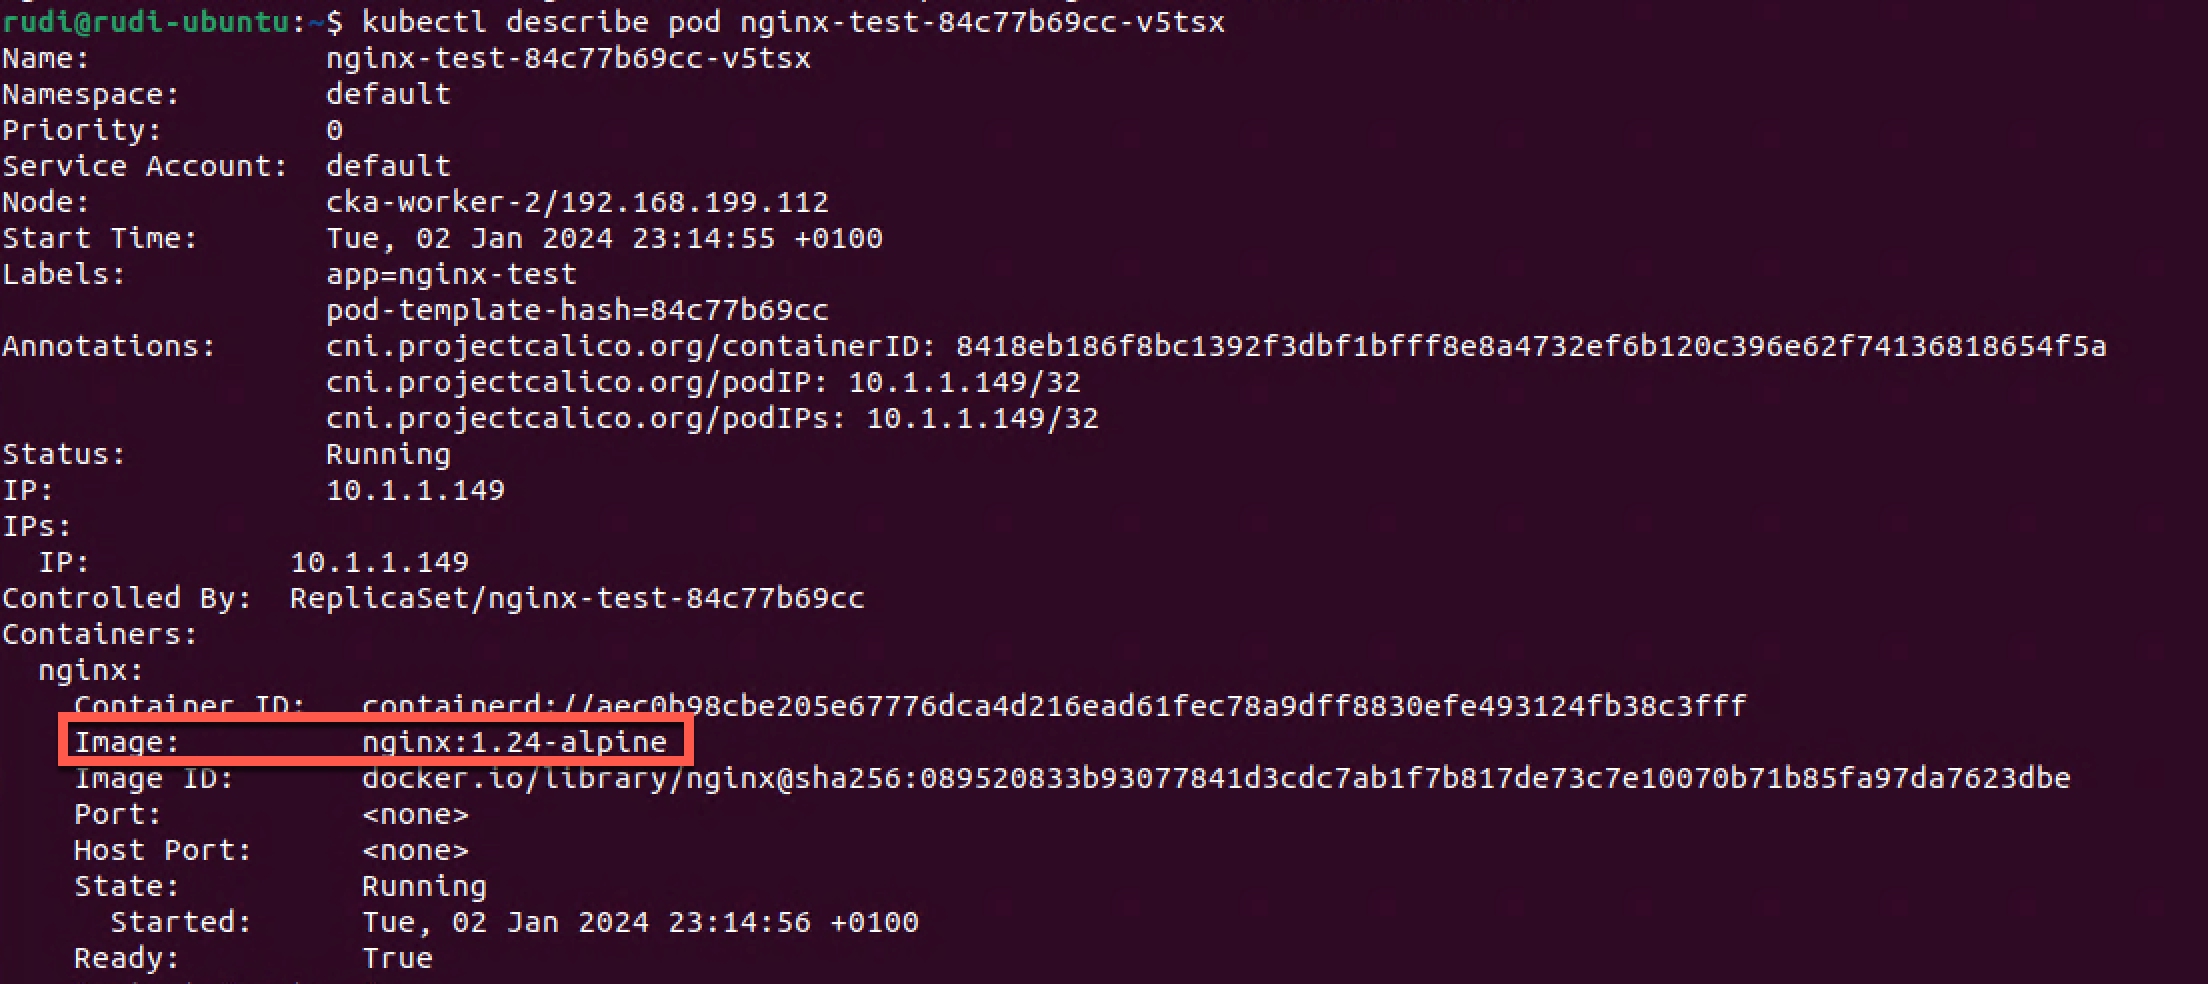
Finally we verify that the pods are infact running the 1.18.0-alpine image.
1kubectl describe pod nginx-test-84c77b69cc-v5tsx
Control a rolling update
Kubernetes Documentation reference
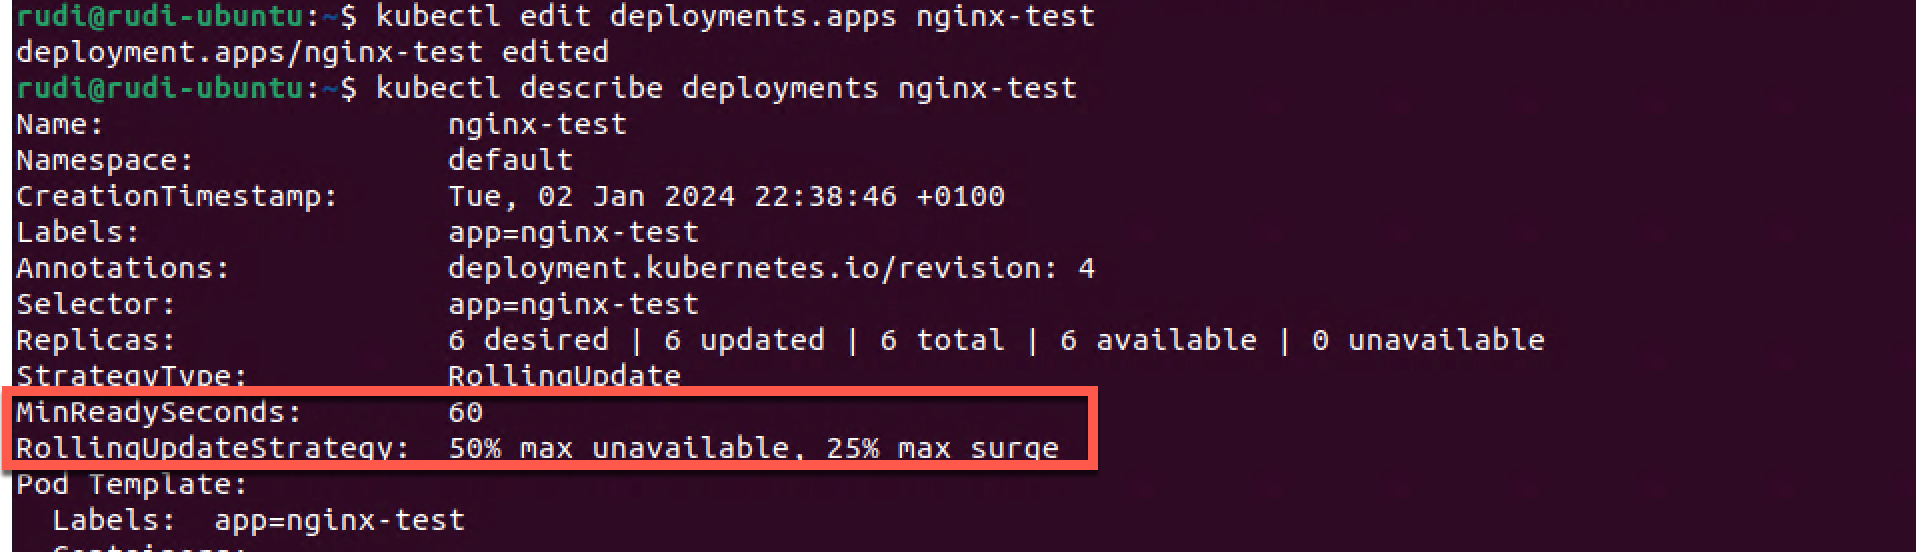
To control how a (rolling) update of a deployment is done we can use maxUnavailable and maxSurge. Other important parameters are minReadySeconds and progressDeadlineSeconds
This parameter configures how many replicas can be unavailable during a deployment. This can be defined as a percentage or a count. Say you have 4 replicas of a pod and set the maxUnavailable to 50%, the deployment will scale down the current replica set to 2 replicas, then scale up the new replica set to 2 replicas, bringing the total to 4. Then it will scale down the old replica set to 0 and finally up the new replica set to 4.
Setting a higher value will speed up the deployment at the cost of less availability, likewise a lower value will ensure more availability at the cost of rollout speed.
maxSurge defines how much more resources you allow the deployment to use. As with maxUnavailable you can define the value in percentage or a count.
Say you allow 25% maxSurge. In our previous example this would allow the deployment to deploy two extra pods, bringing the total up to 6, during the rollout.
This can speed up the deployment at the cost of additional used resources.
This parameter isn't specific to deployment updates/rollouts. It tells Kubernetes how long to wait before it checks if the pod is ready and available. In a rolling deployment this is important so that Kubernetes doesn't roll out too quickly and risking the new pods crashing after killing the old ones.
This parameter can be used to time out a Deployment. Consider a deployment with pods crashing and never gets ready, this is something that should be looked at and you need the deployment to fail and e.g trigger an alert, instead of the deployment trying to keep retrying indefinetely.
By default this parameter is specified to 600 seconds (10 minutes). If the deployment doesn't make progress (a pod gets created or deleted) inside this value it will time out the deployment.
Let's take a quick look at maxSurge and maxUnavailable with our test deployment.
First we'll scale up the deployment to six replicas
1kubectl scale deployment nginx-test --replicas=6
2kubectl get deployments.apps
3kubectl get pods -o wide

Now we'll edit the deployment and set the maxSurge to 25% and maxUnavailable to 50%. We've also set the minReadySeconds to mimic a startup time for the Pod so that we can verify what's happening.
Let's set a new image for the deployment so that we can rollout a new version of the deployment.
1kubectl set image deployment/nginx-test nginx=nginx:1.25.3-alpine

Now let's take a look at the status of the Deployment, Replica set and Pods
1kubectl get deployment
2kubectl get replicasets
3kubectl get pods -o wide
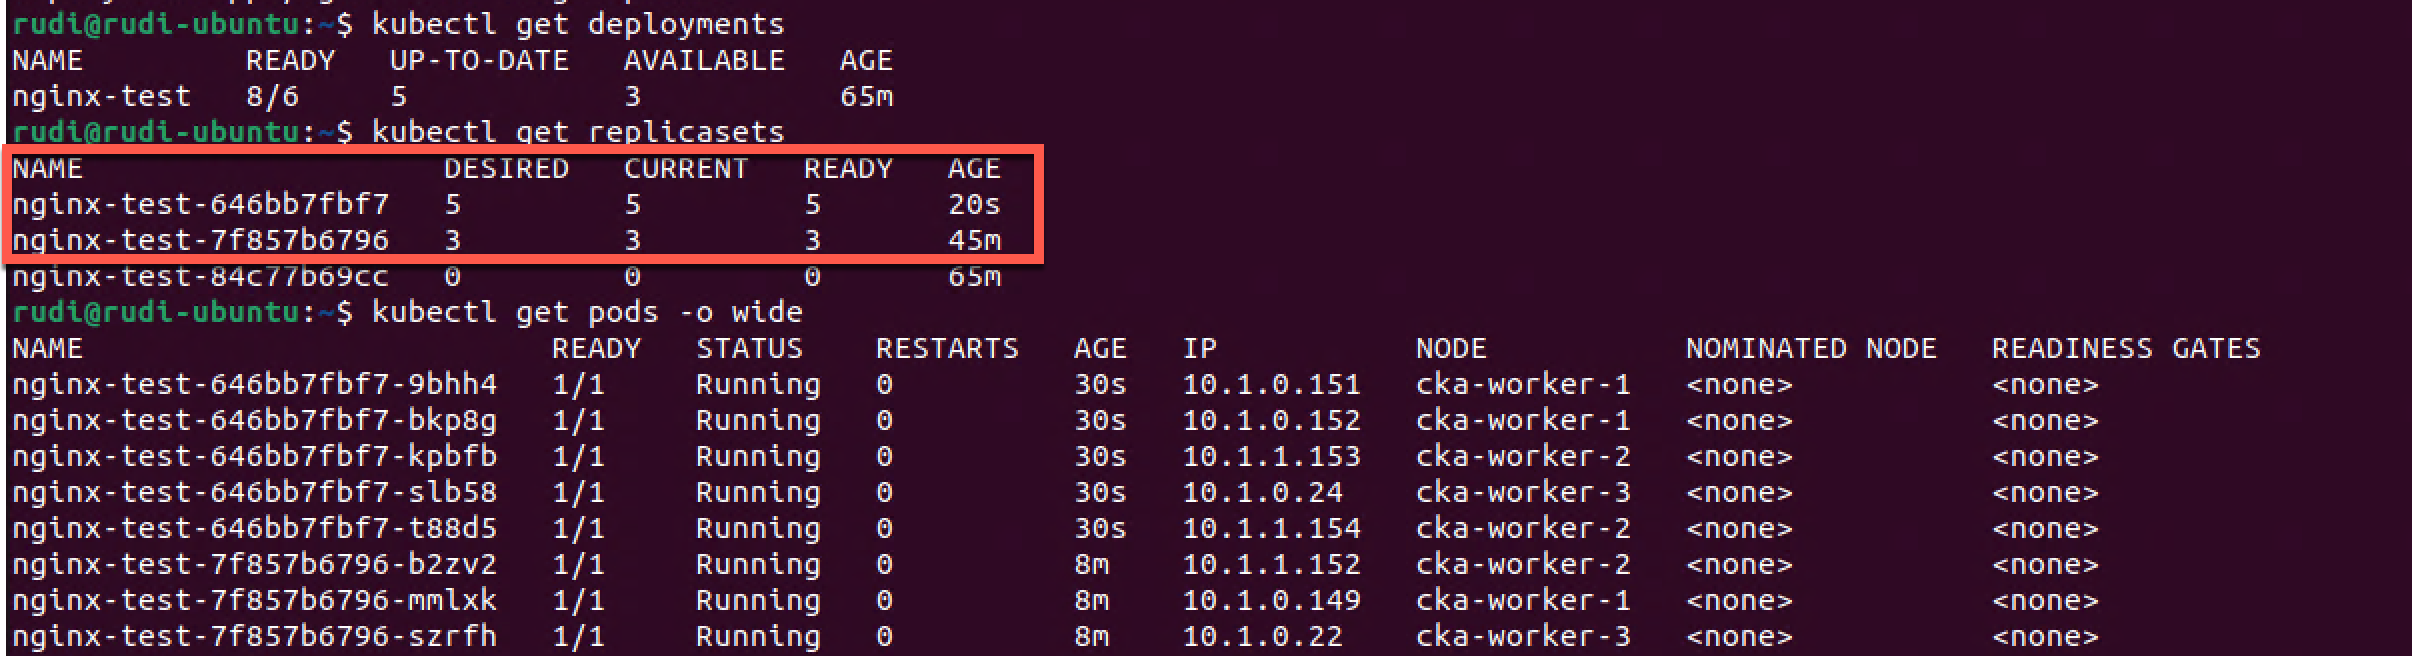
As we can see the Deployment spins up five new pods and spins down three of the old ones, keeping three on the old version, making it 8 pods in total.
So this corresponds to a maxSurge of 25% (25% of 6 is 1.5) which will mean that we can have a maximum of 8 pods running, and maxUnavailable of 50% which will mean that we can run on 3 pods at a minimum.
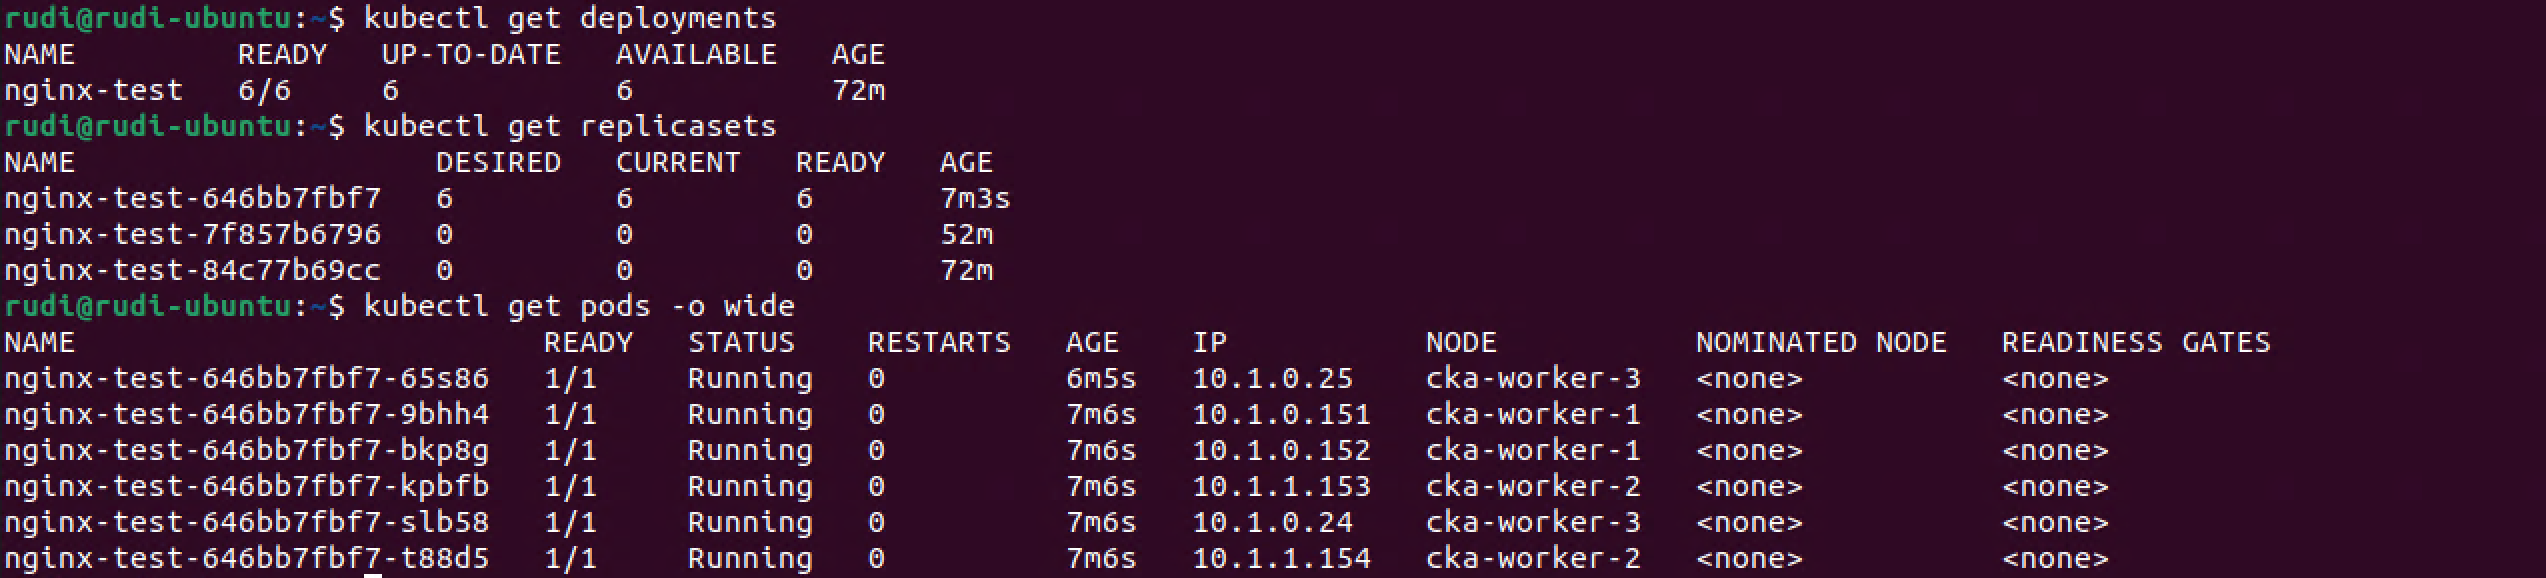
After a couple of minutes the rollout is finished and all of the pods are now running on the new Replica set, 6 pods in total
Summary
This has been an overview of the differences between Pods, Daemon sets, Replica sets and Deployments. There's obviously much more to the concepts than I've covered in this post. I urge you to check out the Documentation for more info, and test things out on your own.
Thanks for reading, and if you have any questions or comments feel free to reach out