Change NSX-T Switch Profiles with PowerCLI
This post describes how to change the MAC Management profile on a logical segment or a logical switch in NSX-T.
The post is quite lengthy, if you know how this works in the UI, or just want to get to the Powershell stuff, feel free to jump ahead. If you're not interested in reading any more and want to get the script directly it's available on GitHub.
We will cover the following:
- Explore switch resources
- Find switch profiles
- Find switches
- Update a switch
- Change profiles with a Powershell script
- A note on the protection level
- Summary
1. Introduction
I'm working on automating the deployment of a nested vSphere environment in our lab with vRealize Automation. The deployed environment will be separated from other environments and to do that we are using On-demand NSX networks which are deployed automatically via the vRA integration with NSX-T. Check out this post for info about the project.
After I got most of this to work I tested to deploy some VMs inside the nested environment and found that they couldn't communicate with eachother if they resided on different hosts. This is a known issue in nested environments, and was in previous vSphere versions (pre 6.7) solved by enabling Promiscious mode on the vSwitch. In 6.7 we could instead enable the MAC learning feature on the switch to allow nested traffic, so this is what this post will be about.
The way to enable MAC learning in NSX is to enable the future in a MAC segment/switch profile and attach this policy to the segment/switch.
2. Change profiles with the NSX-T UI
Let's see how this is done in the UI
2.1 Networking view
First we'll create a new Segment profile of type MAC discovery profile where we enable MAC learning by going to Networking->Segments->Segment Profiles. Note in the screenshot we also see the default MAC discovery profile
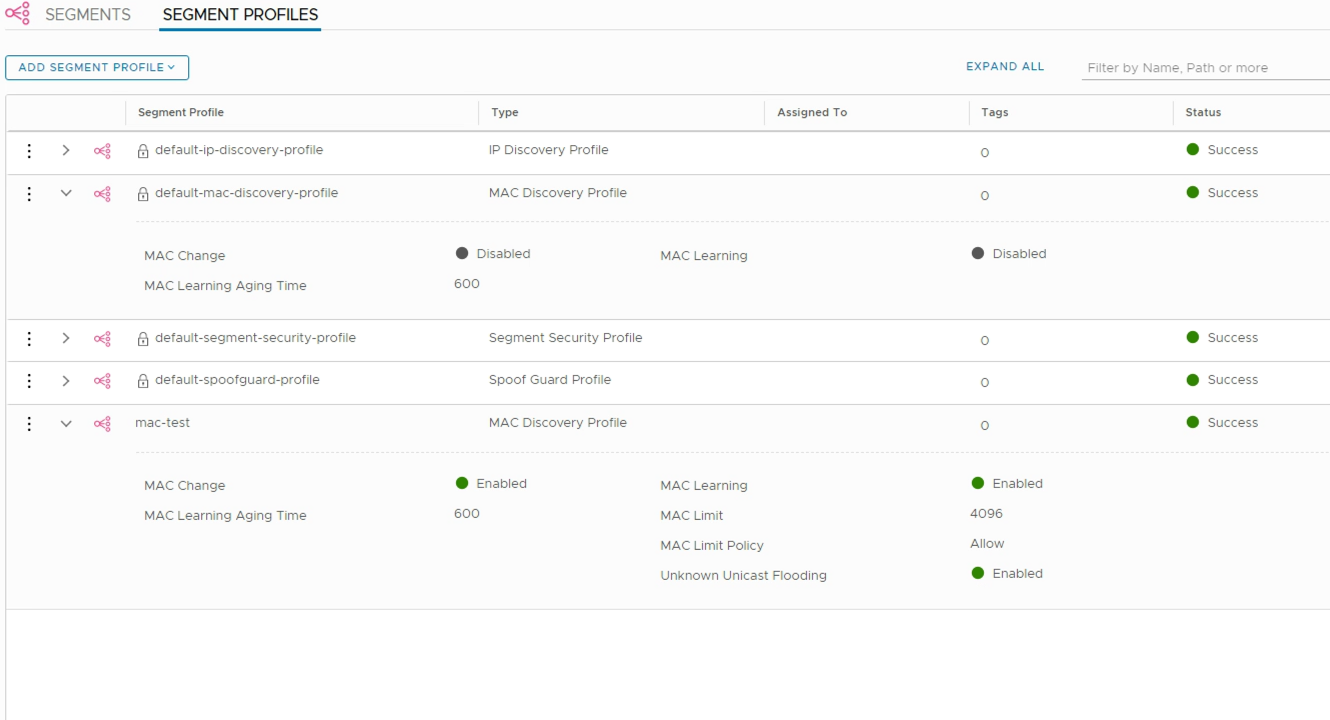
With the segment profile created we can attach it to our segment
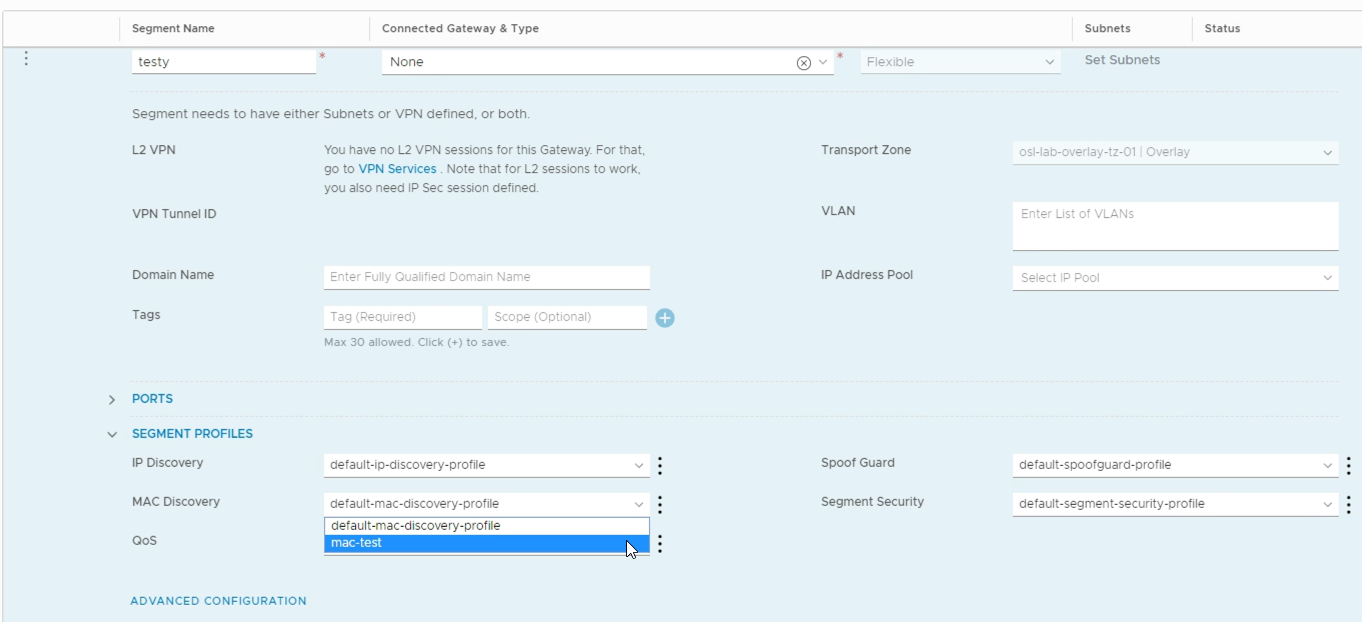
2.2 Segments vs switches - Policy API vs Manager API
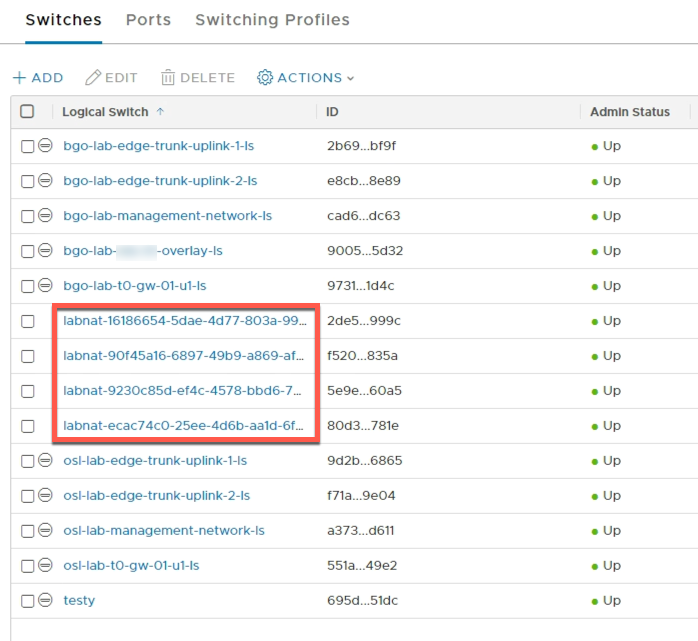
One thing to note is that vRA is using the older Management API when deploying NSX-T resources which means that these resources is only visible in the Advanced view. The Networking UI uses the newer Policy API which came in NSX-T 2.4.
If we take a look at the Segments in the NSX-T Networking UI
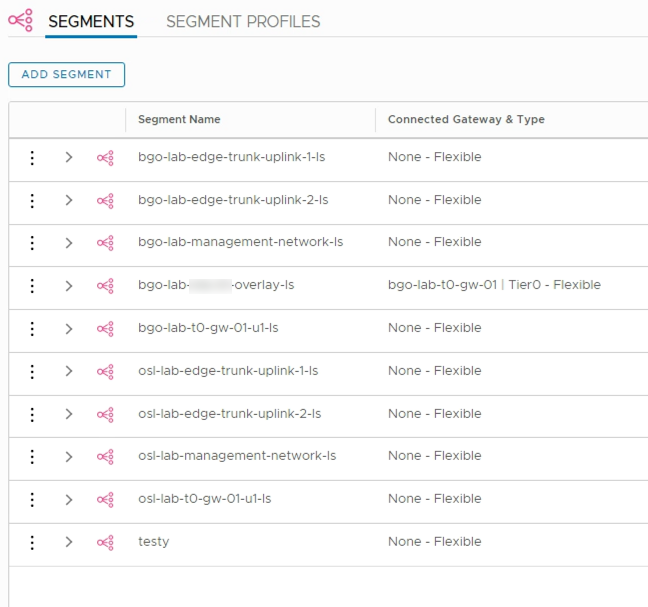
And than compare to the Switches found in the Advanced view we can first see the same resources as in the Segments list, but also four other resources which is not visible as "Segments"
2.3 Advanced view
So to change the vRA deployed resources we need to use the Advanced view. I've created a Switch profile (i.e. Segment profile) with the MAC learning enabled in the Advanced view as well.
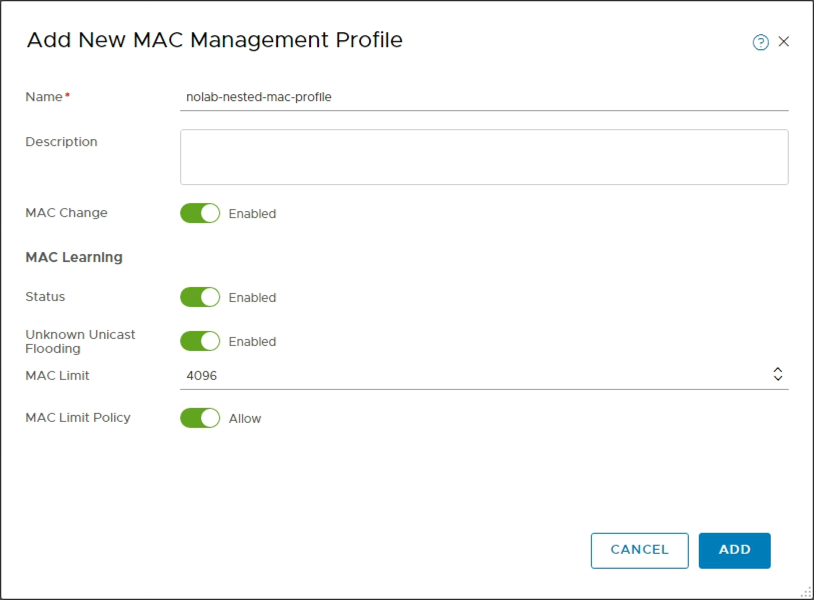
Note that both this and the one created in the Networking view is visible and both can be used in the Advanced view. However what you do in the Advanced view might not be visible/accessible in the Networking view so I use the specific profile created in Advanced going forward

\
To attach this new profile to the switch we click on the switch, go to the Manage tab and select MAC management. Then click on Change and select your new profile and click Save. (Again note that the profile we created in the Networking view is available to select.)
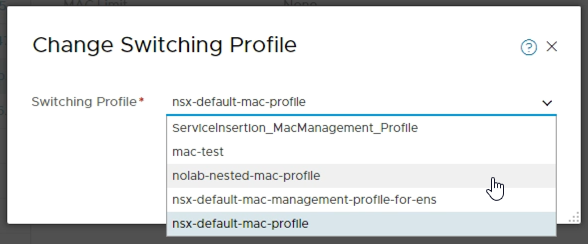
\
Verify that the profile changed
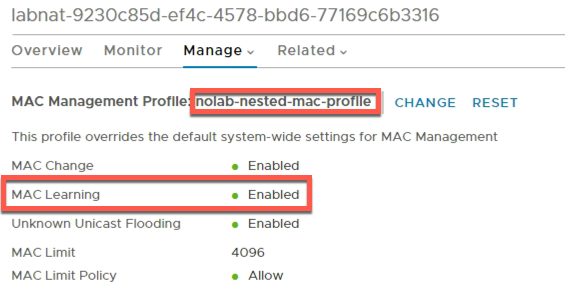
Now that's all great if we were doing things manually, but as we're deploying stuff through vRA we of course want to automate this so let's see how that can be done.
3. Change profiles with the NSX-T Powershell module
Unfortunately I haven't found a way to do this natively in vRA so I've created a Powershell script utilizing the NSX-T capabilities of PowerCLI.
Note that there are only four cmdlets available for NSX-T where two of them handle the connection.

So, these doesn't work quite as you might be used to from other cmdlets in the PowerCLI modules as they are more "API like" where you use the different class methods directly.
If you're new to the NSX-T PowerCLI cmdlets check out this blog post by Kyle Ruddy to get started.
Now let's see how we can change the switch profile with Powershell
3.1 Connect to NSX Manager
First of we'll connect to the NSX Manager. In this example I start by creating a Credential object that I'll use to authenticate. Note that there is no "Skip certificate verification" parameter to the Connect-NsxtServer so if you're using self-signed untrusted certs this needs to be handled first.

We want to work with switches and profiles so we'll focus on those. We'll use the Get-NsxtService for this and most of the upcoming commands.
3.2 Explore switch resources
To list switches and profiles we need to know the correct class names to search. Let's check out the available switch classes
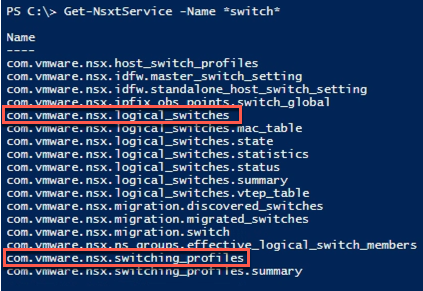
3.3 Find switch profiles
So let's check the switch profiles first

As you can see the first result only seems to return the name of the class, but it's actually a larger object. In the second command I'm piping it to the Get-Member cmdlet to see what's inside it.
Now let's use the list() method to see if we can get the actual profiles
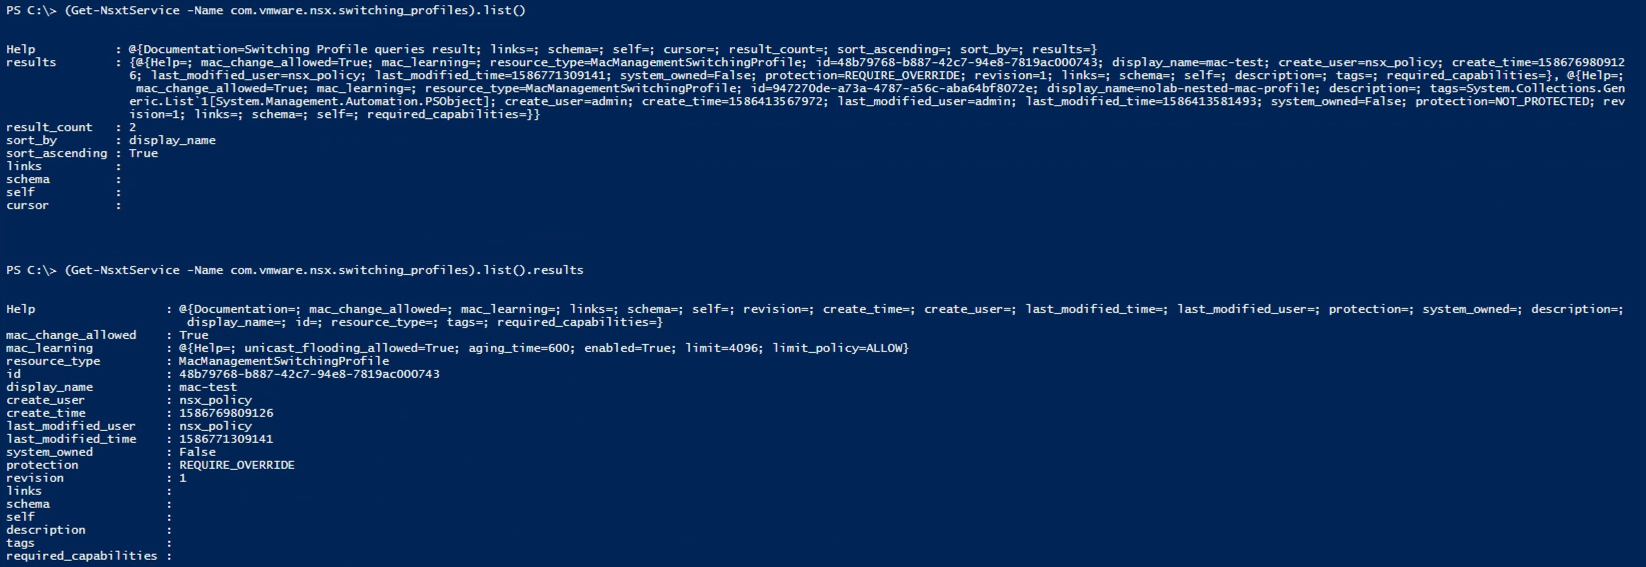
Again I'm running two commands as you see the first one doesn't provide the details of the profiles.
I'll make use of standard Powershell functionality to limit the properties to get a cleaner view at this point

Ok, so we have the profiles and we need the ID later on when we're attaching it to our switch. Note that the Get-NsxtService cmdlet only returns the user created profiles. To get the default ones you need to use the Get-NsxtProfileService cmdlet.
3.4 Find switches
Now let's find the switches with the class name we found earlier. I'm only outputting the number of switches in the first command and then the list of ids and names in the second
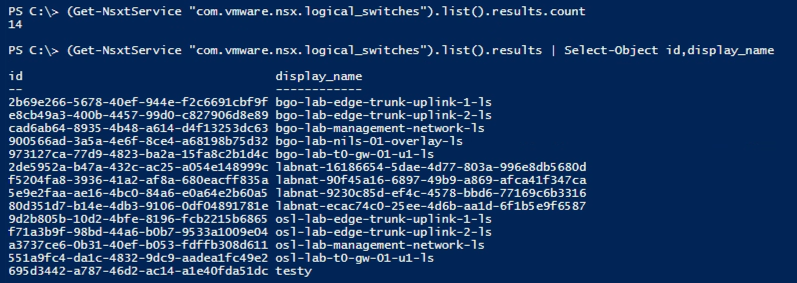
Let's check out the full object for one of our switches

\
Notice that there's one property containing profile ids. Let's take a closer look on that (Note! This is the same switch as the previous examples, but the MAC profile has been set back to the default)

Nice, so what we have to change is the value in the MacManagementSwitchingProfile object. We want to assign that to the ID of our profile that has MAC learning enabled.
3.5 Update a switch
To do this we need to use the update() method of the switch class instead of the list() method that we have used to list the resources. Let's see what's required to use that

So it expects the switch id, and a full switch object. So what we'll do is to change the MAC profile id, push that into a switch object that is a copy of the existing one and push the changed object to the update method.
4. Change profiles with a Powershell script
To do this I've created a Powershell script. Actually it can change the profile for all of the Profile types, not only the Mac profiles. I'll only go through the important parts of the script, the full script can be found on GitHub
 1#Define the different resources to work with (in the full script these are input parameters)
 2$LogicalNetwork = "labnat-9230c85d-ef4c-4578-bbd6-77169c6b3316" #The logical switch name
 3$ProfileType = "MacManagementSwitchingProfile" #The ProfileType
 4$ProfileName = "nolab-mac-nested-profile" #The name of the profile to change to
 5
 6#Find the profile object based on the type and the name
 7$nestProfile = (Get-NsxtService -Name "com.vmware.nsx.switching_profiles").list().results.Where({$_.resource_type -eq $ProfileType -and $_.display_name -eq $ProfileName})
 8
 9#Find the logical switch based on name, note that the list() method outputs an array
10$sw = (Get-NsxtService "com.vmware.nsx.logical_switches").list().results.Where({$_.display_name -eq $LogicalNetwork})[0]
11
12#Pull out the profile ids in use on the switch
13$swProfiles = $sw.switching_profile_ids
14
15#Traverse the profiles to find the correct type and make a note of the index in the array
16$profIndex = 0;
17for($i=0;$i -le $swProfiles.count;$i++){
18    if($swProfiles[$i].key -eq $ProfileType){
19        $profIndex = $i
20        break
21    }
22}
23
24#Pull out the profile object
25$chgProfile = $swProfiles[$profIndex]
26#Replace the ID with the ID of the profile you want to attach
27$chgProfile.value = $nestProfile.id
28
29#Push the profile object back to the array of profiles
30$swProfiles[$profIndex] = $chgProfile
31
32#Push the profile array back to the switch object
33$sw.switching_profile_ids = $swProfiles
34
35#Finally push the updated switch object to the update() method
36(Get-NsxtService -Name "com.vmware.nsx.logical_switches").update($sw.id,$sw)
Now, let's pull the switch once more from the API and check the profile ids

5. A note on the protection level
There is one very important note on the update of switch resources through the API and Powershell. Segments, as they are called when created in the Networking UI or through the new Policy API, will have the protection property set to REQUIRE_OVERRIDE by default, whereas switches created in the Advanced view or through the Management API will have their protection set to NOT_PROTECTED.
Let's take a look at the protection level on segments/switches in my environment

There are other protection levels as well, check the API documentation for more information.
To be able to change the segments which have the REQUIRE_OVERRIDE protection level you need to add the request header X-Allow-Overwrite=true. This is an API thing and I haven't found a way to do this in my Powershell script which uses PowerCLI.
For my use-case I'm currently only working with the logical switches that has NOT_PROTECTED so it doesn't affect me at this point. I guess if I need to do a override later on I could make use of the API directly.
6. Summary
This post has shown how we can use PowerCLI to attach a specific swith profile to a logical switch in NSX-T. With this in place I can automate all of the NSX-T stuff I need in my Nested lab deployment project in vRA. I could use the API directly, but since I use Powershell for other configuration tasks in the environment I'm doing that here as well. Read more about the project in this post.
Thanks for reading this long post. Feel free to reach out if you have any questions or comments!